
The Yorkshiremen F.D Yates and H.E. Atkins were frequent rivals in the British Championships from 1909 until Yates’ untimely death in 1932. Yates came second to Atkins in 4 of Atkins’ 9 British Championship victories! The first game in this article is taken from the match played in 1912 to decide the winner of the 1911 British Championship after they had tied for first with 8,5/11. The 1911 British Championship seems to have been a particularly thrilling event as the Cornish Telegraph of August 31st 1911 relates:
At the close of the first week’s play, Yates led with a score of 6 points followed by Atkins with 4,5 points, and the meeting of these 2 experts was watched with the greatest interest. Their game was twice adjourned, Atkins winning on the 84th move after 8 hours and 20 minutes’ play.
Atkins was unable to capitalise on this result, losing to the Scottish Champion McKee in the 9th round, some over-aggressive play culminating in a gruesome knight fork. With 2 rounds to go, Yates was leading with 8/9 to Atkins’ 6,5/9. The Belfast Newsletter of August 24th declared that victory for Yates “now seems assured”! However, while Atkins won both his last games, Yates could only muster half a point. The same Belfast Newsletter stated that in Yates’ 11th game against McKee “his chance of escaping defeat seemed at one time a precarious one” (if the score is to be believed, Yates blundered and allowed mate in 3 which McKee did not spot).
Atkins built up a good record against Yates over the years – Megabase 2017 gives him +5 over 11 games – and this match certainly contributed, Atkins winning 3-0 (the 4th game was not played). I liked this game for several reasons.
Firstly: the structure. I’ve looked at a number of Hanging Pawns positions in past blog entries (http://matthewsadler.me.uk/attack/lessons-4ncl-january-2017/ , http://matthewsadler.me.uk/the-middlegame/fight-hanging-pawns/ , http://matthewsadler.me.uk/the-middlegame/hanging-out-with-efim/ , http://matthewsadler.me.uk/the-endgame/lessons-haarlem-2016-missing-h6/ , http://matthewsadler.me.uk/chess-for-life/compact-at-the-4ncl/ ) and this is a clear example of the power of this structure when Black plays routinely.
Secondly, it’s a good example of Atkins’ willingness and ability to take on and play typical structures.The games in this article are available again in playable form at http://cloudserver.chessbase.com/MTIyMTYx/replay.html
Atkins,H.E. – Yates,F.D.
British Championship playoff Bradford (1) 1912
1.d4 d5 2.e3 Nf6 3.Nf3 e6 4.Bd3 Be7 5.0–0 Nbd7 6.b3 0–0 7.Bb2 c5 8.Nbd2 b6 9.Ne5 Bb7 10.f4 Ne4 11.c4 Nxd2 12.Qxd2 dxc4 13.bxc4 cxd4 14.exd4 Nf6
Yates has headed with little subtlety for the defensive side of a Hanging Pawn structure. A less obvious approach might have yielded an extra tempo or two. For example, instead of capturing on d2 immediately, he might have waited until White forced him to do so (for example via Qc2). After …Nxd2, Qxd2 White’s queen has ended up on d2 in 2 moves instead of just one. It’s the same point as the one I made in the earlier article http://matthewsadler.me.uk/the-middlegame/hanging-out-with-efim/
As a general rule, unless you have a concrete goal in mind, you should maintain tension for as long as possible. If an exchange is not yet forced, then it is normally correct to delay it. Such tension exerts a restraining effect on the opponent’s plans and possibilities; once the tension is resolved, you often notice that the opponent is closer to implementing his plans.
I’m also not impressed with the move 14…Nf6. Left unchallenged, White’s pawns on c4 and d4 are a formidable barrier to Black’s pieces: neither of his rooks can make any impact on the half-open c- and d-files while White is able to transfer his rook(s) to the kingside along the 3rd rank behind the cover of his hanging pawns. Black has to hit the pawns as quickly and as hard as possible, and the pawn on c4 is normally the easiest to start with:
14…Rc8 15.Rae1 Ba6
Looks like the right way to start. After
16.Qe2
then
16…Bb4
Desperately trying to disrupt White’s structure before he gets settled
17.Rd1 Qc7
…when Black’s pressure against c4 forces White to take action
18.Nxd7 Qxd7 19.f5
is better for White but Black has at least removed White’s possibility of an easy, measured build-up as in the game.
The less desperate option 16…Qc7 (instead of 16…Bb4) is well worth seeing too!
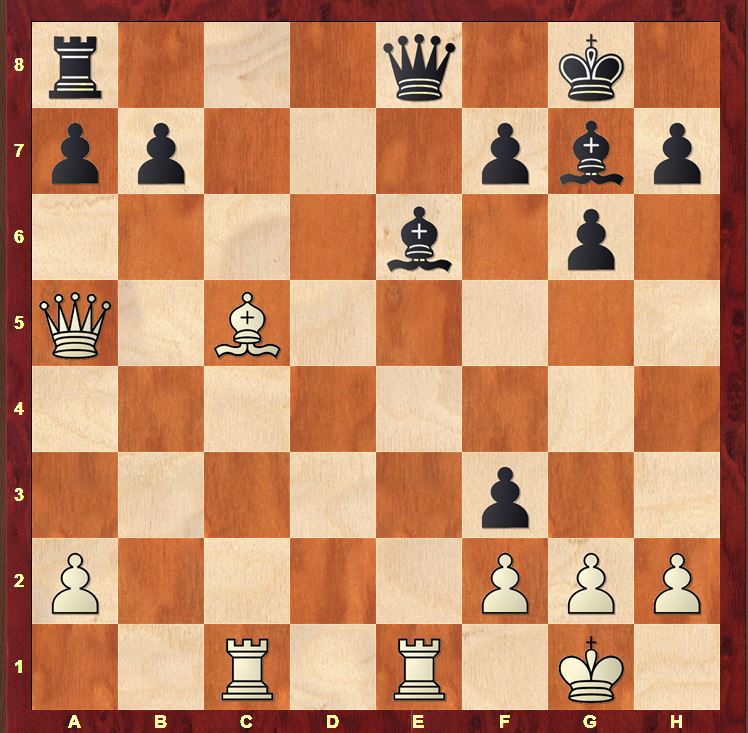
17.Nxd7 Qxd7 18.d5 Bc5+ 19.Kh1 exd5 20.Bxh7+ Kxh7 21.Qh5+ Kg8 22.Bxg7
The typical double-bishop sacrifice, here with a couple of unusual tactical twists
22…Kxg7 23.f5
Threatens f6+ and blocks the Black queen’s access to the c8–h3 diagonal. Why is that useful? 23.Qg5+ Kh7 24.Rf3 The standard rook lift is not enough in this position: 24…Rc6 25.Rh3+ (25.f5 Rh6 26.Rg3 f6) 25…Qxh3 Ouch!!
23…f6
23…Rc6 24.f6+ Rxf6 25.Rxf6 Kxf6 26.Qh6+ Kf5 27.g4+ Kxg4 and now I needed Komodo to cut through the confusion with 28.Rf1 and mate in 6
24.Rf3 Kg8 25.Rg3+ Qg7 26.Rxg7+ Kxg7 27.Qg6+ Kh8 28.Re6
I wasn’t sure how wonderful this would be for White (although easy to play in a practical game as White always has the draw in hand). Komodo thinks a clear edge (+1.43) mainly due to the invulnerability of the c-pawn (which I hadn’t spotted)
28…dxc4
28…Bxc4 29.Rxf6 Rxf6 30.Qxf6+ Kg8 31.Qe6+ and the rook on c8 is loose
29.Re4 with mate on h4
15.Rae1 Qc7 16.Re3 Rfd8 17.Rfe1 Bd6 18.Rh3 Rac8 19.Qe2
It really is too easy for White! 19.Qf2 threatening Qh4 was also very strong
19…g6 20.Rg3 Bf8 21.f5
21.d5 was also very powerful. The text is more complicated but very strong too.
21…Bg7
21…exf5 22.Bxf5 Rb8 23.Nxf7 is the line pointed out by Coles when 23…Kxf7 24.d5 leads to carnage
22.fxe6 fxe6 23.Nxg6
23…hxg6 24.Qxe6+ Qf7 25.Qxf7+ Kxf7 26.Bxg6+
26.d5 building up the pressure was even stronger
26…Kg8 27.Re7 Rd7 28.Rxd7 Nxd7 29.Bf5 Rc7
Loses. 29…Kf7 30.Bxd7 Rxc4 still gave some chances to resist.
30.d5 Nc5 31.d6 Rf7 32.Rxg7+ Rxg7 33.Bxg7 Kxg7 34.d7 Nxd7 35.Bxd7 Kf6 36.h4 Ke5 37.Be8 Be4 38.g4 Bd3 39.Bf7 a5 40.g5 Bb1 41.a3 Kf5 42.Kf2 a4 43.Ke3 Bc2 44.Kd4 Bb3 45.Kc3 Bd1 46.Kb4 Ke5 47.h5
1–0
A cautionary tale for players on the Black side of the Hanging Pawns structure. Don’t hesitate! Start attacking those pawns as quickly as possible!
The last phase of Atkins’ career started in 1935 when he played for the English team in the 1935 Warsaw Olympiad, together with William Winter, Sir George Thomas, C.H.O.D. Alexander and Harry Golombek. Atkins’ return (39 years after he’d first played for England) was greeted in the Yorkshire Post of August 13th 1935 with the headline “Great Yorkshire Player’s Return”. The author Gerald Abrahams commented that “his play will be watched with interest because he was celebrated on the theoretic side of the game before chess theory was widely known to amateurs” which doesn’t sound like a glowing endorsement! The tournament was not a great success for Atkins. He started excellently with 4,5/6 but lost 4 games in succession and a finish of 3 draws brought him to 6/13. First reserve Golombek (also described by Abrahams in the article as “a theoretician of ability”) was the most successful British player with a score of 7,5/14. Mention should also be made of Winter’s very creditable 7,5/18(!) on Board 1 (including a draw with Alekhine).
The last game in this article was played by Atkins in the May 1937 Holland-England match in Amsterdam, less than a year after he’d retired from his post as Huddersfield College Headmaster (the Yorkshire Post of 8th October 1936 dedicated a short article detailing his achievements). The Dutch team was reasonably strong boasting Euwe and Landau on the top 2 boards. England edged the first round 5,5-4,5, but faded 6-4 in the second round to lose the overall match 10,5-9,5. The game against Prins is an interesting echo of Atkins’ game against Rubinstein in which he re-organises his game around his queen after an initial tactical exchange.
Atkins,H.E.- Prins,L.
Match NED-ENG Amsterdam 1937
1.d4 Nf6 2.c4 g6 3.Nc3 d5 4.cxd5 Nxd5 5.e4 Nxc3 6.bxc3 c5 7.Nf3 Bg7 8.Be3 0–0 9.Qd2 Bg4 10.Rc1 cxd4 11.cxd4 Nc6 12.d5 Na5 13.Be2 e6
Atkins has chosen a typically common-sense and natural method of development against the Grunfeld: protect d4 and c3 and get the queen’s rook off the a1 diagonal as quickly as possible in order to achieve d5. Prins now starts up a very fraught tactical operation!
14.Bc5 Re8 15.Bb5
A little too much! 15.Bb4 b6 16.d6 is very powerful for White: d7 is a threat and the knight on a5 is completely offside
15…exd5 16.Bxe8 Qxe8
Black’s position kind of hangs together as Qxa5 can be met by …b6
17.0–0 dxe4 18.Qxa5
A mistake. 18.Bd4 is Komodo’s logical improvement and looks very strong. The idea is after 18…exf3 19.Bxg7 Kxg7 White can leave Black with the offside knight on a5 and pick up the bishop on g4 with 20.Qd4+ Kg8 21.Qxg4 fxg2 22.Rfe1 Black is going to have to do his best to keep White’s rooks off the 7th rank!
18…exf3
Not the most accurate. 18…b6 was much better. Compared to the game, 19.Qb4 is impossible due to 19…bxc5 so either White’s queen has to retreat to a more passive square, or White has to give Black 2 unchallenged bishops with 19.Bxb6 axb6 20.Qg5 Be6 which is bound to be fine for Black. We’re now coming up to an interesting moment
19.Rfe1 Be6
After a tactical flurry, the dust has settled down a bit. At first sight, Black is doing excellently: 2 bishops, the threat of …b6 winning a piece, and …fxg2 opening up White’s kingside structure while Black’s king remains safe. It’s quite astounding that White should be able to finish off the game with a mating attack within 6 moves! I really like the manner in which Atkins sweeps his pieces from the queenside to the kingside, once again – just as in the Rubinstein game – underpinned by the coordination of a queen and bishop (the queen and light-squared bishop in that game, the queen and dark-squared bishop in this game)
20.Qb4
Just a one-move attack against the b7 pawn at first sight, but there is a much deeper idea.
20…b6 21.Bd4
Excellent strategy: the best way to neutralise a pair of bishops is to exchange one. In this case, once Black’s dark-squared bishop is exchanged, Black’s own kingside dark-squares start to look sensitive too (White will do his best to get his queen to f6 after the exchange of bishops) so Black’s it’s understandable that Black wants to avoid the exchange.
21…Bf8
The engines start off reasonably positive about this move, but the more of Atkins’ moves they see, the less happy they are. Watch how Atkins swivels the White queen around the bishop on d4 to bring it into attacking play.
22.Qc3 fxg2 23.Qf3
A great square for the queen, eyeing both f6 and the rook on a8 (which restricts the movement of the Black queen on e8). White also has the insidious threat of Bb2/a1 followed by Qc3 finding another path to the a1–h8 diagonal. Black is seriously stretched as he will find it hard to cover 2 squares as far apart as c3 and f6.
23…Qd8
23…Bg7
Trying to repair his mistake on move 21 fails to
24.Bxg7 Kxg7 25.Rxe6
25…fxe6 26.Rc7+ Kh6 (26…Kg8 27.Qf6 Qf8 28.Qxe6+ Kh8 29.Qd7) 27.h4 my line which wins, but Komodo spots forced mate! (27.Qh3+ Kg5 28.f4+ Kxf4 29.Rc4+ Ke5 30.Qc3+ Kd6 31.Qd4+ Ke7 32.Rc7+ Kf8 33.Qg7#)
23…Be7
covers f6, but just gives White an easy way to increase his advantage
24.Rc7 Rc8 (24…Rd8 25.Bb2 Rd6 26.Qc3 f6 27.Ba3) 25.Qf4
24.Rcd1
A very good move. First I thought that 24.Red1 might be stronger, then I thought I’d refuted it with a computer-like defence… but then the engines showed I’m not a machine! Both seem to be strong!
a) 24.Bb2 Bg7
Neutralises White’s initiative: the queen on d8 now covers the entry point on c7 for White’s rook
b) 24.Rc7 Bd5 25.Qf4 Bd6 26.Qh6 Bf8
c) 24.Red1 Bd5
24…Rc8 25.Rxc8 Bxc8 26.Bb2 was my idea: Black cannot cover c3 and f6, so 24…Rc8 is impossible. 26…Qe7 27.Qc3
25.Qf4 Bxa2
This was my miracle defence. The idea is to get the bishop away from e6 to a safe spot on the a2–g8 diagonal so that Black can meet Qe5 with …f6. Unfortunately, a2 is not a protected outpost!
26.Rd2 Bringing the bishop back into open play!
26.Bb2 Qe7 27.Rd7 Qe6 28.Qd4 f6 was the type of line I was looking at when Black still has chances due to White’s weakened king
26…Bb3
26…Be6 27.Qe5
26…Bd5 27.Bb2
27.Bb2 Qe7 28.Qf3
Ouch! Forks the rook on a8 and the bishop on b3!
24…Bd5
24…Rc8 25.Qf4 Rc4 26.Qe5 Rxd4 27.Rxd4 Qe7 28.Red1 was the reason I was keen to find an alternative to 24.Rcd1. It’s much better for White, but feels confusing for a human! Prins (or Trins as he was called in the first day reports!) allows a nice finish for the 65–year-old Atkins
25.Qf4 Rc8
25…Bd6 26.Be5 Be7 27.Bc7 Qd7 28.Qe5 picks up the bishop
26.Re8
A nice finish, deflecting the queen
26.Re8 Qxe8 27.Qf6
demonstrates exquisitely the power of the bishop and queen combination that Atkins brought to life starting on move 20!
1–0
Just a little postscript. I was analysing these games as training for my 4NCL games a few weekends ago. In a fraught and complicated encounter with the Spanish IM Alberto Real Suarez, I suddenly thought of Atkins!
Sadler,Matthew D – Suarez Real,Alberto
4NCL March 2017
From an unpromising early middlegame, I’d tricked Black into sacrificing his queen. Assessing the position from afar, I said to myself with a wry internal smile that I might be forcing Black to sacrifice his queen brilliantly! At this point I needed to make a fundamental choice: either I defended g2 with the queen via 28.Qf3 and then tried to generate counterplay with my kingside pawns (f4–f5) or I defended g2 with the rook (28.Rg1) and left my queen free. I think you can imagine what I wanted to do after having studied Atkins’ games! I found a very nice sequence of moves to neutralise Black’s play and coordinate my own.
28.Rg1 Rxe4 29.Qxc5
Bh6 is an annoying threat, so Black tries to displace the queen from the a3–f8 diagonal
29…Rc4
I was dithering a little between 30.Qe7 and 30.Qe5, but I felt I could coordinate my queen, bishop and rook much better with a centralised queen
30.Qe5 Rcc2 31.Bh6 Rc8 32.Re1 Rac2 33.Kg1
There we are! Queen and bishop acting together to create mating threats and both back rank and second-rank threats neutralised. Thank you Henry Ernest! I won on move 53.
1–0
One last intriguing thing: Coles mentions that “I have been fortunate in having placed at my disposal all his old chess notebooks”. I wonder where these have ended up. It would be fantastic to put together a complete collection of Atkins’ games including all the club games he played throughout his career.