
Looking through some old analysis, I came across these fragments from a tournament I played just over a year ago. They seemed interesting to me so I hope you like them too! One of them at least is pretty spectacular!
From round 1:
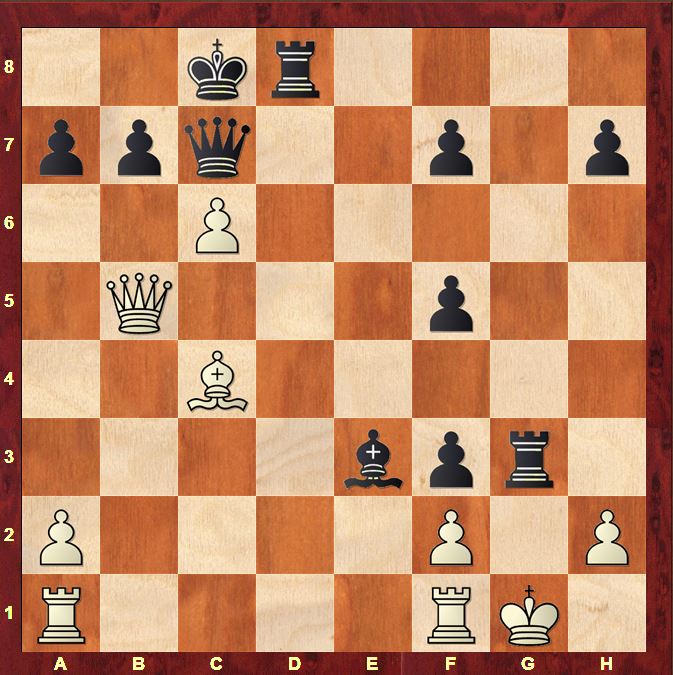
Sadler,Matthew D – De Roode,Martijn
Haarlem 2016
We had reached this position after 19 moves of a King’s Indian. Black is 2 pawns down but has a healthy lead in development in return as well as annoying pressure along the a7–g1 diagonal. It’s natural to assume that White should be trying to complete his development as quickly as possible but as the George Gershwin song goes, “it ain’t necessarily so”. White can also stand his ground and use his centralisation and central and queenside space advantage to force Black’s pieces back. In that way, when Black tries to strike at White’s position, his pieces will be so far back, they won’t be able to do any harm.
20.Bd2 Nb7 21.a4
Reinforcing the knight on b5, and more importantly threatening a5 driving back the queen from b6 (and thus neutralising the pressure on the a7–g1 diagonal) followed by a6 when the a-pawn has become a major danger in the space of a few moves!
21…Nd6 22.Bd3
Now White completes his development, bringing his bishop to the ideal d3 square as …Nc5 is no longer possible.
22…Bxb5 23.Nxb5 Nxb5 24.Qxb5 Qd4 25.Ke2 Nh5 26.g4 Nf6 27.a5 h5 28.g5 Ne8 29.a6 Nd6 30.Qb4 1–0
And this spectacular sequence from Round 3:
Vereggen,Lars – Sadler,Matthew D
Haarlem 2016
I’d been tempted into a rather rash sequence by some unusual tactical points. Probably the fact that this was the 3rd game of the Saturday increased my tendency to excessive violence!
18…Bxe3
19.Qb5
It works! While White was thinking, I got rather worried about 19.Kh1 Rd2 (my intention, probably not the best) 20.Rad1 which would have put me right back on the defensive
19…Rxg3+
Worthy of a diagram!
20.Kh1 Rg2
20…Rh3 21.Qxf5+ is the point of 19.Qb5
21.Qxb7+ Qxb7 22.cxb7+ Kb8 23.fxe3 Rdd2 24.Rxf3 Rxh2+ 25.Kg1 Rdg2+ 26.Kf1
I think my opponent had expected 26…Rc2 27.Kg1 with a draw by repetition, but amazingly Black has a much stronger line.
26…Rg4
27.Rxf5
27.Re1 Rxc4 28.Rxf5 Rcc2 is also very unpleasant for White.
27…Rh1+ 28.Ke2 Rxa1 29.Bd5 Rg7 30.Re5 Rg8 31.Bxf7 Rh8 32.Bd5 h5
and Black won without too much difficulty
33.Rg5 h4 34.Rg2 h3 35.Rh2 Rh5 36.Bb3 Kxb7 37.Kf3 Rh6 38.e4 Rf1+ 39.Ke3 Kc6 40.e5 Kd7 41.Ke2 Rf5 42.e6+ Ke7 43.Ke3 Rh4 44.Ke2 a5 0–1