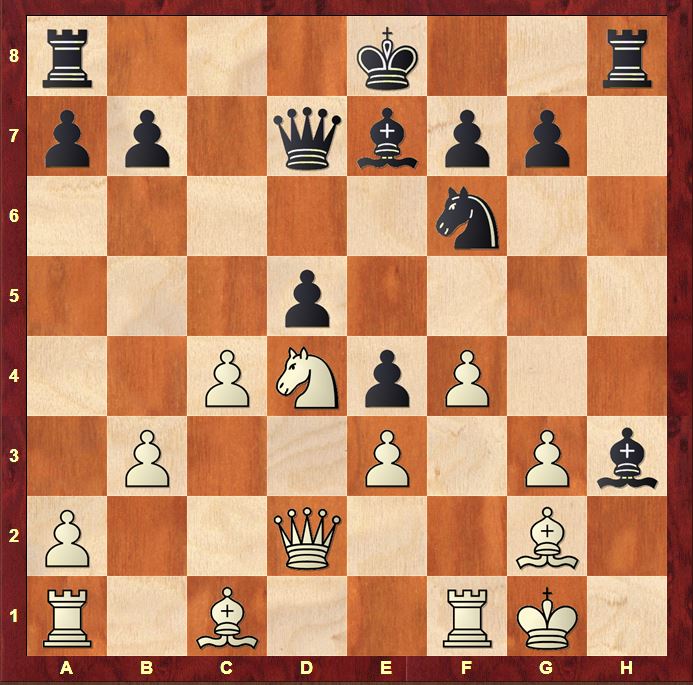
At the recent 4NCL weekend, I played 2 attacking games which was a welcome change from the long grinds I’ve been playing in the past 6 months. This may be related to the Alekhine games I’ve been studying recently! Unfortunately, in my game against Ravi Haria, my attacking play wasn’t quite up to Alekhine’s standard. I missed a strong continuation sacrificing a rook for a winning attack and instead allowed a miracle defence…

The opening went badly wrong for White and Black developed a huge attack through simple means. Black is planning to follow up with …Ng4, …Bxg2 and …Rh2 so White has to create some instability in the Black position if he is to keep the Black pieces at bay.
18.cxd5
The best defensive attempt, removing Black’s pawn support of his e4 pawn. Now 18…Ng4 can be met by 19.Bxe4 Bxf1 20.Kxf1. It looks a little airy, but Black doesn’t have mate! The simple 18…Qxd5 (intending …Qh5) is met by 19.Qe2, covering the g4 and h5 squares and threatening Qb5+ exchanging off the queens. For this reason, I settled on a different attacking setup.
18…Qg4
Not intending …Qxg3 (which allows White to involve his queen in the defence with tempo via Qf2) but rather the much stronger …Bxg2 followed by …Rh3 targeting the g3 pawn. I started thinking in terms of a forced win at this stage.
19.d6
A desperate attempt to induce some confusion in Black’s position and the best defensive try again. Unfortunately, out of an array of tempting possibilities, I chose the least convincing alternative!
19…Bxg2
19…Bxd6 20.Nb5 looked a little confusing, so on principle I was looking for a clearer option if available.
20.Qxg2 Rh3
2 forcing moves and now White has a choice. His choice in the game led to the position on move 24 that I’d envisaged when I played 19…Bxg2. It was here however that I started to doubt how convincing my position would still be after 21.Kf2.
21.Ne2
21.Kf2 Qh5
This was the idea. Black is threatening …Rh2 and after 22.Kg1 Bxd6 then 23.Nb5 is much less powerful as White’s queen is tied down passively to the defence of g3. I had also examined the following line very closely
A) 22.dxe7 Rh2 (22…Ng4+ 23.Kg1 Rh2 24.Qxe4 There is no mate! ) Kg1 Rxg2+ 24.Kxg2 At first sight I was a little disappointed in Black’s position as the natural 24…Ng4 is met by the embarrassing 25.Rh1. However, I was very pleased to find 24…Qa5.
This stops White from developing easily with Bd2. Black follows up with …Ng4, …Kxe7 and …Rh8 and should win comfortably. While I was admiring this line, I was suddenly struck by the standard defensive technique of reversing the move order.
B) 22.Bd2 Stops …Qa5 and prepares to meet 22…Rh2 with 23.Rh1
23…Ng4+ 24.Kg1 Rxg2+ 25.Kxg2 Qg6 26.dxe7 Kxe7
I was worried that this might be difficult to win after White takes control of the c-file with 27.Rac1. Stockfish still gives Black –1.51 but I don’t like the number of checks from minor pieces I’m going to have to calculate to consolidate my position!
The game continuation justified my play: I kept control and increased my advantage without any complications.
21…Bxd6 22.Bb2 Bc5
Hitting the sensitive e3 pawn
23.Bd4 Bxd4 24.exd4 Kd7
Heading for a forced transposition to a winning knight ending
25.Kf2 Qh5 26.Rh1 Ng4+ 27.Kg1 Rxh1+ 28.Qxh1 Qxh1+ 29.Kxh1 Rc8 30.Rc1 Rxc1+ 31.Nxc1 Kd6 32.Ne2 Kd5 33.Kg2 Ne3+ 34.Kf2 Nc2
The last moment where accuracy was required. The knight on c2 attacks d4 and also stops the White king from establishing itself in front of the e-pawn. This paralyses White as he cannot move his knight away from e2
35.g4
35.Nc3+ Kxd4 36.Nb5+ Kd3 and the e-pawn queens
35…e3+ 36.Kg3 Ke4 37.Nc1 Nxd4
0–1
So how could I have done better?
Let’s go all the way back to the position after 19.d6.
During the game, I quickly scanned this continuation:
19… Bxd6 20.Nb5 Bc5 21.Nc7+ Kf8
Putting the king on e7 is tactically very inconvenient. For example, after 21…Ke7 22.Nxa8 Bxg2 23.Qxg2 Rh3 24.Kf2 Qh5 25.Kg1 Ng4 then 26.Qxe4+ Kf8 27.Qf3 makes it hard for Black to proceed
22.Nxa8
During the game, I made a sour little face to myself while considering this continuation. My own king is looking a little peaky (Qd8+ & Nc7 is the immediate threat) while the sacrificed rook imposes a requirement for accuracy on me that I felt to be excessive considering how good my position was. It should be simpler than this! However, analysing this in the train on my pocket set, I realised that this was virtually winning. When I put it to Stockfish later, he was in initially unimpressed with 19…Bxd6 but his evaluation jumped to -5.19 once I put 20…Bc5 on the board!
22…Bxg2
22…Bxe3+ 23.Qxe3 Bxg2 also wins according to Stockfish! 24.Qc5+ (24.Kxg2 Qh3+ 25.Kf2 Ng4+) Kg8 25.Kxg2 Rh3 26.Qe3 Qh5
23.Qxg2
23.Kxg2 Qh3+ 24.Kf2 Ng4+ 25.Ke2 Qg2+ 26.Ke1 Qxg3+ 27.Kd1 Nxe3+
23.Qd8+ Ne8 24.Nc7 Rh1+ 25.Kf2 Rxf1+ 26.Kxg2 Qf3+ 27.Kh2 Rh1#
23…Rh3 24.Kf2
24.Ba3 Bxa3 25.Kf2 Bc5 wins
24…Qh5 25.Kg1
25.Bd2 Rh2 is much stronger in this line: the knight on d4 held White’s position together but it’s been worth a rook to lure it away. Black threatens …Qf3+!
25…Ng4
26.Rd1
26.Re1 Rh2 27.Qxe4 No check! 27…Rd2 was the gorgeous line I was thrilled to find… and it works!
26…Nxe3
26…f5 was my line which also wins. The text doesn’t fear ghosts!
27.Rd8+ Ke7 28.Qxe4+ Kxd8
…Rxg3 follows on the next move. So that was another chance for immortality I didn’t take!


