
One of the eternal questions that practical players face is how to remember more than a couple of theoretical endings. Taking rook and pawn endings as an example, knowledge of the simplest positions such as Philidor’s defence in rook and pawn against rook…
Philidor’s position
1…Rb6 2.d6 Rb1 3.Ke6 Re1+
…or the Lucena position….
Lucena’s position
1.Re4 Rg2 2.Kf7 Rf2+ 3.Kg6 Rg2+ 4.Kf6 Rf2+ 5.Kg5 Rg2+ 6.Rg4
…is now commonplace, but the ending arsenal of most players is not much greater than this. Speaking for myself, if I compare the time I have spent trying to learn theoretical endings during my professional career to the theoretical knowledge I have readily at my fingertips, then I can’t help feeling disappointed.
I’ve recently been reading (and enjoying) a new book entitled “Understanding Rook Endgames” by the endgame expert Karsten Mueller and computer expert Yakov Konoval. The core of the book is the use the authors have made of 7-man tablebases. This allows the authors to view perfect play in K, R & 2Ps vs K, R & P endgames and – through the use of custom utilities – extract useful positions from which conclusions can be drawn. The opening section is however a quick recap of K, R & P vs K & R and K, R & 2Ps vs K & R and I was once again distressed to notice that not all these positions were sharp in my mind. I would probably be able to reconstruct them given 5 minutes, but with the current time controls at international level, you’ll probably be down to your increments by the time you reach the position. As Nigel Short put it when we interviewed him for “Chess for Life”, “You’re down to 3 minutes, dehydrated and you want the bathroom, and you’ve been playing for 4 hours and you can’t remember how it’s supposed to go!”
So I thought it was time to give it another go and try to get these endings more clearly into my head. I decided that I would try and nail this knowledge in a different way this time, tailored to the specific conditions of practical play at the current moment.
As far as I understand my brain, a lot of this infrequently-used theoretical knowledge is not directly available to me. It is retrievable but that requires some extra stimulation. Essentially I need to reconstruct my mindset at the time I last studied the ending – the thoughts that occurred to me, the specific page of the book I was looking at, or the comments I wrote in Chessbase when I inputted my conclusions – which takes time. The process can be speeded up considerably by seeing the initial moves played on the board… but to play those moves, you need to have an idea of where you’re going! That gave me an idea for the training I’m about to describe.
My basic premise is that in most of these endings, there is
- An initial period in which both sides play their pieces to the squares they consider appropriate
…leading to…
- A final period of precise tactical play in which the win / draw can be concretely demonstrated
The second period is the biggest test of your memory which implies that the greatest amount of time possible should be reserved for it.
So my idea was to aim consciously to get that knowledge out of my head in 2 steps.
- I would try and formulate a general plan of the direction in which my pieces should go in each specific situation (e.g. “He’s got a knight’s pawn, so I need to get my king in front of it”)
That should enable me to play a few moves quickly “by hand” and build up extra time via increments for 2 reasons:
- I’m able to play the first sequence of “getting my bits into position” moves more quickly than before which allows me to build up time on my increments
- My opponent may spend a longer if he is unable to think in my time
- That saved time can then be invested in piecing together the concrete variations I have in my head, hopefully on the fly whilst I’m playing the first phase on autopilot.
Of course, it all depends on putting together some good and easy-to-remember rules. So let’s get cracking!
We’ll start off with an examination of positions with b(g)/c(f)/d(e) pawns as these have many similar features. We’ll deal with a(h) pawns separately as these have a number of peculiar features.
K, R & P on the 5th rank vs K & R
The situation where the pawn has reached the 5th rank (supported by the king) is the normal place to start when learning these endgames. It’s around this time that Black has to settle some far-reaching decisions as to the placement of his king and rook.
K, R & Knight’s pawn on the 5th rank vs K & R
The defending side of a K,R & P vs K & R ending has 3 basic defensive tactics:.
Basic Defence – Knight’s Pawn – Defence #1
The first tactic is to place the defending king in front of the pawn. What better way to stop the pawn advancing than to place an immovable obstacle in its path? White will of course try to prevent this by applying 2 techniques:
- Cutting off the Black king from the pawn with his rook
- Shouldering away the Black king from his pawn with his own king, typically by placing his king in front of the pawn.
Basic Defence – Knight’s Pawn – Defence #2
The second tactic is to keep “hanging on” to White’s pawn by placing the Black rook behind it. This restricts the freedom of White’s king. For example, 1.Kg7 loses the pawn to 1…Rxg5+
Basic Defence – Knight’s Pawn – Defence #3
The third tactic is to continuously check the opposing king. The side with the pawn can evade those checks by using his pawn as a shield. This tactic works well as the rook needs 2 moves to switch to giving checks from another side. However, Black often uses this tactic to drive back the White king so that Black’s king can approach the White pawn.
1…Rf1 2.Kg6 Ra1 threatening checks from the a-file
K,R & Knight’s P – 5th rank
Let’s put everything together and examine a typical situation. White’s king has fled from the checks of the Black rook using the pawn on g5 as a rear shield. Note that the White king on g6 prevents the Black king from getting closer to the White pawn, which means that Black is unable to implement Basic Defence #1 (putting the king in front of the pawn). Moreover, Basic Defence #2 is also unlikely to have any success as the king on e7 is blocking the 2nd rank. White’s king would thus be safe from lateral checks on the g7 square.
White obviously needs to queen his pawn and the obvious way is to get his king out of way and let the White pawn steam on to the 8th rank. However, Black excellently-placed rook on g1 puts some little problems in White’s way. First of all, White cannot play 1.Kg7 to vacate the g6 square for the pawn as the g5 pawn hangs. 1.Kh6 looks natural but then Black has the opportunity to get his king closer to the pawn with 1…Kf7 which is very annoying. Black even threatens mate with 2…Rh1+ and 2.Ra7+ Kg8 isn’t progress for White. White does however have a way of making progress, a method to which Black has no answer:
1.Rg8
Not easy to spot! From g8 the rook keeps taking away access to the 8th rank from Black king and it makes White’s next move possible by X-ray defending the g-pawn.
1…Rg2 2.Kh7
g5 is defended so the king can move out of the way.
2…Rh2+
2…Kf7 The most obvious attempt: the White king strays so the Black king moves in. However, Black lacks the firepower to stop White’s g-pawn from advancing. 3.g6+ Kf6 4.Rf8+ Ke7 5.g7 Rh2+ 6.Kg8 will lead to the Lucena position.
3.Kg7
Now that the g-pawn is no longer attacked, the king can move to g7 and free g6 for the pawn.
3…Rg2 4.g6 Rg1 5.Ra8 Rg2 6.Kh7 Rh2+ 7.Kg8 Rg2 8.g7 and we will get the Lucena position again.
Our first rule for these endings is: if White has a knight’s pawn (b- or g-pawn) on the 5th rank supported by his king then Black MUST get his king in front. No ifs and buts – anything else loses!
K, R & Bishop’s pawn on the 5th rank vs K & R
K, R & Bishop’s Pawn – 5th rank – King on Long Side
Let’s start with the same situation as in the example with the knight’s pawn. This position is also losing for Black. White to move proceeds with exactly the same plan:
1.Rf8 Rf2 2.Kg7
So is this also losing for Black? This is where the beautiful concept of the “short side” and “long side” comes in. Let’s take a look at the position with just the f-pawn on the board:
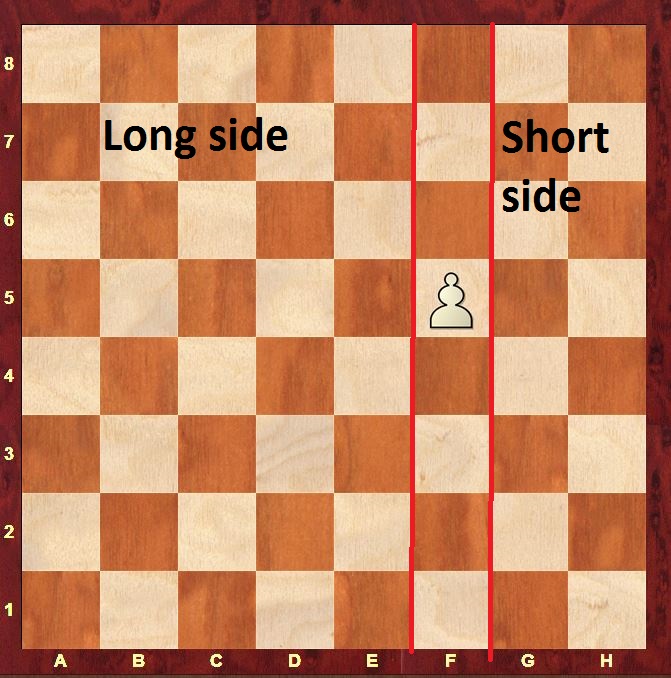
If we look at the previous example, we will see that the Black king on d7 was on the long side. We should also remark that the short side doesn’t really exist for a knight’s pawn: there’s too little room on the side of the board.
Let’s take our example and then try and place the king on h7 – on the short side. Do we see any advantage here?
K, R & Bishop’s pawn – 5th rank – Short side
Intuitively, this feels wrong: why place the king on a restricted square on the side of the board. You might expect that White only gains additional possibilities based on mate. The answer is all to do with the Black rook and Basic Defence #3
1.Rf8 Ra1
When the White rook moves to f8, it supports the f-pawn but it also leaves the White king exposed to checks from the side. White’s rook can no longer be used to block checks from the rook from f8.
2.Re8
The rook steps to the side to be able to block lateral checks from the rook on the e-file
2.Ke7 Ra7+ 3.Kd6 Ra6+ 4.Kc7 Notice here how large the checking distance is between the Black rook and the White king. Before the White king can smother the Black checks, he needs to travel all the way to the queenside, far away from his pawn. This gives Black the opportunity to get his own king in front of White’s pawn. When the cat’s away… 4…Kg7 5.Re8 Kf6
2…Rf1
And the rook goes back to attacking White’s pawn again!
3.Ke6
The White king drifts away to allow the pawn to advance…
3.Re5 Rf2
3…Kg7
…and the Black king edges closer
4.Re7+ Kg8 5.Kf6 Kf8 6.Ra7 Kg8 7.Ra8+ Kh7 and we’re back where we started!
Our second rule is: if White has a bishop’s pawn (c- or f-pawn) on the 5th rank supported by his king, make sure your king can always escape to the short side if necessary so that your rook can check laterally from the long side.
K, R & Central pawn on the 5th rank vs K & R
Let’s take a look at the long and short sides in this scenario:
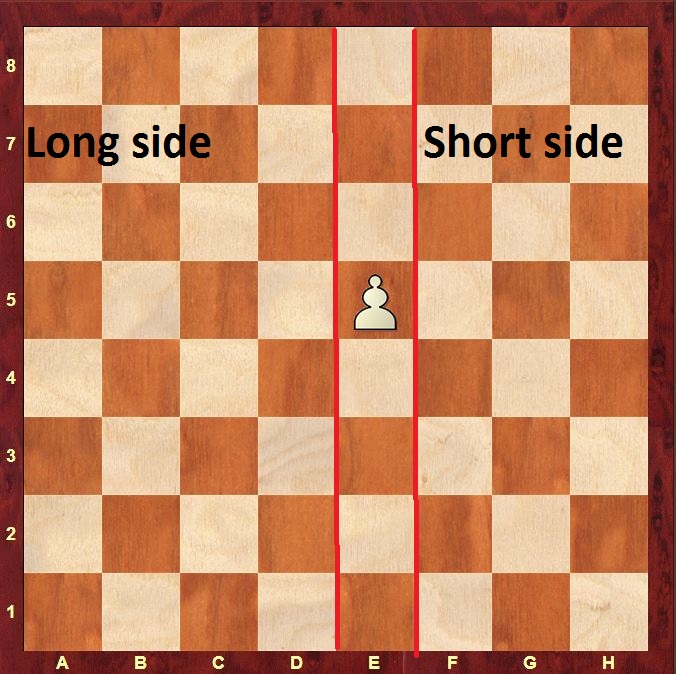
As you can see, there isn’t too much difference between the long and the short side here. Although you should always prefer the short side, fleeing to the long side is also enough for a draw.
K, R & Central pawn – 5th rank – Long side
1.Re8 Rh1
The only drawing move here – the fact that Black’s king is on the long side renders the margin for error much smaller.
2.Kf7
2.Rg8 Re1 Again the only move, but very easy to understand.
2…Rh7+ 3.Kg6 Kd7
Gets the king back in front just in time!
Our third rule is: if White has a central pawn (d- or e-pawn) on the 5th rank supported by his king, you can place your king either on the short side or long side and hold a draw. You should be aware however, that defence with the king on the long side requires greater precision.
Our fourth rule is a general one: you should always place the king on the short side if given the choice.
Having seen this, you may be tempted to think that the superior side should always aim to be left with a knight’s pawn and certainly not a central pawn.
Just a slight digression, the English Grandmaster Keith Arkell has developed his own scale of values for the pawns. In his scale, the g-pawn is the most valuable pawn on the board. He’s a great lover of rook endings (in Chess for Life, we calculated that 14.7% of his games end in rook endings, which is significantly higher than the average for all other players (9.1%). I do wonder whether this love of the g-pawn has something to do with these theoretical endings! However, the Lord is both mighty and merciful.
K, R & P on the 6th rank vs K & R
K, R & Knight’s pawn – 6th rank
This position is just drawn. Black can just stay passively with his rook on the 8th rank and just grin at White as he tries to make something of his seemingly overwhelming advantage!
1.Rg7+ Kh8
1…Kf8 2.Kh7 wins for White! Watch out!
2.Rh7+ Kg8
Once White’s pawn gets to the 6th rank supported by his king, the knight’s pawn increases Black’s defensive possibilities if he can get his king in front of the pawn:
Our fifth rule is: as long as he can get his king in front of the pawn, Black can allow a knight’s pawn to advance to the 6th rank supported by the White king on the 6th rank as passive defence is sufficient to hold the draw.
So can you defend passively against a bishop’s pawn or central pawn on the 6th rank, assisted by a king? No you can’t!
K, R & Bishop’s pawn – 6th rank
By contrast, don’t try this at home!
1.Rh7 Kg8 2.f7+ wins for White.
You need to apply Philidor’s defence (mentioned right at the start of this article) to ensure that the White king never gets a chance to settle on the 6th rank.
Our sixth rule is: you must not allow White to establish a bishop’s pawn or central pawn on the 6th rank supported by his king on the 6th rank unless you are able to drive the king away immediately with rear checks. The defensive technique to achieve this is Philidor’s defence.
I have to mention that Black does have another rather desperate method of defending against the scenario with White’s king and pawn on the 6th rank with the attacking king safe from lateral or rear checks. For this to work, Black must have his rook on the second rank:
Assuming you cannot apply Philidor’s defence or the desperate stalemate defence, what sort of saving position should you try to achieve with Black when a central pawn reaches the 6th rank? The basic contours are not too difficult to guess: king on the short side and lateral rook checks from the long side with maximum checking distance. As you can imagine, the situation is quite fraught and requires maximum accuracy from Black. For me, this is one of the endings where constant repetition over the years seems to have borne fruit – I can remember it perfectly!
K,R & Central Pawn 6th rank – K Short side, R Long side
Black’s forces are beautifully-placed:
- The king on g7 is ready to move to f6 (or f8) if White’s king moves drifts away from the e-pawn
- The position of the Black rook on a8 fulfils 2 crucial functions:
- Black has maintained maximum checking distance between the rook and the White king which ensures maximum disruptiveness from a checking sequence.
- The rook prevents White from achieving his desired plan (as we saw earlier) of moving his king forwards (with Ke8) and letting the pawn follow behind him.
However, whenever you hear that a defender’s position is perfect, there is always a possible zugzwang in the air. White can give Black the move with a subtle sequence.
1.Kd6+ Kf6 2.Kd7 Kg7 3.Ke7
Black is to move and has to disrupt his perfect defensive structure. However, he has a waiting move at his disposal that does not affect the balance of the position. This is usually the key to defending such positions.
3…Kg6 4.Rb1
4.Rd7 Kg7 5.Rd6 Kg6 6.Rc6 Kg7
4…Ra7+ 5.Kd8 Kf6 6.Re1
6.e7 Ra8+
6…Ra8+ 7.Kd7 Ra7+
Our 7th rule is: if White’s central pawn threatens to get to the 6th rank supported by his king and you cannot anticipate this via Philidor’s defence, then play the king to the short side and the rook to the long side with maximum checking distance, while standing guard over the back rank.
A complicated rule isn’t it? That just shows how small the difference is between a draw and a loss. Take this example where Black has not managed to maintain maximum checking distance:
K, R & Central Pawn – K Short side, R reduced checking distance
1.Kd6+ Kf6 2.Kd7 Kg7 3.Ke7 Kg6 4.Ra1 Rb7+ 5.Kd8 Kf6
5…Rb8+ 6.Kc7 Here we see the downsides of Black’s reduced checking distance. The White king has smothered the checks without having to wander too far from his pawn. 6…Rb2 7.Re1
Always a surprising moment for me whenever I see it! The king on g6 is fatally misplaced here: White is threatening e7–e8 and the Black king is no longer in time to get in front of it! 7…Rc2+ 8.Kd7 Rd2+ 9.Ke8 leads to the Lucena position
6.e7 Rb8+ 7.Kc7 Re8 8.Kd6 Rb8 9.Rf1+ Kg7 10.Kc7 Ra8 11.Ra1
Ah! Classic!
11…Rh8 12.Kd7
After seeing this example, you can imagine the reason for our eighth rule: you should always maintain the maximum checking distance between the Black rook and the White king.
This rule also explains why a similar position with the bishop’s pawn is always drawing for Black:
Even with his rook on the b-file, Black has sufficient checking distance between his rook and the White king.
Just to round off, the 8 rules in one table:
| Material | Rule# | Rule |
| White has a knight’s pawn (b- or g-pawn) on the 5th rank supported by his king | 1 | Black MUST get his king in front of the pawn |
| White has a bishop’s pawn (c- or f-pawn) on the 5th rank supported by his king,
|
2 | Black’s king must always be able to escape to the short side so that Black’s rook can check laterally from the long side. |
| White has a central pawn (d- or e-pawn) on the 5th rank supported by his king
|
3 | Black’s king can be either on the short side or long side to hold a draw. Defence with the king on the long side requires greater precision. |
| All positions | 4 | You should always place the king on the short side if given the choice. |
| White has a knight’s pawn on the 6th rank supported by his king on the 6th rank. | 5 | As long as he can get his king in front of the pawn, Black can hold the draw with passive defence |
| White has a bishop’s pawn or central pawn on the 6th rank supported by his king on the 6th rank. Black’s king is in front of the pawn.
|
6 | Never allow this unless you are able to drive the king away immediately with rear checks. The defensive technique to achieve this is Philidor’s defence |
| White’s has a central pawn on the 6th rank supported by a king on the 7th rank | 7 | Play the king to the short side and the rook to the long side with maximum checking distance, while standing guard over the back rank. |
| All positions | 8 | You should always maintain maximum checking distance between the Black rook and the White king |
So that’s the lot for this article. In the next article, we’ll take a look at positions with the pawn on the 4th rank. In this situation, theoretical efforts focus on positions in which Black’s king is cut off and thus unable to move in front of the pawn. Here again, there are a number of simple rules to follow
Lot to take in but I am going to get the chess set out and go through it. Thanks
Hi Kevin, thanks! Do let me know if it helps make the subject easier to understand / remember, and if there are things that aren’t clear! Best Wishes, Matthew
Very useful-many thanks!
Hi Gordon, thanks! If you have any suggestions for improving it let me know! The goal was to make things as easy to remember as possible. Best Wishes Matthew
This is a godsend! I have previously read so much on rook endings and understood so little. This sets it out in a clear manner and for the first time I am beginning to understand the basics. Thanks
Thanks very much David! Glad it helps! Best Wishes, Matthew
Thanks Matthew, I’ll keep a print from the schedule in my pocket whenever I’m playing 🙂
Hey Jeroen, we’ll have you searched if you play rook and pawn endings too well! 🙂
Really nice treatment of the R & P vs R subject!
Thanks Greg! Glad you liked it! Best Wishes, Matthew