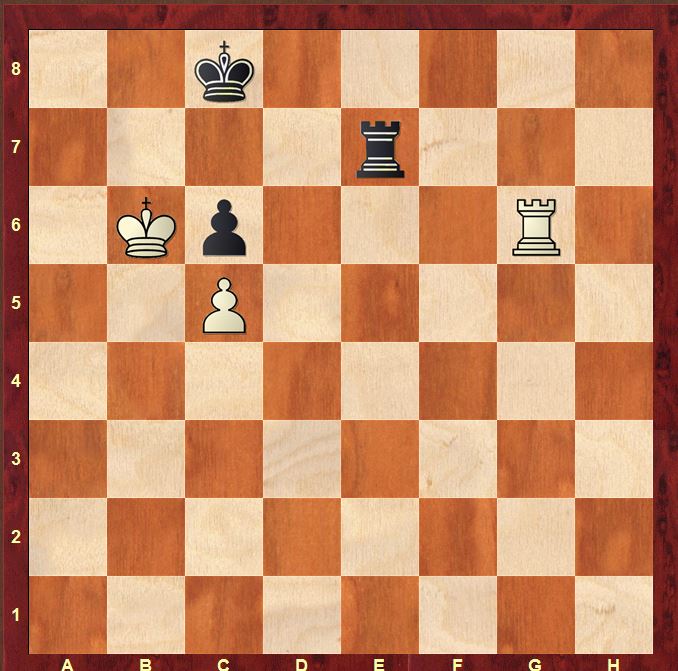
A couple of months ago, I wrote a series of articles on King, Rook and Pawn vs King and Rook. In this article, I want to examine a couple of positions that show the practical application of the knowledge we learned. The practical value of building up a body of easily retrievable knowledge on K, R & P vs K & R endings is to simplify your assessment of transitions into these endings. It makes a huge difference knowing that a specific position is drawn, or even just knowing that a position is drawn if you manage to achieve a certain goal (for example, placing the king in front of the pawn).
For reference, the articles are available here: http://matthewsadler.me.uk/the-endgame/king-rook-pawn-vs-king-rook-part-i/, http://matthewsadler.me.uk/the-endgame/king-rook-pawn-vs-king-rook-part-ii/ and http://matthewsadler.me.uk/the-endgame/king-rook-pawn-vs-king-rook-part-iii/
I’d like to show you a couple of examples taken from Mueller’s and Konoval’s scary but super recent book “Understanding Rook Endgames” (Gambit) which illustrate this point:
Burn – Spielmann San Sebastian 1911

This position occurred in a practical game more than 100 years ago! It’s a good example of how to use our rules to take appropriate decisions when transposing into K, R & P vs K & R endings.
As Black we understand that the pawn on c6 is doomed. As Black we also know that we would ideally defend this type of position with Philidor’s defence (Rule #6). However, this involves getting a Black rook onto the 3rd rank and with White’s rook on g6, this is unlikely to happen.
The other type of defence to aim for is to get the king over to the short side of the pawn (in this case a7) and then check with the rook from the long side (Rules #2 and #7). Looking at this from the Black side, we can see some prospects:
1.Rxc6+ (as played in the game) is met by 1…Kb8 (heading for the short side) and after 2.Rh6 Rb7+ 3. Kc6 Rc7+ drives the king away and allows Black to establish his king in front of the pawn.
Looking at things from the White side, we need to stop the Black king from fleeing to the short side: we need to get the king moving to the long side. This is the most important goal in the short-term; capturing the pawn can come later.
1.Rg8+
1.Rxc6+ Kb8 2.Rh6 Rb7+ 3.Kc6 Rc7+ 4.Kd5 (4.Kd6 Kb7 5.Rh1 Rc6+ 6.Kd5 Rg6 achieves Philidor’s defence) 4…Rg7
1…Kd7 2.Kb7
Mueller. The Black king has been driven to the long side which will leave Black’s king poorly placed when White finally captures the c6 pawn.
2…Re1 3.Rg7+ Kd8 4.Kxc6 Re6+ 5.Kb7 Re1 6.Rg8+ Kd7 7.c6+ wins
Taimanov – Estevez Brno 1975
Looking at things from the Black side, we understand that Black MUST get his king in front of the White g-pawn in order to draw (Rules #1 & 5). We also know that passive defence with a Black king on g8 and rook on the 8th rank facing a White king and pawn on the 6th rank is possible against a knight’s pawn (Rule #5).
1…Kf7
Heading immediately for the …Kg8 + …Rf8 structure
1…g5+ 2.Kxg5 is intuitively very tempting – and was played in the game – driving the White king back and seemingly clearing the path to g8 for the Black king. However, this is an optical illusion: the Black king is still restricted by the White king and his rook is too clumsily-placed on f6 to be able to contribute effectively to the defence 2…Rf1 (2…Rb6 3.Rf4 Rb8 4.Kh6 Rh8+ 5.Kg7 The Black rook is too late on the 8th rank to be able to check the White king back) 3.Ra7+ Kf8 4.Kg6 followed by Ra8+ and the king is driven away from its only saving position in front of the White pawn
2.g5
2.Kh7 Rf3
2.Ra7+ Kg8 3.Ra8+ Kf7
2…Rf1 3.Ra7+ Kg8 4.Kxg6 Rf8 draws
Black has reached the ideal defensive structure against a knight’s pawn.


In the game burn-spielman black manage to draw after 2…, e5, using horowitz kling, right?
Hi, Not quite sure what you mean there. The Burn-Spielmann game ended (from the diagrammed position) 63.Rxc6+ Kb8 64.Rh6 Rb7+ 65.Kc6 Rc7+ 66.Kd6 Kb7 67.Rh8 Rc6+ 68.Kd5 Rg6 69.Rh7+ Kc8 and we’re back in Philidor’s 3rd rank defence! Best Wishes, Matthew
Sorry, my mistake. I set up the pieces on the board with the White rook on f6 instead of g6 (initial position of the diagram) and then couldn’t see how you win with White. Thanks for blog, very interesting.