
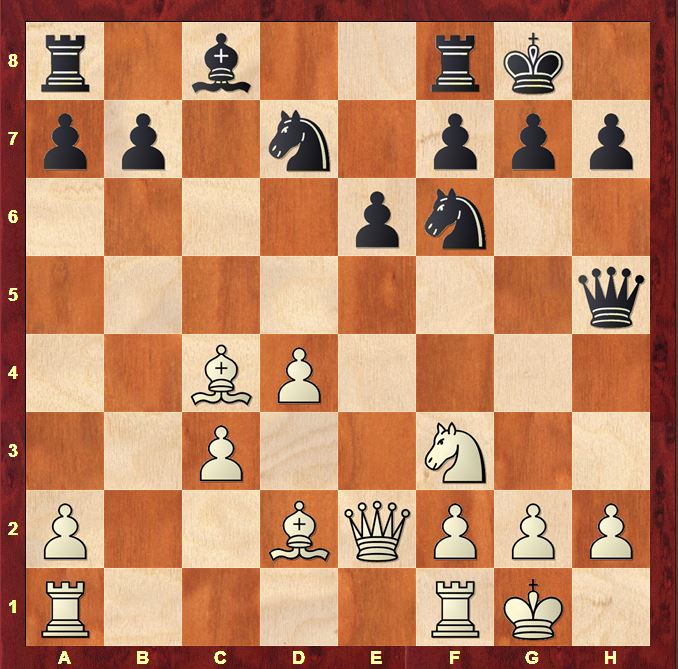
After a quick win in the 1st round, the 2nd round at Haarlem was a considerably tougher struggle against the Dutch FM Rene Tiggelman. We join the game after 10 moves. Via a transposition, we have reached a tabiya of the 4.e3 Nimzo-Indian.
10…Bxc3 11.bxc3 Qa5 12.Bd2 Qh5
I’ve played the White side of the 4.e3 Nimzo since I was 14 or 15, which means I’ve accumulated lots of little thoughts as “Oh, I suppose even this might be interesting” about the positions over the years. This was one of them. I’ve seen Viktor Kortchnoi play the plan of …Nbd7, …Qa5 and …Bxc3 against an early Bg5 a few times. Here’s a little summary:
10.Bg5 Qa5 11.Bd3 (11.Rc1 Bxc3 12.Rxc3 b5 13.Ra3 Qb6 14.Rb3 a6 15.a4 Qc7 16.Bd3 bxa4 17.Rc3 Qa5 18.Ra3 Bb7 19.Rxa4 Qd5 was the very creative course in Ljubojevic-Kortchnoi Leon 1994; 11.Qe2 Bxc3 12.bxc3 b6 13.Ne5 Bb7 14.Nxd7 Nxd7 15.Bd2 Qf5 16.Bd3 Qd5 17.f3 Nf6 18.Be3 e5 19.c4 Qd6 20.c5 bxc5 21.dxc5 Qc7 22.Rac1 Bc6 23.f4 Rfe8 24.fxe5 Qxe5 25.Rce1 Rad8 26.Bb5 Bxb5 27.Qxb5 Ng4 28.Bf4 Qd4+ 29.Kh1 Rxe1 30.Rxe1 Nf2+ 0–1 Vaisser,A -Kortschnoj,V New York 1994) 11…b6 12.Nb5 Ba6 13.Qe2 Bxb5 14.Bxb5 a6 15.Bc6 Rac8 16.Bb7 Rb8 17.Qxa6 was a clear advantage for White in Hillarp Persson – Kortchnoi Banyoles 2006
I had idly wondered whether Black might try a similar manoeuvre against other White systems, aiming to bring the Black queen to h5 very early. In this way, Black ensures that Ne5 from White leads to the exchange of queens, while if White delays Ne5 too long, Black will develop pressure along the a8–h1 diagonal with …b6 and ..Bb7.
The drawback to the manoeuvre is that Black spends 3 moves in the opening to achieve the exchange of queens. During the ensuing ending, I noticed at certain points that – due to this investment of time – I was missing some “comfort tempi”. For example, I would normally expect to have the move …h6 already played in such positions; in the game, I had to watch out continually for back-rank mate tricks during the transition phase between moves 20 & 24 because I hadn’t had time to play it yet.
13.Rfe1 b6 14.Ne5 Qxe2 15.Rxe2 Bb7 16.Nxd7 Nxd7 17.a4 Rfc8
Strangely enough, this is already a moment of defining importance in the game. Even stranger, this wouldn’t be the case if White played in the most challenging way in the next couple of moves. However, I had guessed correctly that White would continue the plan of exchanges that he had commenced on move 14 and then it really does matter.
18.Bd3 Bd5 19.a5
This was the move I expected. It’s a perfectly good move in fact, but it does give Black one of his positional goals on a plate: the exchange of light-squared bishops, leaving White with the lesser bishop of his pair.
19.Ree1 Bc4 20.Be4 would make Black work harder to achieve the exchange! 20…Bd5 21.Bd3 was obviously not what I was looking for.
19…Bc4 20.Bxc4 Rxc4 21.axb6 Nxb6
Here we see the point of 17…Rfc8 instead of 17…Rac8. If I had played 17…Rac8, then 21…axb6 would have been necessary as 21…Nxb6 just leaves the a-pawn hanging. I spent some time on the 17th move agonising about this decision. I decided that the best I would get out of a structure with a Black b-pawn on b6 (17…Rac8) was R & 4Ps vs R & 3Ps on the kingside. I felt that a passed a-pawn would give me additional chances to distract and tie down White’s pieces, while the prospect of bringing my knight quickly to c4 was also attractive. This structure does involve extra risk as White now gains a passed c-pawn. While Black can keep the pawn under wraps for now with a blockade on c4 with his knight, this blockade will come under pressure when White brings his king to d3 or b3. If I lose my blockade, I may well be lost! The (excessive) time investment on the 17th move was spent trying to gauge how quickly White could achieve Kd3 or Kb3 and what my resources were to prevent or fight it once it happened. In the end, I decided that the plan of …e5(-e4) would give me chances to annoy White too so I went for it.
As often happens, I also missed something simpler while trying to weigh up the pros and cons of a faraway position. Yochanan Afek pointed out after the game that instead of 21.axb6, 21.d5 forces the game into equality.
21…exd5 22.Re7 Rd8 23.axb6 Nxb6 (23…axb6 24.Rxd7 That missing …h6 again!) 24.Raxa7 d4 25.Rxf7 dxc3 26.Rxg7+ Kh8 27.Rxh7+ Kg8 28.Rag7+ Kf8 with a draw by perpetual
22.Be1
Again, certainly not a bad move, but – just like 19.a5 – a move that gives Black a positional achievement for free: the advance of the a-pawn. For that reason, 22.Ra5 feels less accommodating, inhibiting the advance of the a-pawn. The idea is that 22…Nd5 23.Be1 Nxc3 24.Rc2 Ra4 25.Bxc3 wins a piece. White has thus time to double up rooks on the a-file.
The text is – just like 19.a5 – a move that holds clear equality as long as White exploits the tactical chances based on Black’s weak back rank while he still has them.
22…a5 23.Rb2 Rc6 24.Kf1
24.Rb5 a4 25.c4 is Komodo’s sharp spot, and it basically does the business. After 25…Nxc4 26.Rxa4 the worst is over for White. After 24.Kf1, there is no longer a path for White to force clear equality which means a complicated struggle now lies ahead.
24…a4 25.Ke2 a3 26.Rb3 Nc4 27.Ra2
I spent 20 precious minutes weighing up my next couple of moves. In general, I’m happy with the transformation in the game since move 19:
- Black has gained enormous amounts of queenside space by pushing the a-pawn to a3 without much resistance from White.
- The passed pawn on a3 ties down the White rook on a2.
- The Black knight on c4 holds back White’s own passed pawn on c3 and defends the a3 pawn securely.
However impressive these achievements are, they will not win the game for Black. Black has to find a way to exert additional pressure on White’s position while maintaining his capability to deal with White’s most pressing source of counterplay: Kd3 and Rb4 challenging the blockading knight on c4. There were 4 factors that were running through my mind:
- The obvious way to increase the pressure on White’s position is to mobilise Black’s kingside majority and advance the kingside pawns, supported by the Black king.
- I needed to be able to achieve …e5–e4 quickly to chase away the White king from / prevent the White king from coming to d3.
- I wanted to have the capability to bring my king towards the centre to be able to shore up the knight on c4 from d5 if an exchange of rooks were to take place (this was more a feeling than anything else – I didn’t actually see any concrete variations where this might happen)
- I wanted to maintain the capability to tease the White kingside with my rooks and thus to extract weaknesses there which my king or knight could exploit later.
This last point may seem a little mysterious, but it’s a typical technique in endings with rooks on. A couple of famous examples:
Alekhine,Alexander – Marshall,Frank James
St Petersburg preliminary 1914
1.e4 e5 2.Nf3 Nf6 3.Nxe5 d6 4.Nf3 Nxe4 5.d4 d5 6.Bd3 Bd6 7.c4 Bb4+ 8.Nbd2 Nxd2 9.Bxd2 Qe7+ 10.Qe2 Qxe2+ 11.Kxe2 Bxd2 12.Kxd2 Be6 13.cxd5 Bxd5 14.Rhe1+ Kd8 15.Be4 Bxe4 16.Rxe4 Re8 17.Rae1 Rxe4 18.Rxe4 Nc6
A famous Alekhine manoeuvre. White is ahead in development, but Black’s position seems devoid of weaknesses. However, Black’s kingside pawns – devoid of piece protection – are vulnerable to frontal attack by White’s rook.
19.Rg4
19.Ng5 Kd7 20.Nxf7 Rf8
19…g6 20.Rh4 Ke7
20…h5 allows 21.g4 so Black is forced to give up the h-pawn
21.Rxh7 Rd8 22.Rh4 Rd5 23.Re4+ Kf8 24.Kc3 Rf5 25.Re2 a6 26.a3 Ne7 27.Re5 Rf6 28.Kd3 b6 29.Re2 Nd5 30.Ke4 Nf4 31.Rc2 Nxg2 32.Ne5 Ke8 33.Rxc7 Rxf2 34.Nc4 b5 35.Nd6+ Kf8 36.d5 f6 37.Nb7 Nf4 38.b4 g5 39.d6 Ne6 40.Kd5 Nf4+ 41.Kc6 Rxh2 42.Nc5 Rd2 43.Rc8+ Kf7 44.d7 Ne6 45.Nxe6 Kxe6 46.d8Q Rxd8 47.Rxd8 g4 48.Re8+ Kf7 49.Re2 f5 50.Kd5 Kf6 51.Kd4 f4 52.Ke4 Kg5 53.Rc2 f3 54.Rd2 Kh4 55.Kf4 Kh3 1–0
Marshall,Frank James – Lasker,Emanuel
World Championship USA 1907
1.e4 e5 2.Nf3 Nc6 3.Bb5 Nf6 4.d4 exd4 5.0–0 Be7 6.e5 Ne4 7.Nxd4 0–0 8.Nf5 d5 9.Bxc6 bxc6 10.Nxe7+ Qxe7 11.Re1 Qh4 12.Be3 f6 13.f3 fxe5 14.fxe4 d4 15.g3 Qf6 16.Bxd4 exd4 17.Rf1 Qxf1+ 18.Qxf1 Rxf1+ 19.Kxf1
A deservedly celebrated example of the power of a rook operating laterally across the board. See the trail of weaknesses and entry points for Black’s bishop and king that the rook’s manoeuvre creates!
19…Rb8 20.b3 Rb5
Looking to attack the c-pawn with …Rc5
21.c4 Rh5 22.Kg1
22.h4 g5
22…c5 23.Nd2 Kf7 24.Rf1+ Ke7 25.a3 Rh6
Fantastic! The rook will perform the same disruption from the 3rd rank!
26.h4
In order to centralise his king. However, Black now gains an unchallengeable post on g4 for his bishop.
26…Ra6 27.Ra1 Bg4 28.Kf2 Ke6 29.a4
In order to activate his rook, White feels compelled to place his a-pawn on a square defended by another pawn. Now however, his chances of generating play on the queenside with b4 are gone.
29…Ke5 30.Kg2 Rf6 31.Re1 d3 32.Rf1 Kd4
The king invades decisively thanks to the passed d-pawn and weakened queenside dark squares created by Lasker’s rook manoeuvres.
33.Rxf6 gxf6 34.Kf2 c6 35.a5 a6 36.Nb1 Kxe4 37.Ke1 Be2 38.Nd2+ Ke3 39.Nb1 f5 40.Nd2 h5 41.Nb1 Kf3 42.Nc3 Kxg3 43.Na4 f4 44.Nxc5 f3 45.Ne4+ Kf4 46.Nd6 c5 47.b4 cxb4 48.c5 b3 49.Nc4 Kg3 0–1
Back to my game!
In this position, you can imagine that it might be interesting to force White to play g2–g3 via an attack on the g-pawn. This could give Black an entry point later for his king via the kingside light-squares h5/f5–g4/e4–h3/f3 as well as a great outpost for his knight on f3. It’s definitely an option you want to keep open: such nuances can be the difference between a win or a draw.
The presence of 2 sets of rooks and an open file controlled by the opponent is a complicating factor. In the Marshall-Lasker game, Black could play his king to e7 (controlling entry points on the open f-file while shielded from checks by the White e-pawn) while his rook roamed from wing to wing. In this position, the Black king is much more vulnerable to rook checks. It’s thus likely that Black will have to move one of his kingside pawns to activate his king (…f6, …f5, …g6, …g5, or …h6) but that inevitably means that the lateral range of Black’s rooks on the kingside (either on the 3rd rank or the 4th rank) will be inhibited. It’s also a consideration that I had to deal with in my best game from the Olympiad at Tromso: the 4th round win against the Latvian Grandmaster Miezis.
Miezis,Normunds – Sadler,Matthew
Tromsoe ol 2014
Black has a pleasant advantage due to the isolated White d-pawn, but he will need to create more weaknesses to stand a chance of winning the game. As you can imagine, I was alert to the possibility of bringing my rooks to the f and g files to tease out some more entry points on the kingside. I also wanted to activate my king but due to the open c and e files, I knew that the centre was not the place to be! After some thought, I settled on 25…g6 as the best balance of interests; I felt that I would still manage to mobilise my rooks via the 5th rank or via the f-file, exploiting the weakness of the f4 square. And lo it came to pass!
25…g6 26.Kf2 Rd6 27.h3 Red7 28.Rcd1 Kg7 29.Bc4 b5 30.Be2 Rc7 31.Re1 Rf6+ 32.Kg1 Bd5 33.Bd3 Rf4
34.Bf1 h5 35.Be2 h4 36.Rf1 Rxf1+ 37.Kxf1 Rc3 38.Kf2 Kf6 39.Bd3 Kg5 40.Be2 Kf4 41.Bf1 f6 42.Re2 Be4 43.b4 Ra3 44.Rd2 Bd5 45.Be2 f5 46.Bd1 Rg3 47.Bf3 Bxf3 48.gxf3 Rxf3+ 49.Kg2 Rg3+ 50.Kh2 Ke3 51.Rd1 Ke2 52.Rb1 Rd3 53.Rg1 Rxd4 54.Rxg6 Rxb4 55.Rxa6 f4 56.Rg6 f3 57.Re6+ Kf2 58.a3 Rb2 59.a4 Re2 60.Rf6 Ke3+ 61.Kg1 Re1+ 62.Kh2 f2 0–1
I’m not sure whether I came up with the right balance in the present game, but I did my best! In the end, these were the considerations my plan addressed:
- I was a bit anxious about White meeting a quick …e5 with …dxe5, distracting the knight from c4. It felt – rightly or wrongly – like losing some control on the position. I preferred to be able to meet dxe5 with …fxe5 (keeping the possibility of …e4 in the position)
- I wanted my king to be closer to the action. I preferred to have it on f7, possibly exposed to checks, than on h7.
- I would hold back a little on pushing my g-pawn to keep the possibility of pricking at the kingside pawns via …Ra5–g5/h5 or (after …e4 and a later …f5) by …Rg6/h6.
The obvious downside to this plan is that the advance of my kingside pawns is going to take longer (for example, I’ll be playing …f5 in 2 moves) At the end of the day, you rarely get things perfect: these things are judgment calls and you have to make the call before your time runs out!
27…f6 28.Bd2 e5 29.Bc1
Again, this is not a bad plan from White but I wasn’t unhappy to see it. White adds pressure to the a3 pawn, but he will not be able to take it under normal circumstances due to the pin on the a-file. Furthermore, the c3 pawn is now poorly defended which gives Black additional tactical possibilities involving the retreat of his knight from d6 (see the game!)
29…e4
I was reluctant to play this move as the presence of my rook on c6, the loose bishop on c1 and the possibility of opening the c-file with …exd4, cxd4 had activated my tactical antennae! But…stick to the plan! It’s also a good feeling to take away an option like Kd3 from the White player. A move like …e4 seems to say “You should have played it while you still could!”
30.h4
To prevent Black from starting his kingside pawns rolling with …g5
30…Ra5
I started feeling happy here, though maybe there’s no objective reason for it. I started dreaming of …Rh5 forcing g3 and then …Rf5–f3, landing on the soft, squidgy f3 outpost I’d created and then attacking the c3 pawn that White has weakened with the manoeuvre Bd2–c1. Instead of 30.h4, I’d been looking more at moves like 30.Rb5 interfering with Black’s plan to activate his rook along the 5th rank or 30.Kd1 aiming for Kc2–b3.
31.Rb8+ Kf7 32.Rb7+ Kg6
I was surprised that White forced my king to g6, but he had a specific tactical idea in mind. While he was thinking, I discovered that the move …h6 would also have been very useful in this position as my desired manoeuvre …Rh5, g3 …Rf5 aiming for the outpost on f3 now fails to g4 …Rf3, h5 mate! (…h6 would allow the king a retreat to h7!) You can imagine a little grimace on my face as I came across this again! I did discover to my pleasure and surprise that the awkward looking 33.f3 could be met by the interesting 33…Nd6 hitting the weakness on c3 (33…f5 34.h5+ Kf6 35.h6 is annoying… Yes, that’s right, it wouldn’t happen if my pawn was on h6 already!) 34.Rb3 Nb5 35.Bd2 f5 when I still find a way to keep a pawn on e4 36.Ke3 Nd6 is the point]
33.h5+
This came as a complete shock. I took the pawn before I understood what White’s idea was! After all, I’d been looking at ideas of …Rh5 continually and now I had it for free!
33…Rxh5 34.Ra7
This was it! Very ingenious: White cannot be stopped from taking on a3, and once that happens, Bf8 is next on the menu! The best reply was not difficult to find however as I’d been focusing on such ideas since White had played the manoeuvre Bd2–c1.
34…Nd6 35.Bxa3
35.Bd2 Nb5 36.Ra5 Nxc3+ 37.Bxc3 Rxc3 38.R5xa3 was the toughest defence. Lots of work still to do! The text gives Black a winning position
35…Nb5
36.Bf8 Nxa7 37.Rxa7 Rg5 38.Rxg7+ Kf5 39.Rxg5+ fxg5
A nice little bonus: Black gets a pawn structure with which he can create a passed h-pawn.
40.Bb4
We were down to increments by this time and I found it difficult to judge whether it was a good idea to let the d-pawn run or not. In the end, I decided to start safe.
40…Ke6 41.Ke3 Kd5 42.Bc5
42.f3 exf3 43.Kxf3 h5 was the idea
42…Rf6 43.Be7 Rg6 44.g4 h6
Finally I play this move… and I wondered whether I should – I’m putting a pawn on the colour of White’s bishop which might make it tougher to activate my rook. However, I decided that g7 and f8 were within my power to cover adequately.
45.Bf8 Rf6 46.Bg7 Rf3+ 47.Ke2 Rh3
White now blundered a pawn with 48.Be5 Rxc3 after which the game was effectively over although my realisation was somewhat long-winded… 48.Be5 Rxc3 49.Bg7 Rh3 50.Kd2 Rh4 51.Ke3 Rh3+ 52.Kd2 Ke6 53.Ke2 Kf7 54.Be5 Rd3 55.Bh8 Kg6 56.Be5 h5 57.gxh5+ Kxh5 58.Bg7 Kg4 59.Bf6 Kf4 60.Bg7 Ra3 61.Be5+ Kf5 62.Bg7 Ra7 63.Be5 Ra5 64.Bc7 Ra2+ 65.Ke3 Ra3+ 66.Ke2 Rd3 67.Be5 Rb3 68.Bc7 Rb2+ 69.Ke3 Rb7 70.Bd6 Rb3+ 71.Ke2 Kg4 72.Be5 Rb5 73.Ke3 Kf5 74.Bc7 g4 75.Bd6 Rb3+ 76.Ke2 Rd3 77.Be5 Kg5 78.Ke1 Kh4 79.Ke2 Kh3 80.Bg7 Kg2 81.Be5 Rf3 82.Bg3 e3 83.fxe3 Kxg3 0-1
48.Bf8 was tougher keeping an eye on the h6 pawn. Black now has a neat idea to finish the game
48…e3 49.f3
49.fxe3 Ke4 50.Kf2 Rf3+ wins the bishop
49…h5 50.gxh5 g4
51.c4+
The randomising try that’s a constant feature of any calculations in these positions.
51.fxg4 Ke4 52.Bd6 Rh4 followed by …Rxg4–g2+
51.Bh6 Rxf3 52.Bxe3 Ke4
51…Kxc4
51…Kxd4 52.Bg7+ nudges the Black king away nastily 52…Kxc4 53.fxg4 Kd5 54.Kd3 draws!
52.Bh6
52.fxg4 Kxd4
52.Kxe3 Rxf3+ picks up the bishop
52.Bg7 g3 53.Kxe3 Rh1
52…Rxf3 53.Bxe3 Kd5
is a win for Black. Black picks up both pawns and K,R & g pawn on the 5th vs K & B is a win!
As you can see, White played pretty well before he blundered with first 33.h5+ and then the decisive mistake 35.Bxa3. In essence, White chose the wrong moment to plump for a tactical path to clear equality. Black’s time-consuming queen manoeuvre in the opening …Qd8-a5-h5 gave White a number of tactical chances based on the weakness of Black’s back-rank which he failed to take. After that, it was just a complicated struggle in which Black was for choice and made progress, but was objectively never too far from equality until 33.h5+.
Thank you for this very instructive game! Although I never played the Nimzo, I now and then stumbled over similar structures via the French: 1. e4 e6 2. d4 d5 3. e×d5 e×d5 4. c4 Lb4+ 5. Sc3, and after exchanges later on d5 and c3, plus a knight development Nb8–c6–a5, Black is trying to setup a blockade on c4 and d5 against the White pawns on c3 and d4.
Hi Ulrich, thanks for your comment! With a bit of luck, I’ll be posting a game in your French structure very soon!