
One of the most enjoyable books I’ve read in the past couple of years is “Learn from the Legends – Chess Champions at their Best” by Mihail Marin (Quality Chess). Marin takes 9 great champions – Rubinstein, Alekhine, Botvinnik, Tal, Petrosian, Fischer, Karpov, Kortchnoi and Carlsen – and examines a particular facet of their play in great detail. Some of these are well-known – Rubinstein’s rook endings or Petrosian’s exchange sacrifices for example – but others came as revelations to me. One of these was the examination of Alekhine’s skill in major piece middlegames with Q & R vs Q & R. Marin’s wonderful analysis of Alekhine’s fights with Eliskases, Stahlberg, Keres, Colle, Bogolyubov in this piece configuration made a deep impression of me and increased my respect both for Alekhine and for Marin!
While playing through Alekhine’s Best Games Collection on the train, I came across the game Alekhine-Winter London 1932. This featured a Q & 2Rs vs Q & 2Rs middlegame and Alekhine’s comment on his first move of this middle game was “The objects of this rather profound queen manoeuvre are…” It sounded interesting so I got my pocket chess set out and started to analyse. It turned out to be another Alekhine gem!
We start with the position after Black’s 20th move – 20…axb6
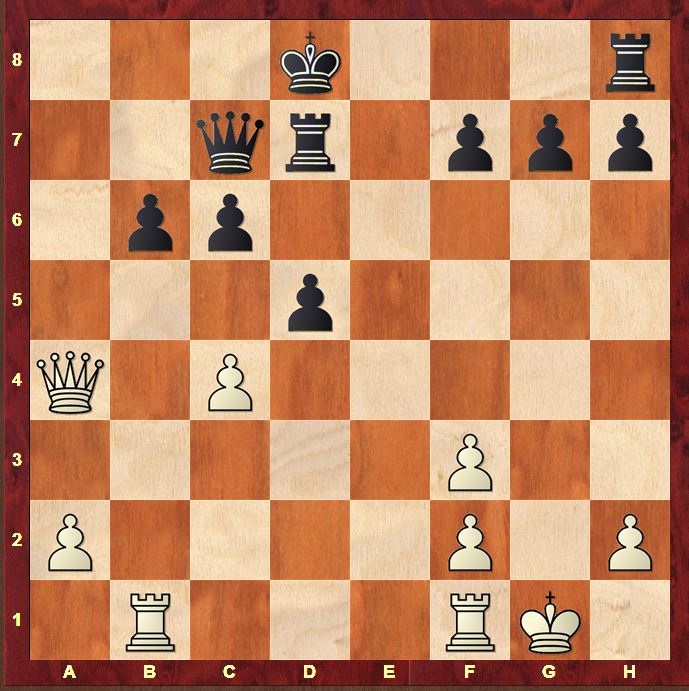
Here Alekhine played the sequence that triggered his comment:
21.Qa8+ Qc8 22.Qa3
I’m not sure whether this sequence was absolutely the best choice in the position, but it shows both Alekhine’s wonderful feel for coordinating his own major pieces and his ability to induce discomfort in the opponent’s position. From a3, the queen cuts across the a3–f8 diagonal, preventing the Black king from making a run for the kingside while also aiming for that lovely soft d6 square. The genius in the move is the follow-up manoeuvre that it prepares: Rb4–a4 activating the White rook with devastating power! Real class!
Winter now played 22…Qb8 which is not the best move. I would like to apply “Sadler’s Rule” here and play 22…Kc7.
“Sadler’s Rule” you ask? Well, I’ll always remember how impressed I was as a 9-year old when my coach Steve Giddins explained “Giddins Rule” to me. “Giddins Rule” stated that in an ending with opposite-coloured bishops, the side with the light-squared bishop has the advantage! Ever since I’ve wanted to immortalise my name in a rule of my own!
Back in my days as a professional, I wrote a book on the Semi-Slav. In preparation for the book, I spent many weeks getting to grips with the super-sharp Botvinnik system: 1.d4 d5 2.c4 c6 3.Nf3 Nf6 4,Nc3 e6 5.Bg5 dxc4 6.e4 b5 7.e5 h6 8.Bh4 g5 9.Nxg5 hxg5 10.Bxg5 Nbd7. After analysing a number of positions deeply, I came to a surprising conclusion which for me has taken the form of a general rule. I can best illustrate it through the game Nikolic-Shirov Wijk Aan Zee 1993.
1.d4 d5 2.c4 c6 3.Nf3 Nf6 4.Nc3 e6 5.Bg5 dxc4 6.e4 b5 7.e5 h6 8.Bh4 g5 9.Nxg5 hxg5 10.Bxg5 Nbd7 11.g3 Bb7 12.Bg2 Qb6 13.exf6 0–0–0 14.0–0 c5 15.d5 b4 16.Na4 Qb5 17.dxe6 Bxg2 18.Kxg2 Qc6+ 19.f3 Qxe6 20.Qc2 Ne5 21.Rae1 Rd4 22.h4 Bd6 23.a3 Qd5 24.Qf5+ Kc7 25.Re2 Kc6
This game – and many others like it – in the Botvinnik convinced me that the king should always be placed on the rank behind his pawn cover, even if those pawns are on the 4th rank! The worst thing you can do is to leave the king on the back rank: the opposing queen is perfect for getting between your pawn cover and the king in such situations. If your king is close to its pawns, then the opposing queen will find it much tougher to get at your king. And that my friends, is “Sadler’s Rule”! Nikolic was of course powerless against it!
26.b3 c3 27.axb4 cxb4 28.Ra1 Nd3 29.Qxd5+ Rxd5 30.Re4 Kb5
31.Rc4 Re8 32.Ra2 Ne1+ 33.Kh3 Nxf3 34.Rxc3 Nxg5+ 35.hxg5 Rh8+ 36.Kg2 bxc3 37.Nxc3+ Kc6 38.Nxd5 Kxd5 39.Rxa7 Ke6 40.Ra4 Rg8 41.Rg4 Be5 0–1
This is why the move 22…Kc7 really appeals to me. Rather than leave the king on the back rank far away from the pawn on d5 in front of it – which invites a White queen check on d6 (note how cunningly Alekhine has put his queen on the a3-f8 diagonal) – it is better to bring the king closer to the pawns even though at first sight it brings the king closer to the danger zone. It’s at moments like this that the words of Wilhelm Steinitz need to be remembered: “I maintain that the king is a strong piece that can usually take care of itself”
Right back to the position after 22…Kc7
White now has a choice of 2 moves: 23.Rb4 and 23.c5.
23.Rb4
Implementing Alekhine’s fabulous idea at once. Black has to be very careful. He has 5 plausible options but most of them lead to disaster!
a) 23…dxc4 24.Ra4 b5 is a tough defence to crack. It took me a good while to find the right idea.
After 25.Ra7+ Kb6 26.Qa5+ Kc5 27.Ra6 Rd3 (27…Rd4 is also decent) I couldn’t find a way to break this… and nor could Stockfish!
25.Ra6 is very neat however, threatening simply to dismantle Black’s queenside pawn chain. It’s impossible to stop!
25…Re8 26.Qa5+ Kd6 27.Qxb5 Re6 and now better than my 28.Qb4+ when 28…Ke5 29.Qc3 Kf5 gives near-equality according to Stockfish(!) is 28.Qa5 Ke7 29.Ra8 with a continuing attack
b) 23…Qb7 looks plausible, but Black just gets destroyed
24.Ra4 Kb8 25.c5 b5 (25…bxc5 26.Qxc5 Kc8 27.Qa3 I’d missed this switchback which wins immediately. Thank you Stockfish!) 26.Ra6 wins.
c) 23…Rd6
I thought that this sharp counterattacking attempt, aiming to bring both the rook and the queen to bear on White’s weakened king’s position might work, but White has a fantastic reply
24.Ra4 Reopens the a3–f8 diagonal for the queen. Very important!
24.c5 Rg6+ 25.Kh1 bxc5 26.Qa7+ Kd6 Finished I thought. Stockfish finds a way to keep the game alive for White! 27.Rc4 dxc4 28.Rd1+ Ke6 29.Re1+ Kd5 30.Qxf7+ Re6 31.Rd1+ Ke5 32.Re1+ is a lovely engine draw
24.Rfb1 Rg6+ 25.Kh1 Qh3 26.Qa7+ Kd6 really does win for Black here
24…Rg6+ 25.Kh1 Qh3 26.Ra7+ Kb8 27.Ra8+ Kc7 28.Qe7+ The key point!
(28.Qa7+ Kd6 wins for Black) 28…Qd7 29.Ra7+;
d) 23…d4
This was the first idea I had high hopes for. However, it isn’t the most accurate move order.
24.Rfb1 (24.Ra4 c5 transposes to 23…c5) 24…Qb8 (24…Qb7 25.Qa5
Which I’m proud to say I spotted in 1 second flat. I think Stockfish still beat me though…
25…Ra8 (25…bxa5 26.Rxb7+ Kd6 27.c5+ Ke7 28.Re1+) 26.Qe5+ Kc8 27.Rxb6 Qc7 28.Qxg7 is pretty grim for Black)
25.Qb2 (25.Qa6 was my thought to transpose back into 24…Qb7 after 25…Qb7 but… 25…b5 26.cxb5 Qb6 is Stockfish’s solution which doesn’t look so terrible after 27.Qa3 c5 28.Rc1 Rc8 29.Rbc4 Kb7 30.Rxc5 Rxc5 31.Rxc5 d3) 25…Re8 26.Kf1 (26.Rxb6 Re1+) 26…b5 27.cxb5 c5 28.Ra4 is a much more dangerous version according to Stockfish.
e) 23…c5
Finally Black’s best move!
24.Ra4 d4 25.Rb1 Kc6 (25…Rhd8 was my line, but I missed a massive tactic 26.Ra5
Wow!! When I see it on the board, it makes sense! This stops the Black king from running to the kingside (26.Ra7+ Kc6 27.Qa4+ Kd6 28.Rxb6+ Ke7 was my intended line with no problems for Black) 26…Kd6 27.Rxb6+ Ke7 28.Rxc5)
26.Ra6 Rb7 27.Rb5 Qf5 28.Qa4 Qg5+ 29.Kf1 Qc1+ is a draw
So I started to examine the other obvious attempt against 22…Kc7: 23.c5
Again Black has a number of reasonable alternatives but only 1 to survive!
a) 23…bxc5 24.Qxc5 There’s no immediate win to be honest, but Black is never going to be able to sort out the weakness of his king. Practically speaking, Black will lose most games from here.
b) 23…b5 24.Qa5+ Kb8 25.a4 Qd8
This was the first idea I had in the position which was based on an incredibly sneaky tactic. Unfortunately White has the choice either of keeping control or… just falling into my trap!
First of all 26.Qd2 stops …Qg5+ and prepares to capture the b-pawn 26…Rb7 27.axb5 Rxb5 28.Rxb5+ cxb5 29.Rb1 wins
And secondly after 26.Qa6 Qg5+ 27.Kh1 Qf6 28.Rb3 Ra7 29.Qb6+ Ka8 30.axb5 Rb8
my incredibly clever idea winning the queen is not so clever after 31.bxc6 (31.Qxc6+ Qxc6 32.bxc6 Rxb3) 31…Rxb6 32.cxb6
32..Qxc6 33.bxa7 Qa6 34.Rfb1 when Stockfish prefers White. The Black king will never get off the a-file!
Black does have a much better continuation however
c) 23..Qa8 24.cxb6+ (24.Qe3 bxc5 25.Qxc5 Rb8 Black is better-organised here than after 23…bxc5 24.Qxc5 and should hold) 24…Kb7
I spent a while thinking about this position and decided that Black should just be fine. White wants to get a rook to the a-file but he just doesn’t have the time. Stockfish agrees – in fact he even gives Black the edge
25.Qc5 Qf8 26.Qa5 Qa8 27.Qd2 (27.Qc5 Qf8 is Stockfish’s top line with a draw) 27…Qa3 28.Rb3 Qd6 29.a4 Ra8 30.a5 d4
Back to the game now where Winter played 22…Qb8
23.cxd5 cxd5
This feels wrong: with 2 rooks on the board White can line up very powerfully against the Black pawn weakness in front of Black’s king
23…Rxd5 was a better attempt and now Alekhine’s 24.Rfd1
a) 24…Rxd1+ 25.Rxd1+ Kc8 is a very brave attempt to keep Black’s pawn structure intact. 26.Qa4 b5 (26…Kc7 27.Qf4+; 26…Qc7 27.Qa8+; 26…Qb7 27.Qg4+ Kb8 28.Rd7 Qa6 29.Qf4+ Ka8 30.Qxf7 Not won yet, but obviously very unpleasant for Black. More pawns will drop; 26…Kb7 27.Rd7+) Qa5 (27.Qg4+ Kb7 28.Rd7+ Ka6 and now something with a4 at some point was my idea. Not bad, but Stockfish prefers another way) 27…Qb7 28.a4 b4 29.Rd4 is the Stockfish way with a big initiative
b) 24…Re8 25.Rxd5+ cxd5
Now Alekhine recommended 26.Rd1 Qe5 27.f4 but that didn’t feel convincing while I was reading his book and it isn’t! Simply 27…Qe6 28.f5 Qd7 looks completely fine for Black
26.Rb5 is stronger
1) 26…Kc7 was my original way of applying “Sadler’s Rule” 27.Rxd5 Kc6 (27…Re1+ 28.Kg2 Qe8 was another idea 29.Qa7+ Kc6 30.Rd3 The king is still in great danger) and now
28.Qd3 Re1+ 29.Kg2 Qe8 30.Rd6+ Kc7 31.Qd4 Qb5 This was my main line for a while: the threat of …Qf1+ ensures a draw.
However
28.Rd1 Stops …Re1+ and leaves the Black king very awkwardly exposed
2) 26…Re5 – Stockfish’s choice – is the best as 27.Qf8+ Kc7 28.Qxf7+ Kc6 gets the king off the back rank while keeping maximum pawn cover!
Now back to the Alekhine game after Winter’s 23…cxd5. The rest of the game is simply stunning.
24.Rb4
Such a great move! Ra4 is coming in as White freed this square for the rook with the manoeuvre Qa8+–a3! It also prepares Rfb1 lining up against the b6 pawn of course.
24…Qd6 25.Re1 Rc7 26.Qb3 Re8 27.Rd1 Re5 28.Rxb6 Rc6 29.Rxc6 Rg5+ 30.Kh1 Qxc6 31.Re1
Notice how many “small moves” White has played, as if shifting his weight from one foot to the other:
Q moving from a4–a3(via a8)-b3
Re1–d1–e1(and c1-b1 to come)
These “small” manoeuvres are very typical for major piece middlegames, also for the defensive side
31…Qf6 32.Qb8+ Kd7 33.f4 Rg6 34.Qe8+ Kc7 35.Rc1+ Kb6 36.Rb1+ Kc5 37.Qb5+
1–0
Stellar play from Alekhine! I’d be so proud to be able to play a game like that!
Postscript 7th May 2016
In my most recent book review column for New in Chess, I raved about Sergei Tiviakov’s latest Chessbase DVD entitled “Learning from the World Champions”. One of the sections is dedicated to Alekhine’s prowess in Q & R vs Q & R endings – a familiar theme after this article I hope!
I had a Eureka moment while listening to Sergei as he explained what Alekhine was doing! He demonstrated that the attacking side in such endings should always try to check the king from a side that the defending player cannot block with his rook. I won’t show you all the examples he gave – you need to buy the DVD for that! – but I have to share the Alekhine game he used to illustrate this technique.
Alekhine,Alexander – Lokvenc,Josef
Prague 1943
White is on the attack but he faces a tricky dilemma as his own king is exposed to checks from the back rank by the opposing queen. A check from the back with 35.Qf8+ can be covered by 35…Rf6 as 36.g4+ Kxg4 37.Qxf6 Qb1+ leads to a draw by perpetual check. Alekhine comes up with an amazing idea to keep the attack going, both protecting his king from checks and reigniting White’s attack from an area that Black’s rook is not yet covering. If you can spot it, you’re doing well!
35.Qc1
Covering the back rank
35…a5 36.Qf1
Preparing to come out to h3 and check the Black king from the side. The game remained complicated and Black did very well to keep himself well in the game until he blundered on move 42.
36…Rh6 37.h3 Ke6 38.Rd3 Qc2 39.gxf4 Rg6+ 40.Kh2 e4 41.Re3 Kf5 42.Qe1 Kxf4 43.Rc3 Qa4 44.Rc5 Qxa3 45.Qd2+ e3 46.fxe3+ Qxe3 47.Rc4+ Kf3 48.Rc3 Qxc3 49.Qxc3+
and White won
Armed with this knowledge, you can better understand the point of the fantastic manoeuvre Qa8-a3 + Rb4-a4 in the Alekhine-Winter game in the main article. Trying to check the Black king on the d-file was useless as the rook on d7 was there to block. With his manoeuvre, Alekhine went round the side and tried to check from the a-file!