
In this column, we continue our examination of episodes from the ROC Nova College Open in July. Going into the last round I was leading with 4,5 / 5 after a tightly-controlled win with Black against the second seed GM Maxim Turov. I had been expecting to play another GM but the pairing system threw up an unexpected pairing against a 2200 player. I had really struggled earlier in the tournament against opponents of this strength, and the last round wasn’t any different. We join the game after 23 moves in a position that is interesting both from the chess and the psychological point of view. As always, a playable version of this game is available at http://cloudserver.chessbase.com/MTIyMTYx/replay.html
Sadler,Matthew D – Vroombout,Enrico
Haarlem Open 2017
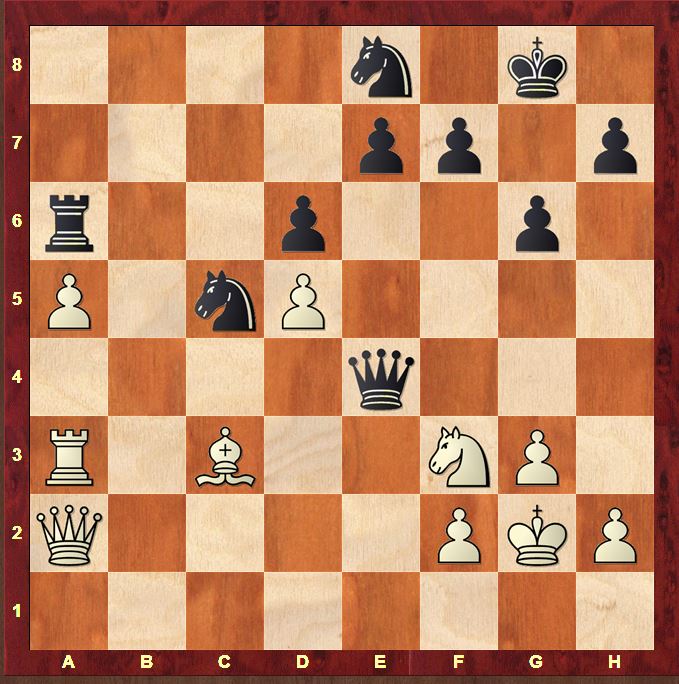
22…Bxc3 23.Bxc3 Qxe4
A typical Benko position has resulted from Black’s exchange of his dark-squared bishop for White’s queen’s knight in order to regain his gambit pawn. The position is delicate for both sides: White must react smartly to prevent Black from picking up the d5 pawn as well (which he is threatening to do with …Nc7 and …Qxd5) while Black’s position is loosened greatly by the absence of the dark-squared bishop.
It’s worth spending some time understanding the relative strengths of both positions. The strength of Black’s position rests on 3 factors:
- Black’s queen on e4 is a fantastic piece, pinning the White knight on f3 (and thus preventing it from playing any positive part in the game) while attacking the pawn on d5 (which has suddenly become weak after its support on e4 was kicked away) and tying down the White queen to its defence.
This situation reminds me of the Minority Attack against the Carlsbad structures of the Queen’s Gambit Declined which we analysed in great deal in “Chess for Life” in the chapter on Keith Arkell. In that opening, once the c6 pawn was captured, the d5 pawn it was supporting tended to disappear too. Take Keith’s game against the Scottish IM Steven Mannion.
1.Nf3 Nf6 2.d4 d5 3.Bg5 Nbd7 4.e3 e6 5.c4 Be7 6.cxd5 exd5 7.Nc3 0–0 8.Bd3 Re8 9.Qc2 c6 10.0–0 Nf8 11.Rab1 Ne4 12.Bxe4 Bxg5 13.Bf5 Bf6 14.b4 g6 15.Bxc8 Rxc8 16.Qb3 a6 17.a4 Ne6 18.Rfd1 Bg7 19.Rbc1 f5 20.g3 Qd7 21.Ne2 Nd8 22.b5 axb5 23.axb5 Nf7 24.bxc6 bxc6
25.Nf4 Nd6 26.Nd3 Nc4 27.Nd2 Nd6 28.Rc2 Ne4 29.Nf3 Qe6 30.Rdc1 Rc7 31.Nf4 Qf7 32.Rxc6 Rxc6 33.Rxc6
33…Ra8 34.Nxd5
34…Kh8 35.Rc7 Qg8 36.Rb7 g5 37.Ne7 Qxb3 38.Rxb3 1–0 Arkell,K -Mannion,S London 1987
Here also in this position, White runs the risk of not just losing 1 pawn back, but 2!
- The Black knight on c5 is another splendid example of what the Romanian GM and writer Mihai Marin calls “stable pieces”. The knight is well-placed on an outpost from which it cannot be driven away by pawns. Why is the knight well-placed? It dominates the White rook very effectively depriving it of access to a variety of light-squares such as b3 (which means the rook cannot activate itself on the b-file). The knight also reinforces Black’s blockade of White’s passed a-pawn on a5.
- Black’s pawn structure has maintained its integrity through the opening and early middlegame: compare that to the mess that White has made of his structure. This restricts the entry points available to White’s pieces for now and keeps Black’s king reasonably safe despite the absence of Black’s dark-squared bishop
What has White’s position to offer?
- A passed pawn on a5. It’s a major trump, restricting the activity of Black’s rook, while also making a number of endings attractive for White.
- A variety of tactical factors: the Black rook’s position on a6 means that Black’s back rank is open for invasion, the Black king is missing the protection of the dark-squared bishop, the queen on e4 – while excellently-placed – is vulnerable to attack by the White rook (in particular, a rook move to the e-file would win the unprotected e7 pawn behind the Black queen)
As we shall see, during the game I focused on the tactical factors and neglected the endgame factors and this led me into some difficulties.
So far for the chess aspects. As for the psychological aspects, we enter now a typical sequence in a game between a high-rated player and his lower-rated opponent. The lower-rated player has emerged unscathed from the opening and the resulting middlegame position has limited opportunities for complication: several pieces have been exchanged and pawn breaks from White are unlikely. In general, the first task of the higher-rated player in such situations – apart from playing good moves – is to induce doubt in his opponent. It is essential to make the opponent feel the complexity of the situation and taste the doubt of choosing between equivalent continuations. Without this doubt, a sensible 2200 player nowadays is completely capable of playing such positions to a very good level. Ideally, the pressure should come from all angles: via the position, and via the clock. I managed the second part reasonably, driving my opponent onto increments after having fallen behind on time in the opening phase, but I felt during the game that I was handling the first part very averagely. I felt that I was consistently a move too late with my threats!
24.Ba1
From afar (calculating on the 20th move) I was very pleased with this idea, which both sets up Qb2 – with the dual threat of mate on g7 / h8 and invasion on Black’s 8th rank – and the unexpected Re3, hitting the queen on e4 and the pawn on e7 behind it. However, Black turns out to have an easy way to defend against both threats. At home, I felt that
24.Bd4
might have carried more danger in a practical game
24…Nf6
24…Nc7 was less disastrous than against 24.Ba1 which is why I decided against 24.Bd4 in the game. 25.Qb2 Ra8 26.Bxc5 dxc5 The key defensive point that makes this playable for Black is 27.Qb7 (27.Re3 Qb4) 27…Qb4 which is a horrible resource to save the day for Black!
25.Re3 Qxd5
Black’s standard “lucky” tactical resource, getting out of White’s attack with gain of tempo by attacking the loose queen on a2
26.Qe2
Supports the rook in hitting e7 while introducing the additional threat of Bxc5, exploiting the loose rook on a6
26…Rxa5
26…e5 27.Bxc5 is the point of playing the bishop to d4
26…Nfe4 27.Bxc5 Nxc5 28.Rxe7
27.Rxe7
27.Bxf6 exf6 28.Re8+ Kg7 29.Qe7 Ne6 is distressingly safe for Black. Black also threatens …Ra3 hitting the knight on f3
27…Ncd7
It feels a little dangerous for Black, but actually it isn’t! The alternative IS very dangerous however:
27…Nce4 28.Qb2 Ng5
28…Ra2 29.Bxf6
29.Qb8+ Kg7 30.Qh8+
30…Kh6
30…Kxh8 31.Bxf6+ Kg8 32.Re8#
31.Qxf6 Nxf3
32.Qxf3
32.Be3+ Ng5+ 33.Kg1 Qd1+ 34.Kg2 Qd5+ is also just a draw
32…Qxd4
still looks like a draw amazingly enough! 33.Qxf7 Qd5+ 34.Qxd5 Rxd5
28.Rxd7 Nxd7 29.Qe8+ Nf8
unfairly holds for Black, and with his knight on f3 pinned by the magnificent queen on d5, it will take White too much time to bring this piece into the game (which he really needs to cause pain to Black’s position
Of course 25.Bxf6 is still possible instead of 25.Re3, transposing into the game and is probably the best move. Why did I feel that 24.Bd4 might have been a better practical move than 24.Ba1? Doesn’t it just lead to the same thing after 24…Nf6 25.Bxf6? The point is that 24.Ba1 is a clear 50–percenter. Black just has to spot that 24…Nc7 loses to 25.Qb2 and then he can make the move 24…Nf6 by elimination (“the other one loses so I have to play this”). After 24.Bd4, it is less clear-cut whether 24…Nc7 or 24…Nf6 is the better move and the pressure on the knight on c5 gives Black the extra necessity of checking ideas with Qe2 (as occurred after 24…Nf6 25.Re3 Qxd5 26.Qe2). In my opinion, 24.Bd4 fulfils the criteria of instilling doubt a little better than 24.Ba1, but I agree that it isn’t a 100% clear thing.
Anyway back to the game after 24.Ba1:
24…Nf6
24…Nc7 25.Qb2
25.Bxf6 exf6
Here however, I definitely lost my way for a few moves. The exchange on f6 has fundamentally changed an aspect of the position and White needs to understand whether this should alter his approach to the position.
White’s general approach with 24.Ba1 was to play on the tactical weaknesses in Black’s position – the back rank unprotected by the Black rook, the long a1–h8 diagonal bereft of cover by a dark-squared bishop, the exposed queen on e4 and the loose pawn on e7 behind it – with Black’s king as the eventual target. After 25.Bxf6 exf6, the following has happened. First of all the tactical factors:
- The weakness along the long diagonal has been camouflaged. The doubled pawn on f6 blocks the a1–h8 diagonal
- Since the pawn on f6 blocks the a1–h8 diagonal, Black’s king has gained a safe spot on g7. This means that Black’s weakness on the back rank is also reduced. At the very least, it will cost White a lot more effort to achieve something there.
- Black’s weak e7 pawn has disappeared: Black’s queen on e4 is no longer tactically vulnerable to Re3.
Now the positional factors:
- Black’s pawn structure has been ruined. Black is no longer able to create a passed pawn on the kingside due to his doubled f-pawns. It also means that losing the d5 pawn is also less serious for White from a positional viewpoint. As we shall see in the game, when Black manages to capture the d-pawn, he no longer frees a beautiful flowing pawn structure but simply a rather manky isolated d-pawn. White has much more leeway for mistakes than before the exchange (thank goodness for me in this game!)
Another important point is that positions without queens automatically become extremely tempting for White. For example, if we remove the queens from the board, White has an exceedingly strong outpost on c6 which can no longer be undermined by …e7–e6. Once the knight gets to c6, the a5 pawn is protected which frees the rook to invade Black’s position either via the b-file or the e-file. White’s king might also be interested in heading towards b5.
In the game, I appreciated this last change too little. Part of my problem was that White still has some dangerous threats! I got started on trying to make them work, and I didn’t have the presence of mind to step back at some stage and consider a different approach. Possibly the result of some nerves, possibly due to an overwhelming desire to win which interfered with the search for the best plan in the position.
26.Re3
Another 50–percenter, and this time there’s no doubt that it’s not the right way to play. White wants to force his pieces to the 8th rank and Black has a choice between 2 moves: 26…Qa4 and 26…Qb4. In fact, Black only needs to spot that 26…Qa4 is awkwardly met by 27.Qb2 to make the choice for 26…Qb4 relatively obvious (it stops Qb2)
26.Qd2 was White’s best move
a) 26..Qe8 27.h4
27.g4 Qa8 28.Nh4 was an interesting idea that attracted me. The idea is that while Black is placing his pieces on the queenside, White opens up the 3rd rank to swing his rook across to the h-file. However, it doesn’t seem to work that well. Even against 28…Nb7! 28…Nb7
28…Ne6 29.Kg3 Nc7 is Komodo’s solution!
29.Nf5 gxf5 30.gxf5 Rxa5
30…Qf8 31.Qb2 hitting b7 and f6 is quite nasty 31…Qe7 32.Re3
31.Rg3+ Kf8 (31…Kh8 32.Qh6) 32.Qh6+ Ke7 33.Re3+ Kd7 34.Qxf6 Qg8+ followed by …Qf8 or …Kc8 holds easily for Black
27…h5 28.Qf4 Qa8 29.Qxf6 Qxd5 30.Qc3
followed by Kh2 and Ng5 still gives White something to play for thanks to his passed a-pawn
b) 26…Kg7 27.Qd4
I’m not claiming an advantage here for White, but the threat of exchanging queens on e4 and then playing the knight to c6 IS serious. Komodo’s evaluation jumps to +1.33 if you give White the move again in this position! This means that Black is forced to regroup his queen and choose himself a new disposition of his pieces.
27…Qe8 28.g4
28.Nd2
is a different White regrouping made possible by the queen vacating d2. The knight can come to c4 (attacking d6 and defending a5) or e4 (if the Black knight moves from c5) while the rook can also come to f3 attacking f6 together with the queen on d4 and possibly with a knight on e4
28…Qb5 29.Rf3 (29.Nc4 Nb3 followed by …Nxa5 works for Black unfortunately) 29…Nd7 30.Ne4 Qxa5 31.Nxf6 Ne5 32.Ne4 Qa4 just holds for Black
28…Qd8 29.g5 Nd7 30.Nd2 Rxa5 31.Rxa5 Qxa5 32.Ne4 Qd8 33.Nxd6 Kg8
is even, but you can see at least that Black has been put under pressure from some unexpected areas!
26…Qb4
26…Qa4 27.Qb2 requires some precision from Black to survive
a) 27…Qxa5 28.Qxf6 Ra8 29.Ng5 Rf8 30.Nxf7 wins;
b) 27…Rxa5 28.Qxf6 is strong for White as the d6 pawn falls too;
c) 27…Ne4 28.Qe2;
d) 27…Nd7 28.Qb7 Rxa5 29.Re8+
29.Re7 Ra7 is a typical defence for Black: the queen and rook combine excellently on the a-file.
29…Kg7 30.Qc8
An excellent square for the queen, which can check a Black king on h6 from c1, or from h3 if the knight moves from d7
30…Rc5 Blocking the queen’s access to c1
30…Rxd5 31.Rh8
is a nasty and unexpected line. Qg8+xh7+ is the deadly threat
30…Ne5 31.Rg8+ Kh6 32.Qh3+
31.Rg8+ Kh6 32.Qe8
The knight on d7 is pinned as the Black queen is no longer protected by the rook on a5 which means that Black cannot defend f7 with …Ne5. I thought this was just winning but Komodo still finds a draw!
32…Rc3 33.Nh4
33.Qxf7 Rxf3 34.Qg7+ Kg5 35.Qxh7 Rxf2+ is Black’s simplest way to the draw
33…Qg4 34.h3 Qh5
Attacking d5
35.Qxf7 Rxg3+
is just ridiculous!
36.fxg3
36.Kxg3 Qg5+ 37.Kh2 Qxh4 38.Qg7+ Kg5 39.Qxd7 Qxf2+ with perpetual
36.Kh2 Rc3 also leads to a draw
36…Qe2+ 37.Kg1 Qe1+ 38.Kh2 Qf2+ 39.Ng2 Ne5 40.Qf8+ Kh5 41.g4+ Kg5 42.h4+ Kxg4 43.Qc8+ Kh5 44.Qc3 Nf3+ 45.Kh3 Ng1+ 46.Kh2 Nf3+
with a perpetual… but good luck finding that during a game!
e) 27…Kg7 28.Qb8
and now Black needs to find the excellent move 28…Ne4 blocking the e-file, in order to survive without too much trauma. Komodo thinks that the repetition 29.Qb1 Nc5 30.Qb8 is the logical end to the game. 28…Nd7 29.Qc8 Rxa5 30.Re8 is the line after 27…Nd7 above (this was the move order in which I’d calculated it)
Back to 26…Qb4
27.Qe2
My idea, threatening Re8+ and Qe7 but Black has a variety of defensive moves to anticipate this threat: 27…Ra8, 27…Kg7 and the game continuation, covering the e7 square and attacking d5 again.
27…Qb7
28.Qd2
28.Re8+ Kg7 29.Rd8 Qxd5 30.Qe8
was my original intention, but to my horror I now saw that this wasn’t even an interesting attacking attempt
30…Ne6 Black’s only move
31.Qh8+
31.Qg8+ Kh6 32.Qxf7 Nf4+ (32…Qxf3+ also wins!) )
31…Kh6 32.h3 deals with the threat against the rook on d8 (32…Nxd8 33.Qf8+ Kh5 34.g4#) but after 32…Rxa5 White has nothing. …Ra3 is coming!
So it was time to call a screeching halt to the all-out major pieces on the 8th approach and to try to go back to manoeuvring out some new advantages. However, I’ve fiddled around for a few moves and Black has lined up on my a- and d-pawns so I’m in a much worse situation now than if I’d played 26.Qd2. What irritated me the most was that with 26.Re3, I’ve virtually forced Black into a very solid deployment of his queen to b7 / a8 instead of making Black think of it himself. In the next stage of the game, I try to keep the game going while trying not to do anything too disastrous. The fact that Black’s pawn structure has been ruined helps me to do this. However, objectively Black is heading towards an advantage now.
28…Qa8 29.Re7
29.Ra3 Nd7 worried me: the knight is simply coming to b6! I decided that activity would worry Black more.
29…Rxa5 30.Qf4
30.Qd4 was my original intention, but I thought it would be more challenging if I attacked 2 pawns instead of 1!
30…Qxd5
30…Ra7 is possible as 31.Rxa7 Qxa7 32.Qxf6 (32.Qxd6 Ne4 wins for Black!) 32…Ne4 33.Qd4 Qxd4 34.Nxd4 Nc3 is better for Black
31.Qxf6 Ra8 32.h4 h5 33.Qg5
I didn’t want to do this of course, but I couldn’t see any other way to get my knight on f3 in the game. Of course, Black should have no problems at all after the exchange of queens.
33…Qxg5 34.Nxg5 f6
34…Rf8 was what I was expecting with a very safe position. Black can’t really exploit his extra pawn but White can’t do anything either. The text kept me vaguely interested
35.Nh7
35.Ne6 is an immediate draw, but I thought I could keep things alive just a little longer
35…f5
35…Ne4 was the move I’d expected with an immediate draw after 36.Rxe4 Kxh7 37.Re6
36.Ng5
Objectively, Black is still 100% fine, but of course with a rook on the 7th and a stable, well-placed knight on g5 there’s a little something to keep White motivated. Pretty much anything should work here for Black, but he should just take care not to let the White king get active. However, play on increments and the tension and tiredness of the last round began to take its toll.
36…Ra2 37.Kf3 Nd3 38.Ne6 Nxf2 39.Rg7+ Kh8 40.Rxg6 Nd1
Essentially the decisive mistake – I think Black had missed that the king can move forwards out of the mate threat. After that, it’s a very difficult position to hold with just increments.40…Ne4 was still fine for Black, though it’s got a bit messier than it should
41.Kf4 Rf2+ 42.Kg5 Rf3 43.Kf6 Nc3 44.Kf7
An amazing transformation. My parents, watching the game at home couldn’t believe their eyes as the computer had been rather pessimistic about my position until then!
44…Kh7 45.Nf8+
1–0
Thank you for such indepth & instructive analysis – particularly enjoyed your psychological approach against such a determined opponent.
Hi Matthew, thanks a lot! Those are always the most instructive and enjoyable games to analyse… although rather more so when you just made it in the end! Such moments always make me think how fragile life as a chess professional is: how you look back at a whole tournament depends on an opponent losing his way in the final seconds of the last round game. A couple of moves different and all you feel is frustration. Glad I always have work on Monday to distract me when that happens! Best Wishes, Matthew