
My second game of the 4NCL weekend was a tough battle against Andrew Lewis. As Black, I won a pawn in the opening but never quite managed to neutralise the compensation White enjoyed due to his 2 bishops and my awkwardly-placed queen.
As always a playable version of this article is available at http://cloudserver.chessbase.com/MTIyMTYx/replay.html
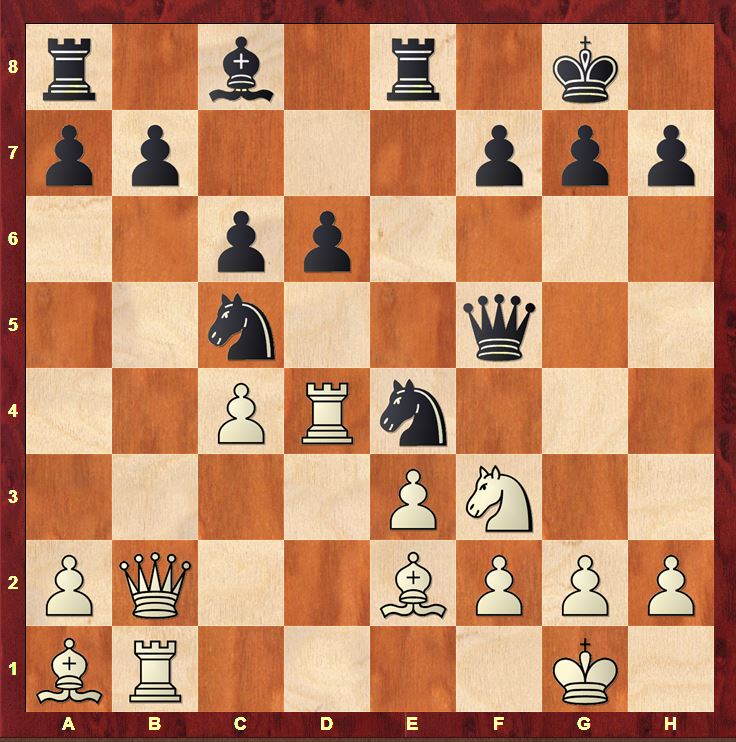
Lewis,Andrew P – Sadler,Matthew D
4NCL 2016
19…f6
After a nervous period between moves 12–18, I felt that I was starting to establish a grip. However, an unstable feature of my position stopped me relaxing too much: my knight on e4. This knight fulfils a crucial role. Firstly, it protects my (extra) pawn on d6. Secondly, it exerts a restraining influence on White’s centre. The queen on f5 and knight on e4 combine against the f2 pawn and keep the White knight pinned to its current post on f3. This in turn prevents White from increasing his central presence with f3 and e4 (which would nail down the backward pawn on d6 still further). The knight on e4 is unstable as it is unsupported by a Black pawn and can be easily chased away by the White f-pawn if White can organise it. The next few moves revolve around White’s efforts to activate his f- and e-pawns and Black’s attempts to keep White caged in.
20.Rf1
Protecting f2 and preparing to move the knight away from f3.
20…Qg6
Played quickly. I felt this was a powerful response to White’s last move.
21.Nh4
21.Nd2 Bh3 22.Bf3 Ng5 wins
21…Qh6
From afar, I’d expected 22.Nf3 when 22…Bg4 again prevents Nd2 and prepares to complete Black’s development with …Rad8. While White was thinking, I suddenly realised that 22.g3 actually prepared a concrete idea: Ng2 (defending e3) followed by f3 and e4. I couldn’t immediately find a good response which confused me and made me a little uncertain.
22.g3
22…Be6
22…Bh3 23.Ng2 Re7 24.f3 Bxg2
24…Ng5 25.Rh4 Qg6 26.Nf4 Qf5 27.g4 felt rather embarrassing. I decided that if I played …Bh3, I would most likely need to follow up with …Bxg2
25.Kxg2 Ng5
was the first line I considered. It was a difficult one to assess. From my point of view, I’m upping the stakes by giving White 2 bishops against 2 knights. White’s long-term compensation for the pawn has gone one notch higher. Moreover, White can achieve e4 in this line so the question is whether Black has a way to react immediately. I didn’t fancy Black’s prospects facing White’s 2 bishops with his 2 knights and a wall of pawns on e4 and f3. For example, I was seriously worried about a line like 26.e4 Rae8 27.h4 Nf7 28.Rf2. The engines still consider Black to have a definite advantage but I disagree. Any attempts for Black to break out could easily go badly wrong. The key point as far as I was concerned was whether 26…f5 was a strong response to 26.e4
26.e4
26…f5 27.exf5 Rae8 28.Bd1 Qh3+ 29.Kg1 Re1 30.Qf2
was the main line of my calculations. When I saw that 29…Re1 wasn’t winning on the spot, I had an emotional counter-reaction and decided that the whole line wasn’t good enough. Essentially, I felt that with 26…f5, I was taking an extreme measure to justify giving White 2 bishops versus 2 knights with …Bh3xg2. That measure felt illogical when you consider that I had played …f7–f6 a few moves earlier (move 19 in fact) to explicitly counter White’s threats on a1–h8 diagonal.
I preferred to go for something that felt much more logical: while White was spending vast amount of time preparing f2–f3, I would free myself of my backward d-pawn and solidify my central control by supporting my knight on e4 with a pawn. A pawn on d5 would also prevent White from expanding with e3–e4. 100% logical, but as I realised with mounting concern, the tactics were not wholly in my favour. Back to my move in the game: 22…Be6
23.Qc2 d5
The plan I had envisaged. My knights on c5 and e4 are loose however so the situation remains fraught for a few more moves. And around here, another problem popped up in my head.
24.Ng2 Rac8
So that my knight is protected after f3 …Nd6 or …Ng5, cxd5. However, rather surprisingly my rook is going to be vulnerable on this square.
25.f3
A moment of great relief. After this move, Black’s plan makes perfect sense. By now I’d realised that I had a tactical problem after 25.Nf4.
A.) 25.cxd5 cxd5 26.Nf4 is not possible: 26…Nxf2 27.Rxf2 Ne4 wins! 28.Qb3 Nxf2 29.Kxf2 Qxh2+
B.) 25.Nf4
White’s best idea. It took me some moments to believe that White’s position was hanging together tactically. That disbelief was influenced by a few subjective factors: White has played Qc2–b2–c2, Rf1–d1–f1 and Nf3–e5–f3–h4–g2–f4. How could the tactics possibly work for him after wasting so much time? Another hard lesson in the unfairness of life!
25…Bf7
White now has 2 possibilities. The second one worried me the most. 25…Bf5 26.cxd5 is fine for White: 26…g5 (26…Nxg3 27.Qxc5 is just good for White) 27.Nd3 cxd5 28.Qb2 gives White excellent compensation for the pawn. When I played 19…f6 to block White’s pressure along the a1–h8 diagonal, I never intended to follow up with …g5!
i) 26.cxd5 g5 I realised I needed this move, and that gave me the feeling I’d lost control somewhat. The position is extremely complicated. (26…cxd5 27.Nxd5 was my first shock: there is no good discovery for the knight on c5.)
a) 27.f3
is not too successful
27…gxf4 28.fxe4 fxg3 29.hxg3 Qxe3+ 30.Kg2 Nxe4 31.Rd3 Qc5 is good for Black;
b) 27.Ne6 cxd5 28.Nxc5 b6 29.Qd1 Rxc5
After such a weakness as …g5, White will always have full compensation for his pawn. Objectively the position is balanced, but comparing this position to the position after move 10, White has made a better job of generating play for his pawn than I have of consolidating my advantage! Note that 29…bxc5 30.Rxd5 Bxd5 31.Qxd5+ Kf8 32.f3 is very unpleasant for Black.
c) 27.d6 gxf4 28.d7 Nxd7 (28…fxe3 29.dxe8Q+ Rxe8 30.f3 wins) 29.Rxe4 (29.Rxd7 fxe3) 29…Rxe4 30.Qxe4
This move worried me as 30…fxe3 loses to 31.Qg4+! However, Black has a simple remedy:
30…Re8 31.Qxf4 (31.Qd4 fxg3 32.hxg3 Bd5) 31…Qxf4 32.gxf4 Bxa2
is an edge for Black
d) 27.Bg4
This was the resource that especially worried me during the game (either here or on move 26). White attempts to disrupt the balanced defensive structure that Black has set up with his last 4 moves.
27…gxf4 28.Bxc8 Rxc8 29.dxc6 Rxc6 30.Rxe4 Nxe4 31.Qxe4 fxe3 32.fxe3 Re6 33.Qg4+ Qg5 is Komodo’s best line for equality)
ii) 26.Bg4 g5
26…Rc7 27.cxd5 is very inconvenient as the rook on c7 is directly in the firing line after 27…g5 28.Ne6 (or 28.d6) Black has no choice but to dive into complications.
27.Bxc8 gxf4
During the game, I couldn’t decide how to assess this position. It seems to be fine but not better.
28.Bf5
28.cxd5 transposes back to 26.cxd5 g5 27.Bg4;
28.Qe2 is a remarkable idea of Komodo’s. Needless to say, I had no inkling whatsoever that this was possible! 28…Qg6 29.f3 Ng5 30.Rxf4 Rxc8 31.Rxf6 Qd3 32.Qxd3 Nxd3 33.h4 Ne6 34.cxd5 cxd5 is Komodo’s line (equal)
28…fxe3
28…f3 29.cxd5 cxd5 30.Rfd1 Komodo, followed by Rxd5
29.fxe3 Qxe3+ 30.Kg2 dxc4
I’ve spent a lot of time analysing this line. I was worried about Black’s king, but he seems to have plenty of resources
31.Qd1
was the main line I looked at, with the dual threat of activating the queen on g4 and invading on d8 with the rook. It also anticipates Black’s main (and very dangerous) attacking idea.
31…Bd5
This is it! But White is ready!
32.Rxd5 cxd5 33.Qxd5+ Kg7
33…Kf8 34.Bd4 Qd2+ 35.Rf2 Nxf2 36.Bxc5+ wins
34.Bd4 Qd2+ 35.Rf2 Re5
Blocking the a1–h8 diagonal with tempo! (35…Nxf2 36.Bxf6+)
36.Qd8 Nxf2 37.Qc7+ Kg8
37…Kf8 38.Bxc5+ Rxc5 39.Qxc5+ Ke8 40.Qxf2
38.Qxh7+ Kf8 39.Qh8+ Kf7 40.Qh7+ Kf8
is a draw. A line I analysed in the train and the engines didn’t find any better – pretty pleased about that!
25…Nd6
One move and everything has changed: Black’s position makes perfect sense again. His pawn on d5 holds back White’s advance e3–e4 and his knight on d6 is ready to jump to c4 or f5 and put pressure on e3. On top of that, the tactics are going Black’s way again.
26.cxd5 cxd5 27.Rh4
27.Nf4 Bf7 28.Nxd5 no longer works due to 28…Ne6 The knight on d6 protects the rook on c8 which means White no longer has the tactic Ne7+. I managed to finish off the game safely, helped by White’s severe time trouble.
27…Qg6 28.Qd1 Qf7 29.Rb4 Nc4 30.Bd4 Bh3 31.Qc1 Ne6 32.Bxa7 b6 33.Rxc4 dxc4 34.Bxb6 Rc6 35.Ba5 Qa7 36.Bc3 Qxa2 37.Rf2 Qa6
The last difficult moment: this move eliminates any last measure of looseness in Black’s position and prepares the transfer of the knight to d3 via c5.
38.Nh4 Nc5 39.Qd2 Nd3 40.g4 Rb6 41.Qc2 Reb8 42.Bd1 Rb1 43.Nf5 Rc1
0–1