
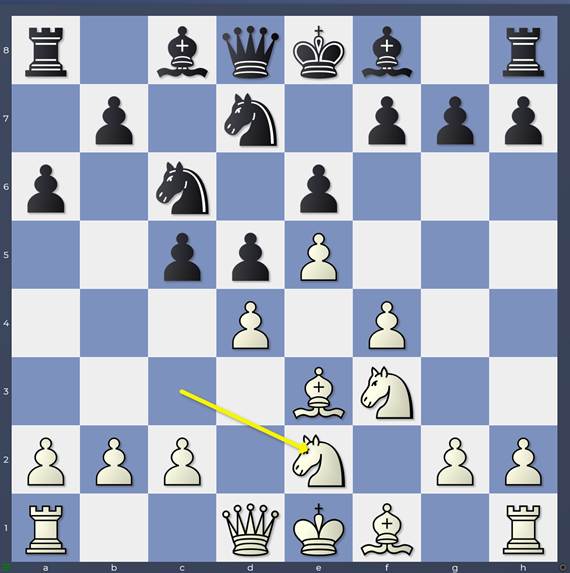
As I’m sure you all know, I’m constantly running engine matches on my cloud machines on all manner of chess topics. Occasionally, I come across a game of which I understand so little that it shocks me! This was the case with this Stockfish-Torch 15”+5’ game played about a week ago.
1. e4 e6 2. d4 d5
My specified moves ended here so the rest of the opening was chosen freely by the engines.
3. Nc3 Nf6 4. e5 Nfd7 5. f4 c5 6. Nf3 Nc6 7. Be3 a6 8. Ne2
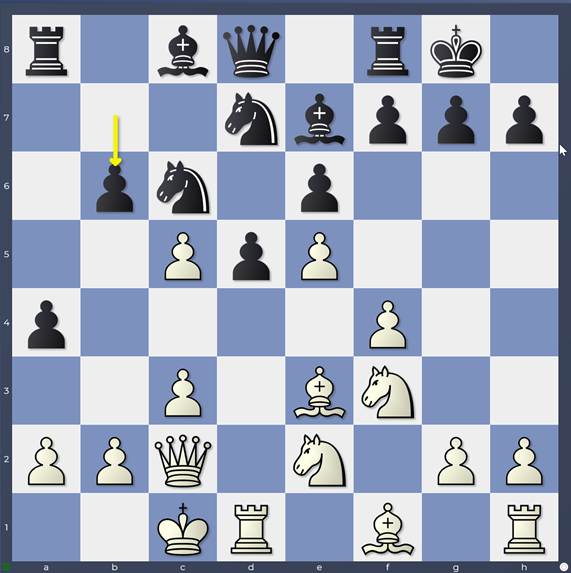
8…Be7 9. c3 a5 10. dxc5 a4 11. Qc2 O-O 12. O-O-O b6
13. cxb6 Nc5 14. h4 Qxb6 15. Bxc5 Bxc5 16. Ng5 g6 17. h5 Be3+ 18. Kb1 Nxe5
19. Nd4 Bxf4 20. Nxh7 Kxh7 21. hxg6+ Kg7 22. Rh7+ Kg8 23. g7 Rd8 24. Bb5 Ng6 1/2-1/2
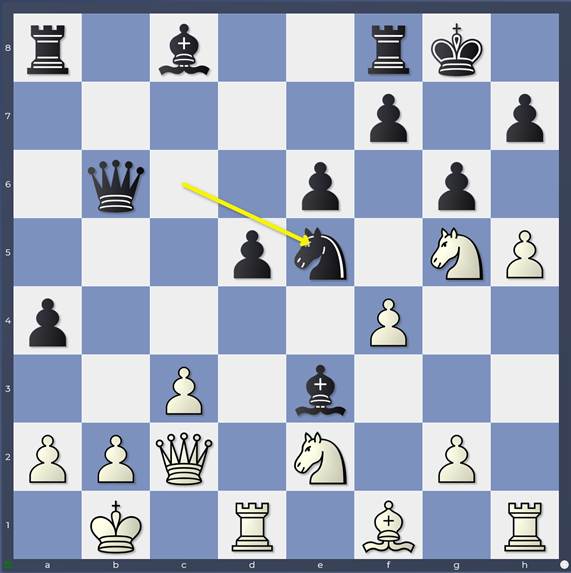
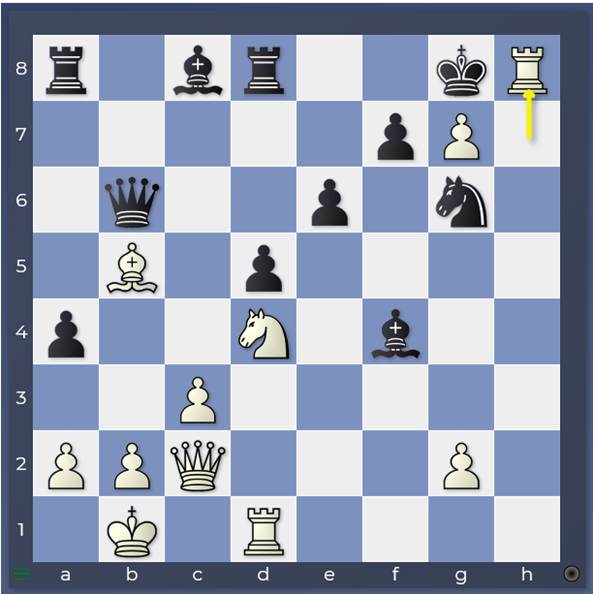
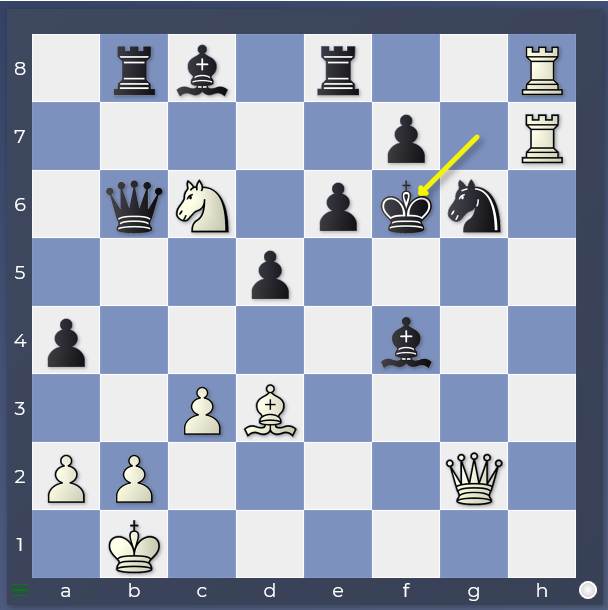
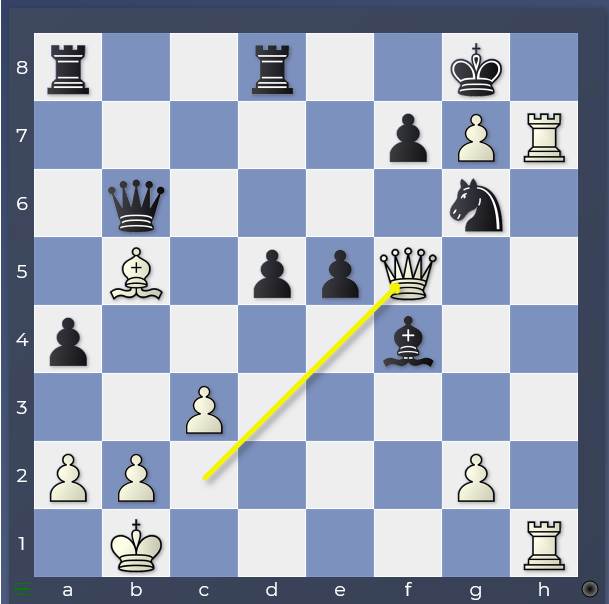
Not only is the game extremely complex, the agreement of a draw in that final position is not something my human brain can fathom! I wanted to try to understand what had gone on before, but it’s impossible to draw any conclusions without understanding the end product. So I started by running a lot of engine games from the 25th move onwards. You won’t be surprised to learn that the result was a draw by repetition but the path to reach it was fascinating and spectacular. We’ll spend the next 3 blog posts on it! Let’s start by considering the position after 24…Ng6.
Black’s last move (24…Ng6) realised 2 defensive tasks: primarily blocking the white queen’s path to h7 (and thus its protection of the rook on h7) and also adding protection to the h8 square (dissuading White from playing Rh8+)
It’s necessary in particular to cover the b1-h7 diagonal as White was threatening 25. Rh8+ Kxg7 26. Qh7+ Kf6 27. Qh4+
On the one hand, it feels frustrating to divert a knight that could join in the siege of the b2–square from c4 to defensive duties, but 24…Ng6 also contains a drop of poison by enabling …e5, undermining the white knight’s support of the bishop on b5 and also connecting the black queen with its kingside along the 3rd rank.
25. Rdh1
An almost automatic reaction, but it’s worth mentioning Black’s response to 25.Rh8+
Variation: 25.Rh8+
We see that 24…Ng6’s value was not in covering the h8-square 25…Nxh8 26. gxh8=Q+ Kxh8 27. Rh1+ Kg7 28. Qh7+ is winning for White with the lovely 28…Kf8 (28… Kf6 29. Rf1) 29. Nc6!
Variation: 29.Nc6
covering e7 and threatening mate on h8 as the tactical point. However, having blocked the white queen’s access to h7, Black is actually able to meet 25.Rh8+ with 25…Kxg7!
The key question after 25.Rdh1 is what White’s biggest threat is.

Game: 25.Rdh1
It isn’t obvious! White has limited control of Black’s kingside dark squares. A sequence like Rh8+ …Kxg7, R1h7+ is met simply by …Kf6 and the king escapes.
White’s key idea however here is 26.g3! Let’s give White the move and see how that looks!
Variation: White given the extra move 26.g3
For me it was only when the question was put to the bishop that I realised what a key part of Black’s defensive setup it is! 26.g3 opens the second rank and interferes with the bishop’s coverage of the h2-square, which means Qh2 tripling on the h-file is a new and worrying threat. Pushing the bishop from f4 also creates opportunities for the white rooks and queen to combine against f7 in forcing manner. For example, 26… Be5 27. Rh8+ Kxg7 28. R1h7+ Kf6 29. Qf2+ is horrible for Black.
The greedy 26…Bxg3 is best, restricting the white queen’s activity by covering both f2 and h2! However, this is clearly a fragile defensive structure! 27. Qg2 Bringing the queen in touch with both h3 and f3 with gain of tempo. The pressure along the g-file will also prove useful! For example: 27…Bf4 Still blocking the f-file 28. Nc6
Variation: 28.Nc6
A lovely and far from obvious resource
The obvious 28… Qxb5 allows the main idea of 28.Nc6 29. Ne7+ Nxe7 30. Rh8# Opening the g-file with 26.g3 has borne fruit as the queen now protects g7 from g2!
28…Re8 Covering the e7-square 29. Bd3 Lining up on g6 is catastrophic for Black. For example 29…Rb8 looking for a desperado against b2 but it’s all too late (29… Qxc6 30. Bxg6) 30. Rh8+ Kxg7 31. R1h7+ Kf6
Variation: 31…Kf6
32. Rxf7+ Kxf7 33. Qxg6#
Isn’t that lovely? The knight on c6 cuts off the black king’s escape via e7.
Back to the position after 25.Rdh1:
Game: 25.Rdh1
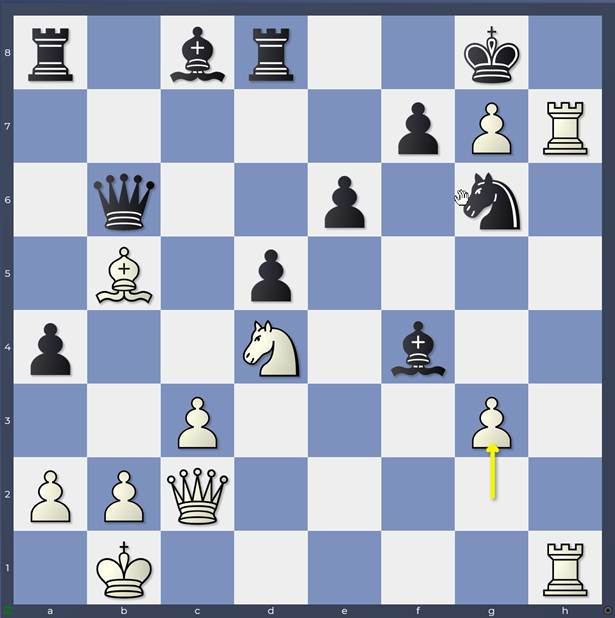
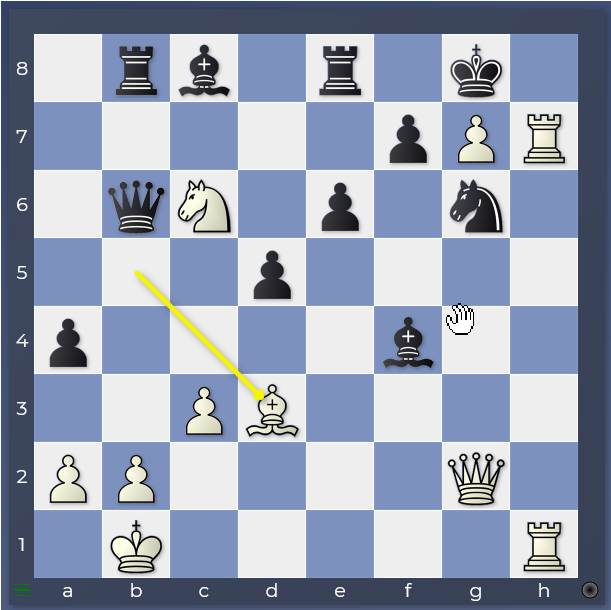
The question arises therefore: how should Black react to this fairly massive buildup on the kingside and the hidden threat of 26.g3? My intuitive reaction would be 25… e5
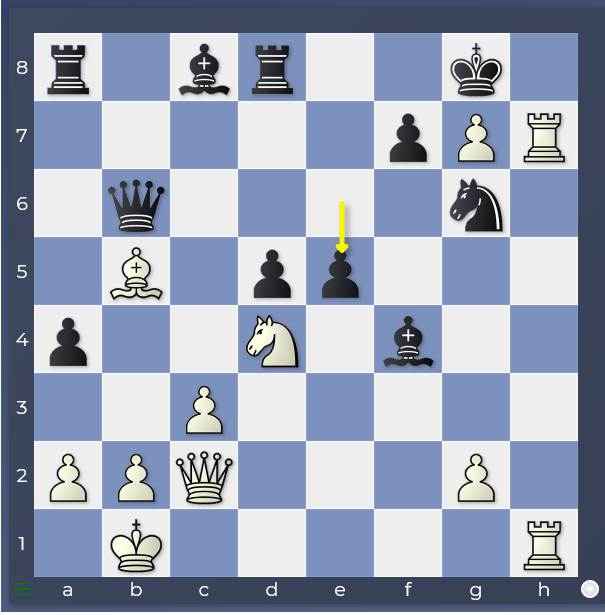
Variation: 25…e5
It looks right doesn’t it? It attacks the knight on d4 which undermines the protection of the bishop on b5 and it solidifies the bishop on f4 which is a crucial defensive piece as we have seen. Crucially also, it links the black queen with the defence of the black kingside by opening the third rank and as a bonus, enables Black’s light-squared bishop to defend some kingside light squares. Sounds like the perfect move right? In fact, it’s a blunder!
26. Nf5 This is a fundamental White attacking resource: the knight on f5 defends g7 and thus introduces the huge threat of Rh8+ 26…Bxf5 27. Qxf5
Variation: 27.Qxf5
This follow-up is very painful for Black as the threat of Rh8+ followed by R1h7+mate is basically unstoppable. 27…Qe6 28. Rh8+ Kxg7 29. R1h7#
So what can Black do? You might naturally start to imagine that Black is already much worse, possibly even losing. Who would think that 25… Rb8

Game: 25…Rb8
would make *so* much difference to Black’s position? Obviously, in general terms you understand that Black wants counterplay on the b-file. But, the queen and rook are both blocked by a bishop on b5, and b2 is defended by the queen on c2… isn’t this just a little feeble and late?
26. g3
Let’s start off with the move that was White’s big threat!
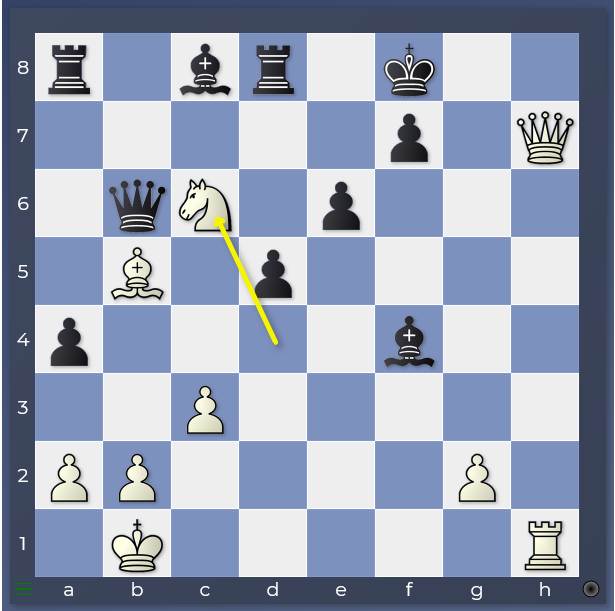
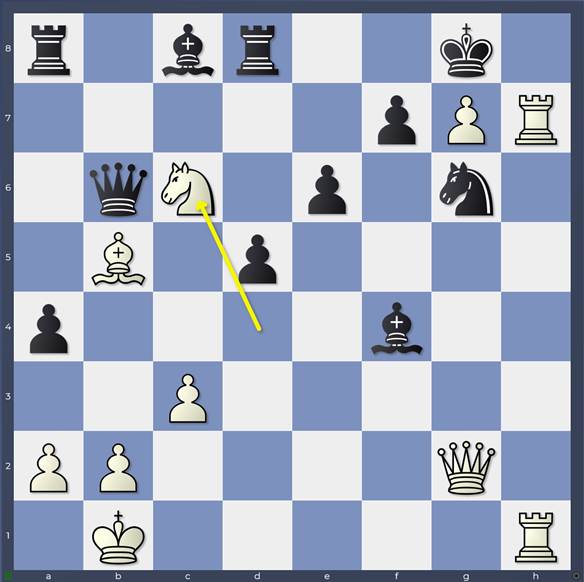
26…Bxg3 27. Qg2 Bf4 28. Nc6
All going the same as we saw so far! I’m threatening Ne7+ followed by Rh8+ mate. As a bonus, after 25…Rb8, 28.Nc6 is forking both rooks!
28…Re8
Covers the e7 square but now…
29. Bd3
Hits the knight on g6.
Game: 29.Bd3
29…Qxc6
Black can desperado with 29… Qxb2+ thanks to 25…Rb8, but 30. Qxb2 Rxb2+ 31. Kxb2 is pretty good for White. So what’s up?
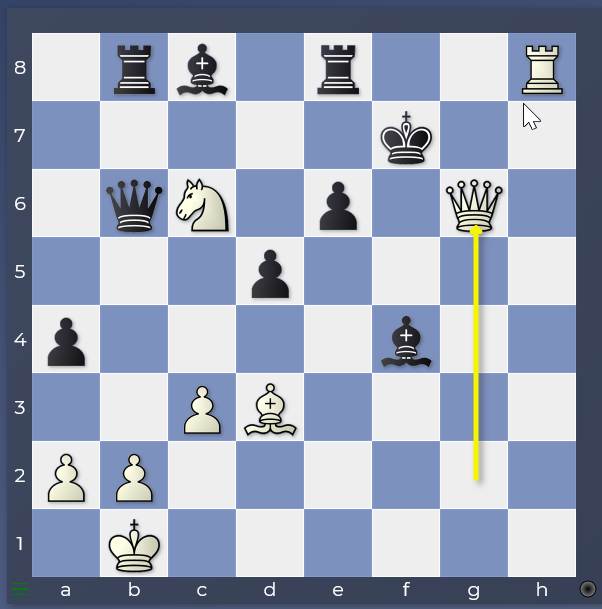
30. Bxg6 fxg6 31. Qxg6
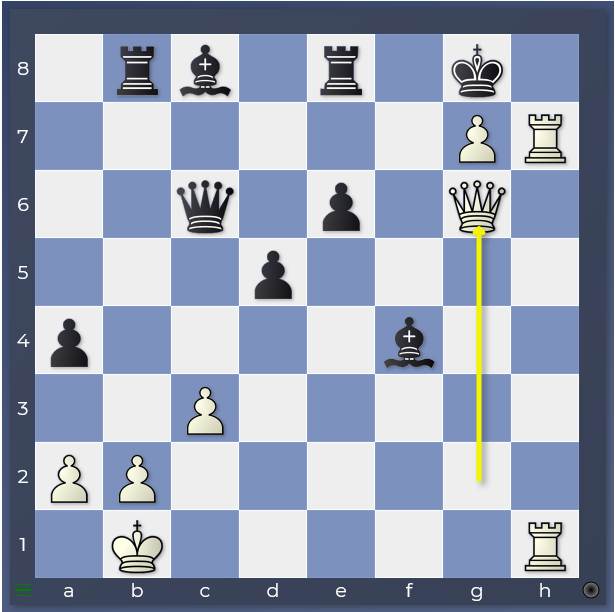
Game: 31.Qxg6
31. Rh8+ Kxg7 32. R1h7+ Kf6 The rook on e8 is defended by the queen on c6!
31… Rxb2+
Game: 31…Rxb2+
When I saw this move, my first thought was “Oh, does he have a perpetual?” No he doesn’t…
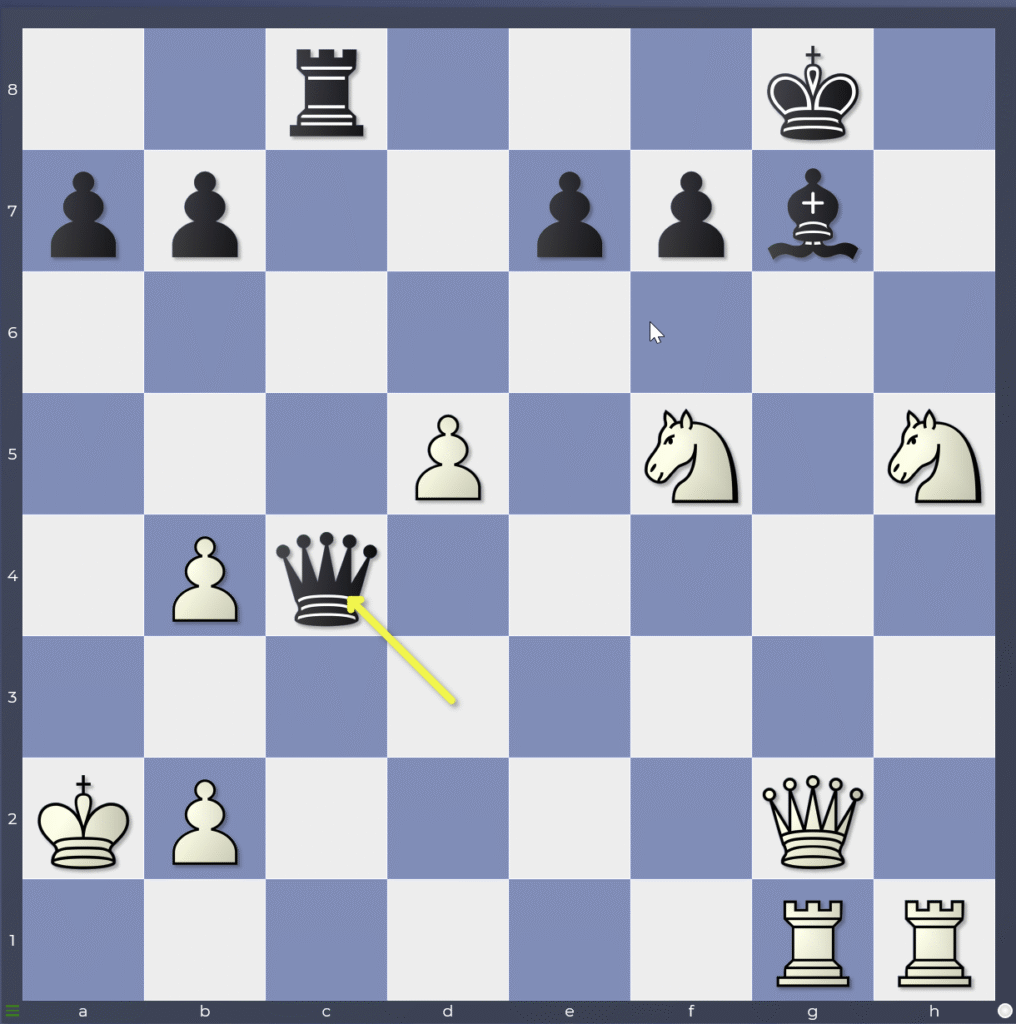
32. Kxb2 a3+
Black has MATE!
33. Kc2 Qa4+
Game: 33…Qa4+
The white king cannot run!
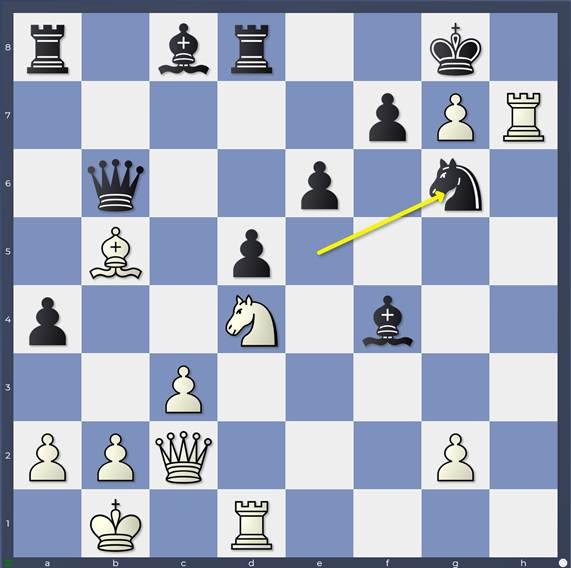
34. Kd3 Ba6+
Simply remarkable! You might play 25…Rb8 on general grounds, but not with much hope that you would ever be able to launch such an attack! In the next blog, we’ll dive deeper into White’s other possibilities at move 26!
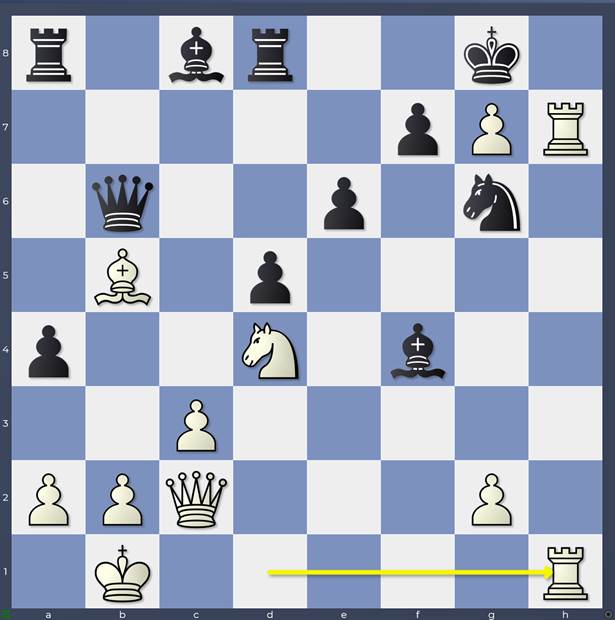
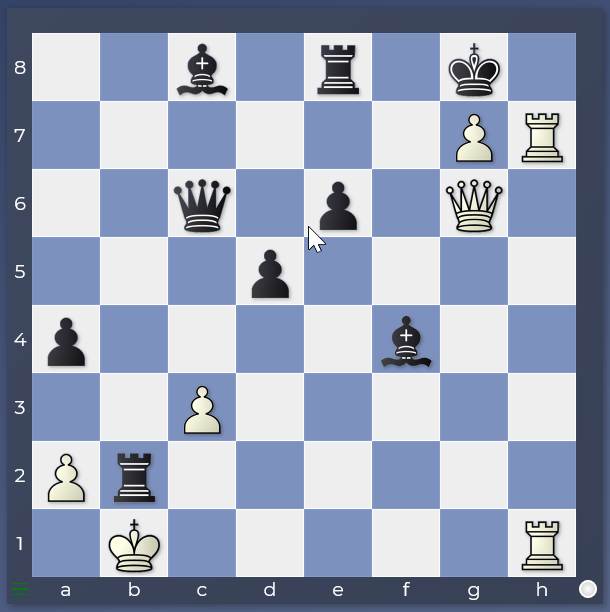
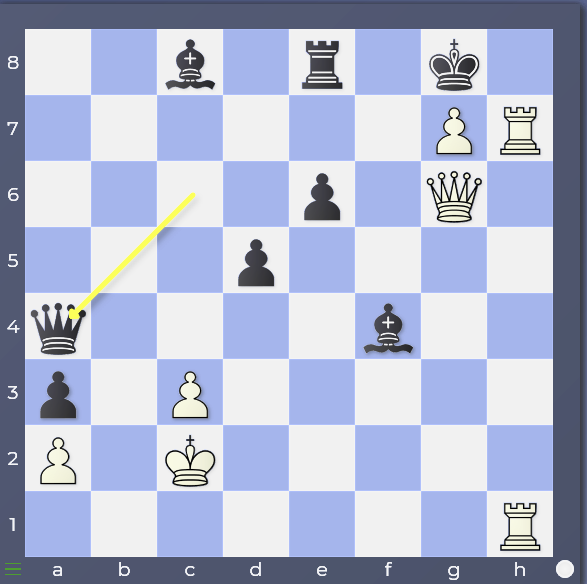
Just as an aside, seeing that position with the white major pieces all around the black king made me think of the end of a thrilling game of mine as Black from Koge 1997 against the Russian grandmaster Yuri Yakovich:
Yakovich-Sadler Koge 1997
Not a win for me, just a draw by perpetual, but I’ve never forgotten the sensation of seeing so many pieces lined up against g7!
Wonderful lines — thanks for posting. I can’t wait to see the next installment. (Small note: your penultimate diagram is wrong.)
Thanks David! Coming up very soon! And thanks for the note about the diagram – I’ll correct! Best Wishes Matthew
Thank you for the effort in putting this together and the exceptional commentary!
Thanks Kevin! Really appreciate that! 🙂 🙂