


Our game this time was played in November 1938 in a tournament organised to celebrate the 60th birthday of one of Sweden’s great chess benefactors.
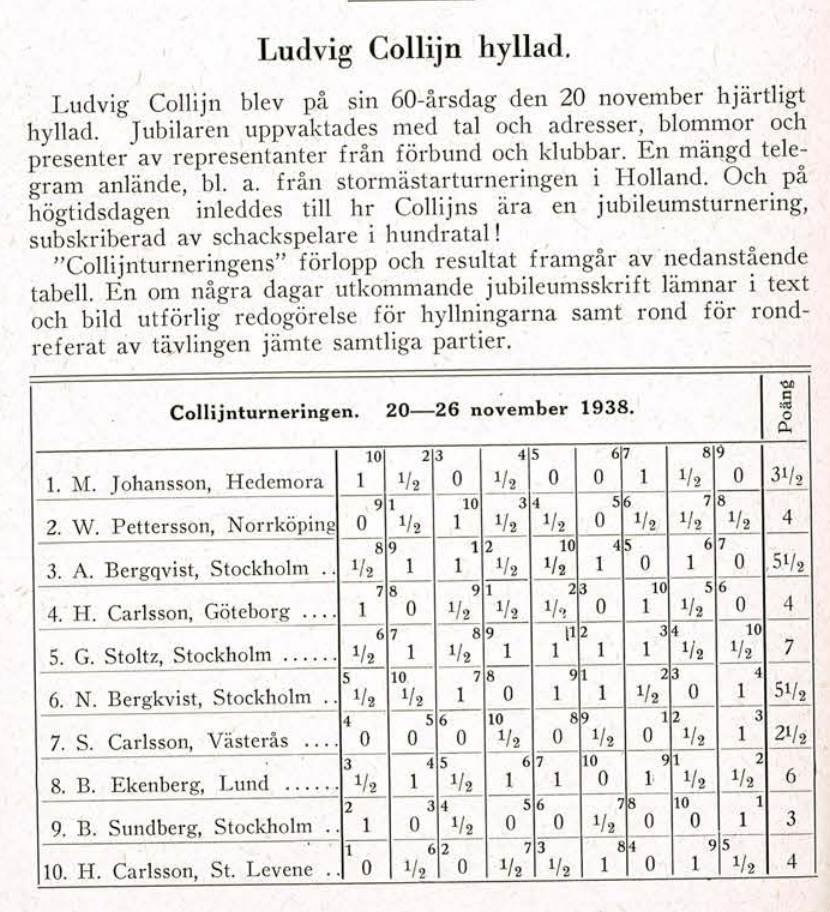
The game was not annotated in Tidskrift för Schack, only the brief description above but a commemorative booklet of the tournament was published through it is unclear whether the games were annotated there. I have located a copy, but I’m wondering whether to part with the vast sums required to own it😉
Carlsson,Sven – Stoltz,Gosta [D33]
Collijn-Turneringen Stockholm (2), 21.11.1938
1.d4 d5 2.c4 e6 3.Nc3 c5 4.cxd5 exd5 5.Nf3 Nc6 6.g3 c4
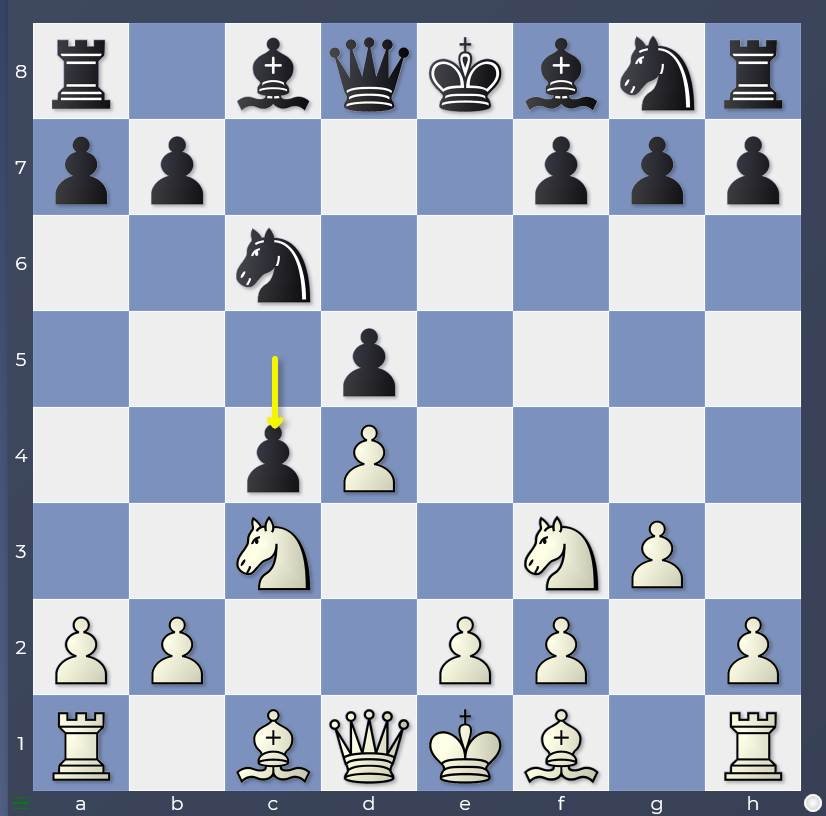
A Stoltz speciality with which he scored +12 =1 -5 throughout his career!
From the aspect of classical principles, this is a poor move. 6…c4 releases Black’s pressure point against White’s centre almost immediately, allowing White to concentrate fully on his own goals which may involve gaining central space or mining the black pawn structure with b3 or e4.
However, by the same token, by taking a committal decision at such an early stage, Black also gives himself an opportunity to realise the optimal development scheme for this pawn structure. Stoltz had come up with the idea of …Bb4 (stopping b3 and dissuading / reducing the impact of e4 by attacking its main supporting piece) followed by …Nge7 (avoiding a pin with Bg5). The knight on e7 also supports …Bf5 fighting for the e4–square and the h7–b1 diagonal. Moreover, …c4 does gain queenside space and Black is ready to build on that with …a6/…Rb8 and …b5 if White plays slowly. And of course, you have to realise that after White achieves the e4–break, and Black responds with …dxe4, The black c4–pawn is weakened and maybe lost but Black does gain a clear target in the shape of the isolated d4–pawn while Black’s pieces are well-placed both to attack the pawn and the light squares around it.
It reminds me a lot of the discussion around the move …c4 in the Torre Attack which I analysed here: https://matthewsadler.me.uk/lessons-from-the-masters/the-mystery-of-c4/ with follow-ups here: https://matthewsadler.me.uk/the-endgame/afraid-of-what-might-be/ and https://matthewsadler.me.uk/attack/understanding-and-knowing/
Stoltz’ concept thus has plenty of merit, and even if it isn’t completely satisfactory, a related idea in the main line – 6…Nf6 7.Bg2 Be7 8.0–0 0–0 9.Bg5 c4 – has proved very effective for Black.
7.Bg2
Stoltz also faced the rigorous 7.e4 dxe4 and now 8.Ng5 a few times in his career. 8…Qxd4 (The clever idea is that 8…Be7 is met by 9.Bxc4 Bxg5 10.Qh5 regaining the piece) 9.Bf4 and now 9…Nf6 10.Qxd4 Nxd4 11.0–0–0 Ne6 is fine for Black as 12.Nb5 Nxf4 13.gxf4 (13.Nc7+ Ke7 14.Nxa8 Ne6 15.Nxe6 fxe6 16.Nc7 Ng4 17.Rd2 g6 threatening …Bh6, activating the rook on h8 is surprisingly awkward for White. The knight on c7 is also not out by the way as …Bd7 will cut its retreat to b5) 13…h6 14.Nc7+ Ke7 15.Nxf7 Kxf7 16.Bxc4+ Kg6 17.Rhg1+ Kh7 18.Nxa8 Bc5 Threatening …Bg4 19.Nc7 Bxf2 is very good compensation for Black
7…Bb4 8.0–0 Nge7
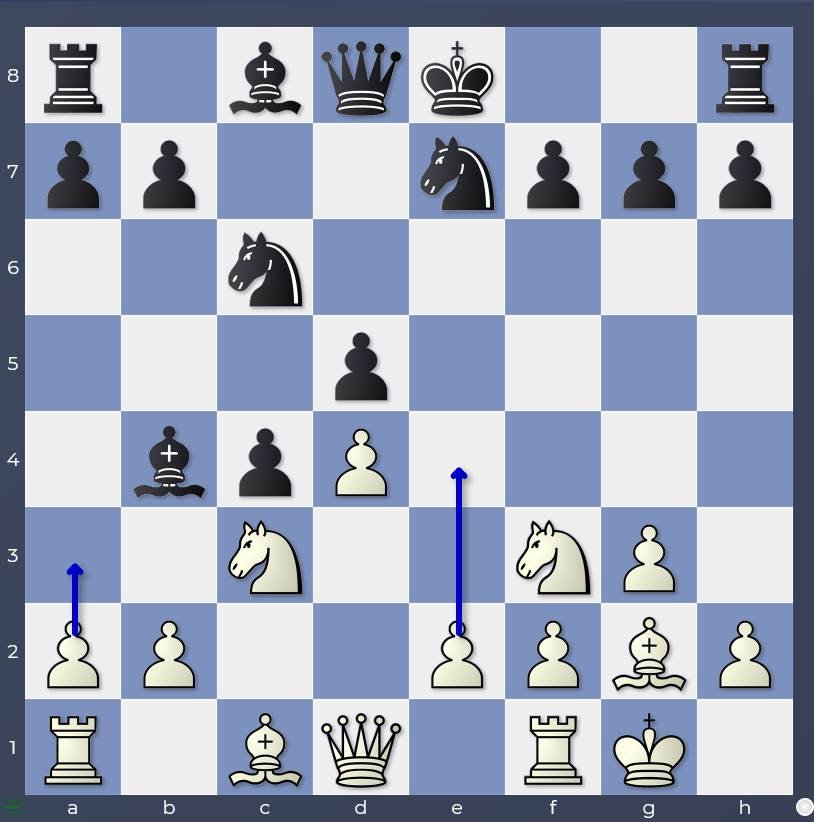
A critical opening choice in the game. Stoltz faced many moves during his career including White’s 2 best ideas: 9.e4 and 9.a3. The move in the game was also tried a lot against him.
9.Ne5
[EB] “Dr Tarrasch believed this move to be a direct rebuttal of the Swedish defence. The move isn’t as energetic as the main line 9.e4 but according to the theorists is still a bit better for White”
9…0–0
White’s general aim by playing 9.Ne5 is to capture on c6, forcing Black to recapture with the pawn, and then play e4, trusting that Black will be reluctant to capture on e4 due to the resulting visible weaknesses in Black’s structure (the doubled c-pawns on c4 and c6), White can then try to intensify pressure against the d5 and c6 pawns (Bg5, Qa4). The general logic is not too bad, but Black’s resources turn out to be considerable, in particular – as Stoltz demonstrates in this game and demonstrated in others – Black’s ability to transform the pawn structure to the advantage of Black’s pieces.
10.Nxc6 bxc6 11.e4
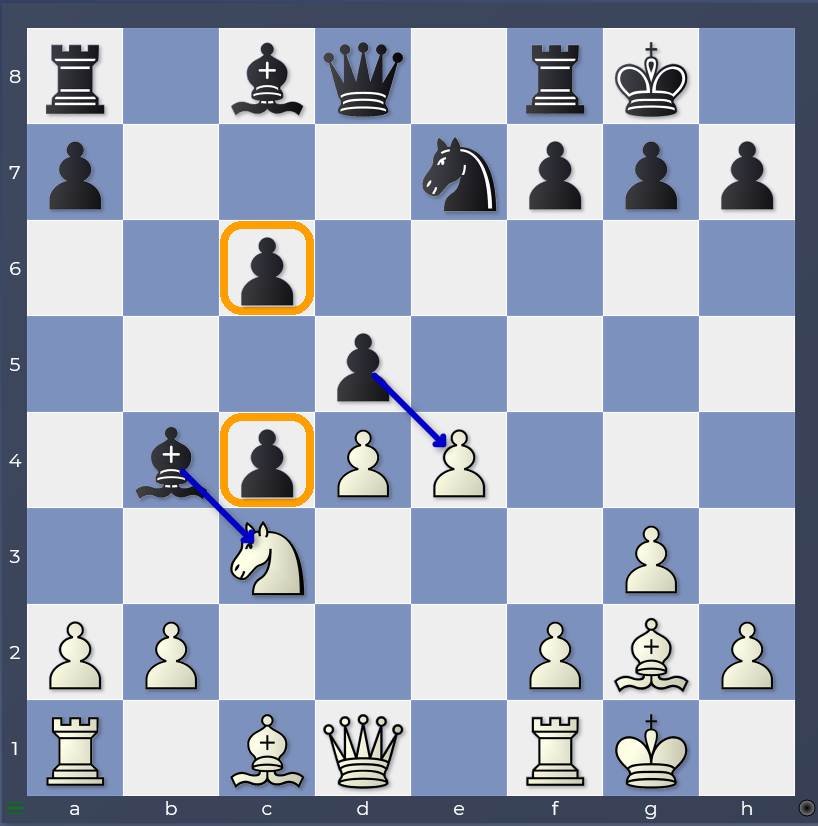
[EB] “Another strategy we could adopt is 11.Na4 followed by b3 to open the c-file and target the backward c6–pawn”
11…Rb8
This is a generally useful move, protecting the b4–bishop, thinking about the b2–pawn and waiting to commit the light-squared bishop according to White’s future direction.
Stoltz tried several moves in this position including the engine’s top move 11…Be6 which is assessed as 0.00. Perhaps most striking of all however was his choice in 1948 against the British master Golombek which directly attempts to implement the strategy he used in this game at a later stage.
11…dxe4 Probably 11…Bxc3 first was a more accurate way of guaranteeing his goal and to avoid giving White the additional resource of 12.Nxe4. 12.Bxe4 Bxc3 13.bxc3 Nd5 14.Qc2 f5 15.Bg2 Be6
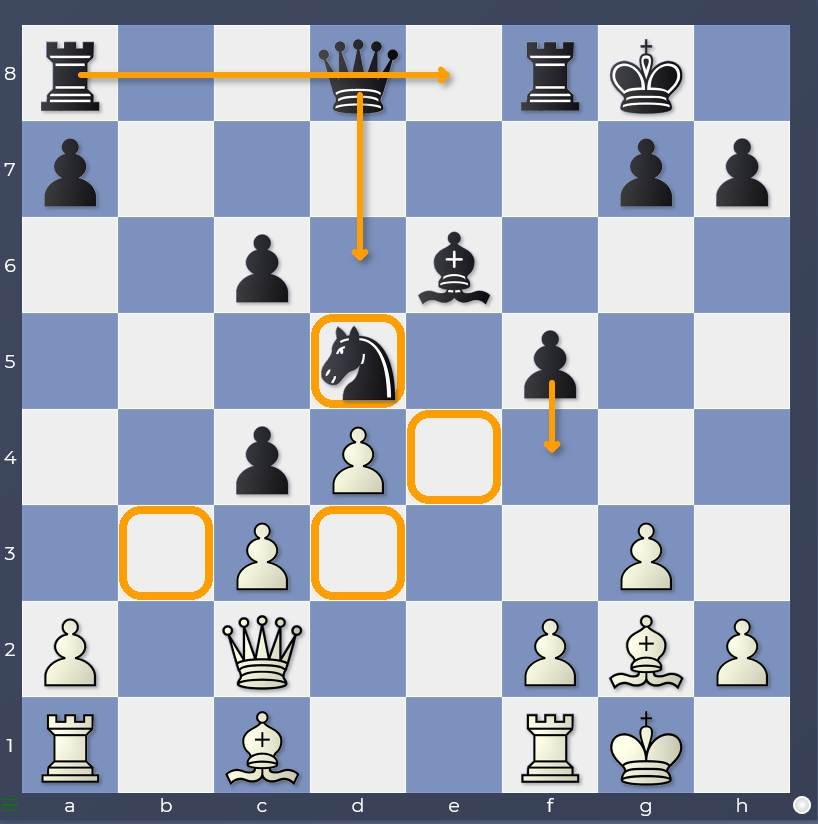
A horrible pawn structure and lots of weak dark squares but look at that white square control! Stoltz intends to mobilise his queen’s rook with …Qd7 or …Qd6 and …Rae8 and then push with …f4. It’s actually a little too much too soon and the engines find some very unpleasant counters but it’s interesting to see the setup that Stoltz generally had in mind for this position. 0–1 Golombek,H-Stoltz,G Karlovy Vary 1948 (2)
12.Qc2
[EB] “For a long time it was believed that a doubled pawn would be weak on c4 after an exchange of pawns on e4. However, Black hasd plenty of choice as to when to make the exchange and the d5–square is an excellent outpost for Black’s pieces in the middlegame and endgame. White should therefore play 12.e5 as in van Scheltinga-Stahlberg Amsterdam 1950, with a slightly freer game and prospects on the kingside.”
I think Book makes a slight error here as van Scheltinga played 12.e5 after 11…Be6, not after 11…Rb8. In any case, it’s hard even with the bare eye to concur with this judgement – White looks nowhere near a kingside attack (with a bishop on g2 pointing to the queenside) while Black has all manner of ways of exploiting his central outposts (…Bf5–d3) and mining the white centre (…c5, perhaps after a preliminary …h6 to stop Bg5). And indeed the engines give Black –0.99(!) after 12.e5!
12…Be6 13.Be3
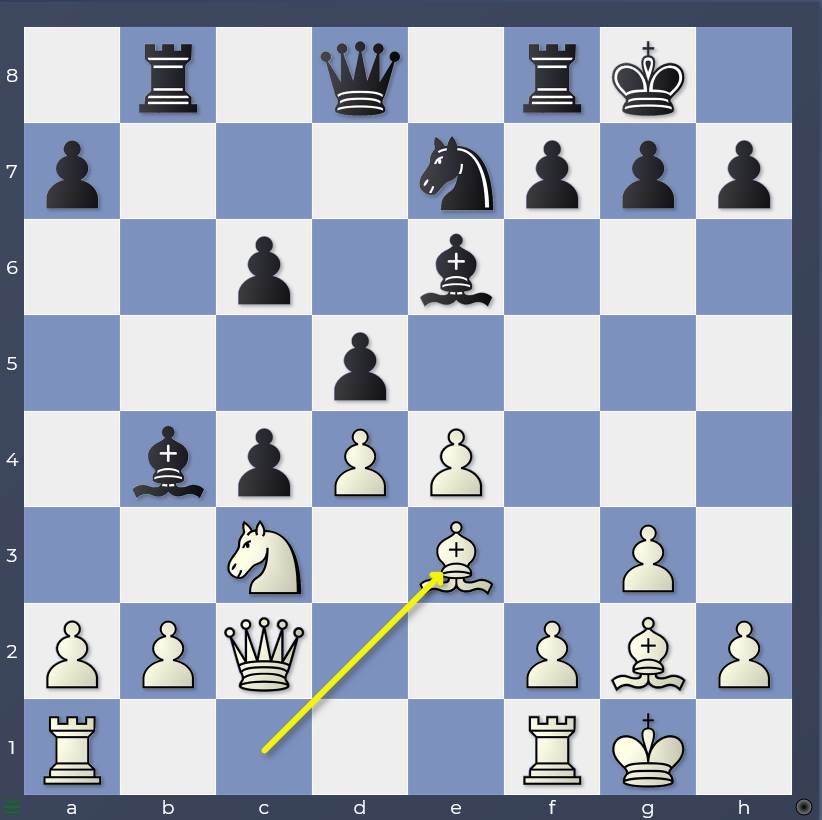
Black has an astonishing number of interesting ways of treating this position. We will see Stoltz implementing the setup he also chose against Golombek 10 years later, but this time in a superior version.
13…Qd7N
Before him, his Swedish colleague Musketeer Erik Lundin played the very interesting a) 13…f5
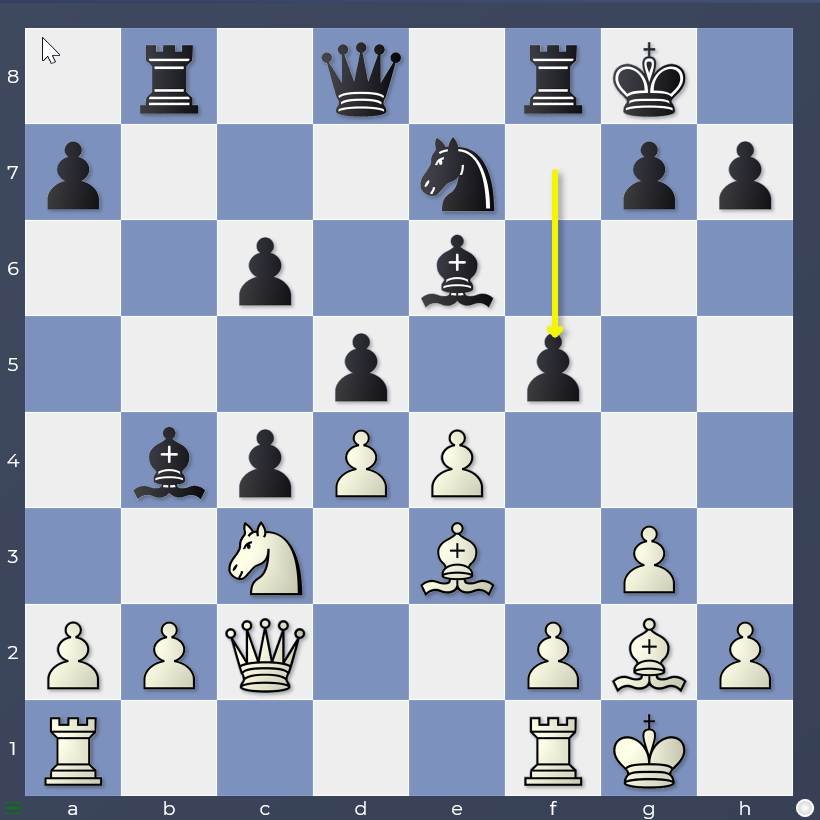
against Reuben Fine and scored a great victory for the Swedish team against the Americans (Lundin had a wonderful result, scoring the gold medal result on his board) 14.exd5 (14.e5 recommended by [EB] is perhaps the most challenging when the engine wants the sacrifice 14…f4 15.Bxf4 Bf5 16.Qd2 Bd3 17.Rfe1 Nf5 claiming full compensation for the pawn for Black.) 14…Nxd5 15.Nxd5 Bxd5 16.Bf4 Bd6 17.Bxd5+ cxd5 18.Bxd6 Qxd6 19.Rfe1 f4 20.Re5 f3 0–1 Fine,R-Lundin,E Olympiad–05 Folkestone 1933 (14.3); And of course the engines suggest b) 13…h5
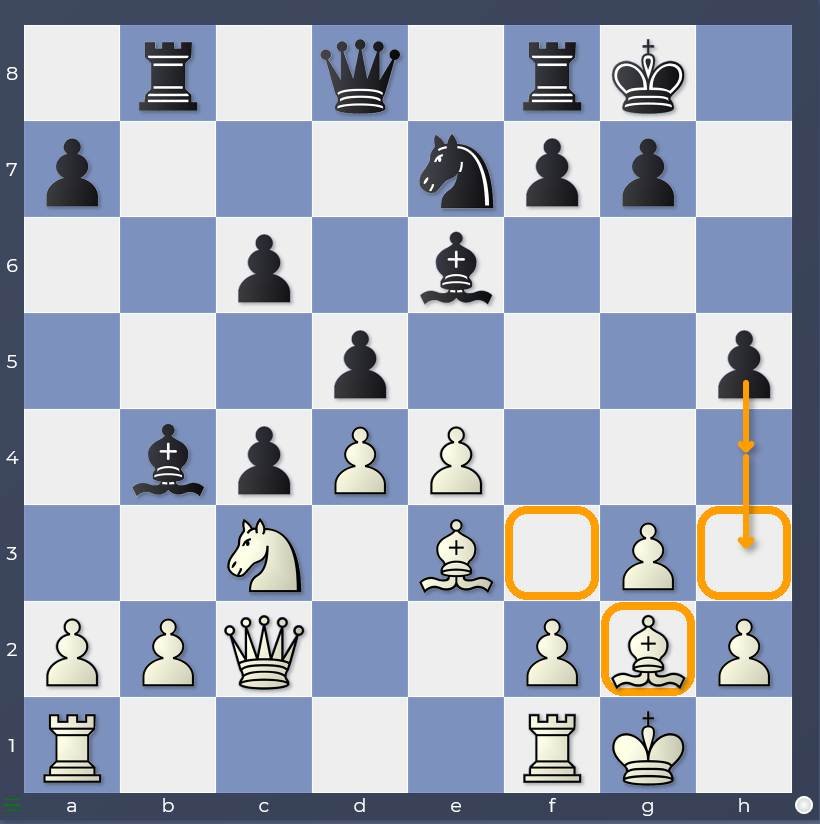
looking to sneak in a quick …h4–h3 to really cause some pain on those kingside light squares! I wonder if that ever occurred to Stoltz and Lundin!? 14.h4 Qd7
14.Rfd1 Bxc3
[EB] “A move typical of this variation. Black exchanges on c3 and e4 and then occupies d5.”
15.bxc3 dxe4 16.Bxe4 f5 17.Bg2 Nd5 18.Qd2
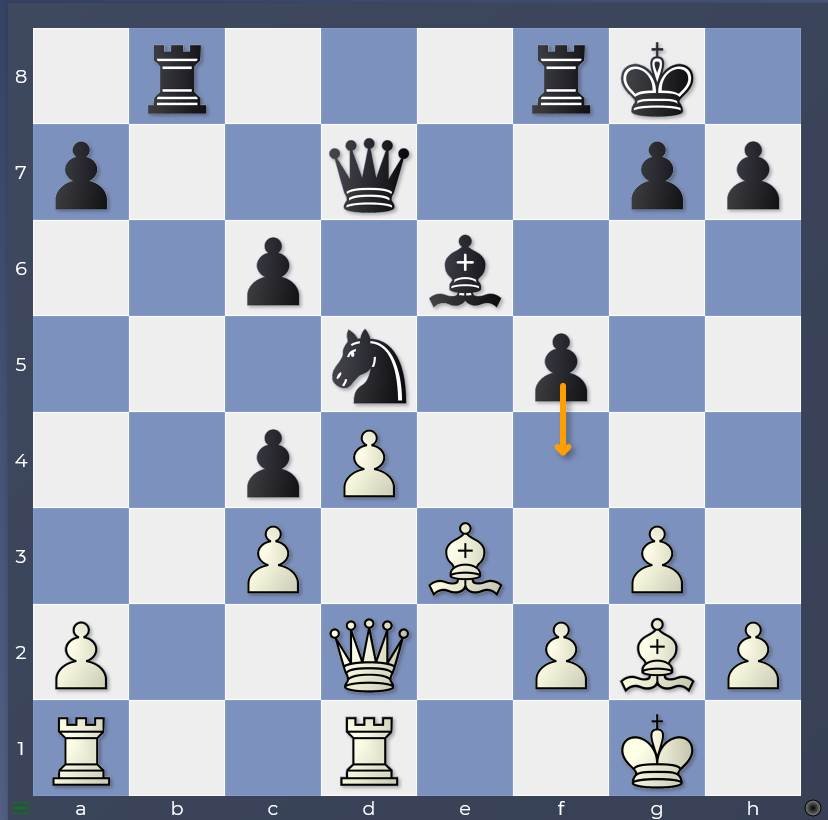
18…f4 [Well this the perfect realisation of Stoltz’ concept: entrenched in the central light squares and then hurling the f-pawn against the white kingside like some great boulder fluing from a catapult against the castle walls! The reaction… is panic!
19.Bxd5
19.Bxf4 Nxf4 20.gxf4 Bd5 was far from pleasant for White but not yet lost. The text can never EVER *EVER* be good!
19…Bxd5 20.Bxf4 Qg4 21.Qe3 Rbe8 22.Be5
22.f3 [EB] “also leads to a swift defeat” 22…Qh5 23.Qf2 g5 24.Be5 Rxf3 25.Qe1 Ref8 26.Rac1 Rf2 27.Qxf2 Rxf2 28.Kxf2 Qf3+
22…Rf3 23.Qe1 Ref8 24.Rd2
[EB] “White must give the pawn back now. Black’s c-pawn is becoming strong”
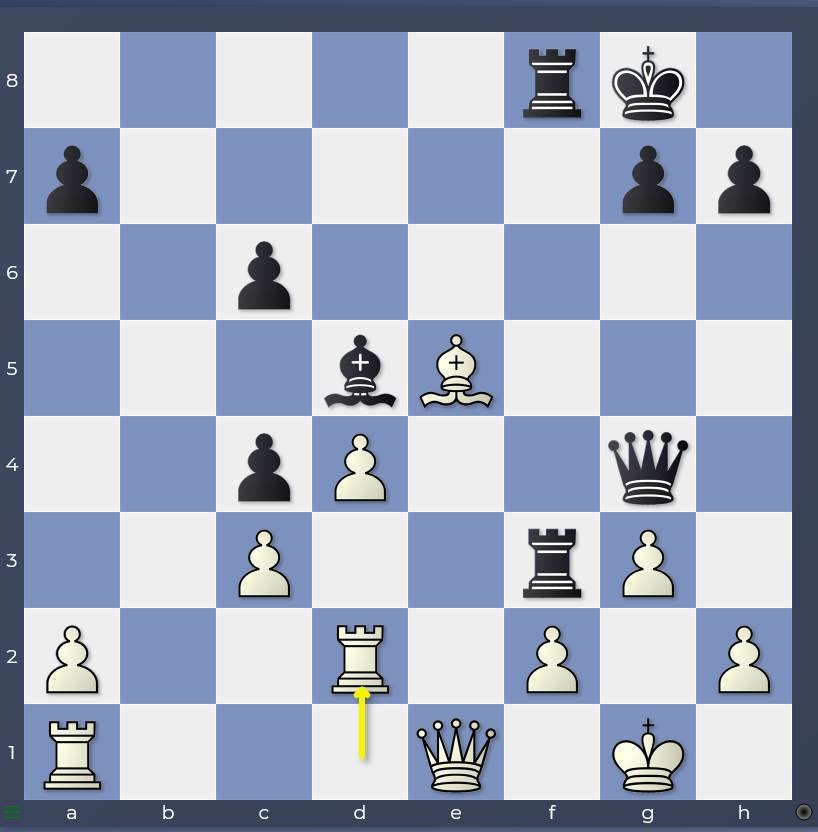
24…Rxc3
24…Rxg3+ was even better, giving mate after 25.Bxg3 (25.fxg3 Qf3) 25…Qf3 26.Kf1 Qh1+ 27.Ke2 Re8+ 28.Be5 Qf3+ 29.Kf1 Qh3+ 30.Ke2 (30.Kg1 Qg2#) 30…Bf3+ 31.Ke3 Bg2+ 32.Kf4
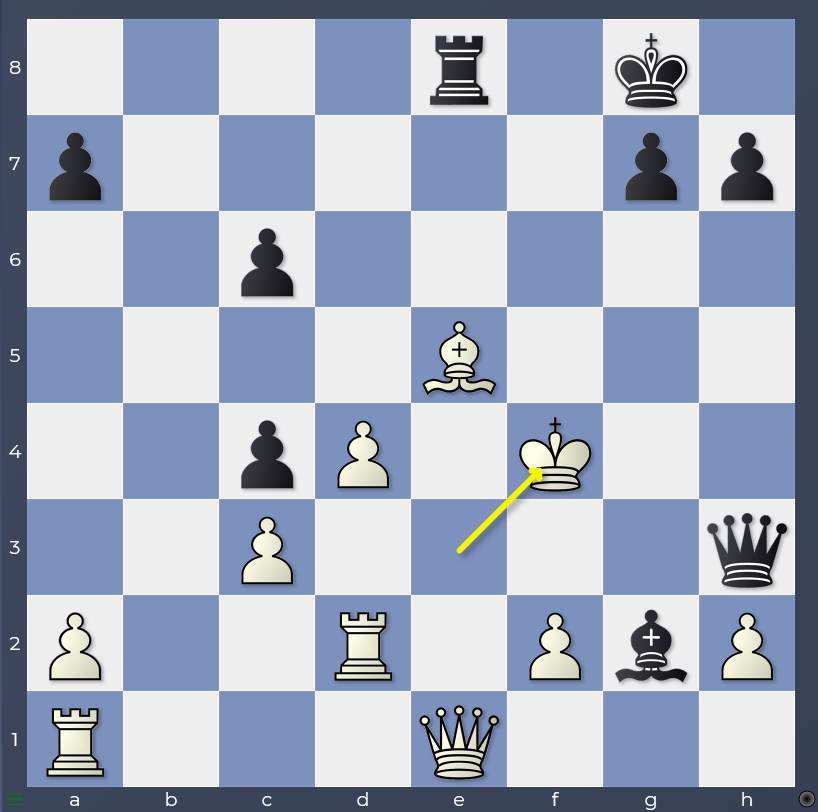
and now why not finish artistically with (32.Ke2 Qf3#) 32…h6 and …g5+ mate! 33.Bxg7 Qf3#]
25.Qe2 Rcf3 26.Rb1 c3 27.Rc2 Qe4
[EB] “The endgame after the queen exchange is easily won”
28.Qxe4 Bxe4 29.Rb7
[EB] “It saves the exchange but not the game”
29…R8f5
29…Bxc2 30.Rxg7+
30.Rc1
30.Rxg7+ Kf8
30…Rxf2 31.Bf4
[EB] “White cannot capture on g7 because of Black’s dangerous threats”
31…Rg2+ 32.Kf1 c2 33.Re7 Rxh2 34.Ke1
34.Rxe4 Rxf4+ 35.gxf4 Rh1+ 36.Ke2 Rxc1 37.Kd2 Ra1 38.Kxc2 Rxa2+ 39.Kb3 Rf2 [EB] “And Black wins the rook endgame – the game is easy.”
34…Bf3 35.Re3 Bg4 36.Re5 Rxe5+ 37.dxe5 Kf7 38.Bd2 Re2+ 0–1