
English grandmaster Stuart Conquest had a wonderful finish to the 2025 British Championships in Liverpool, winning his last 2 games against grandmasters Shreyas Royal and Nikita Vitiugiov to tie for first with Michael Adams and Peter Roberson, subsequently finishing second to the evergreen Mickey after a rapid playoff.
I was particularly interested in the quick game he won as White against Shreyas in the penultimate round. Why is that? The middlegame complications emerged from what chessplayers call a tabiya, which AI defines as “a well-defined position in the opening of a game, often arising from standard opening sequences, where both players have multiple viable continuations”
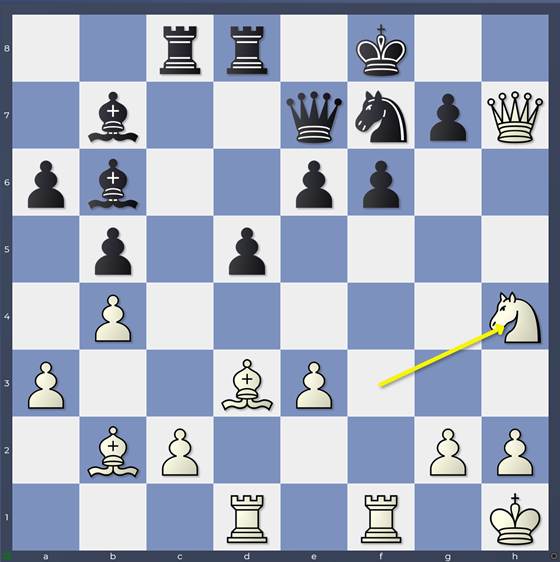
Conquest, Stuart C – Royal, Shreyas
British Championship 2025
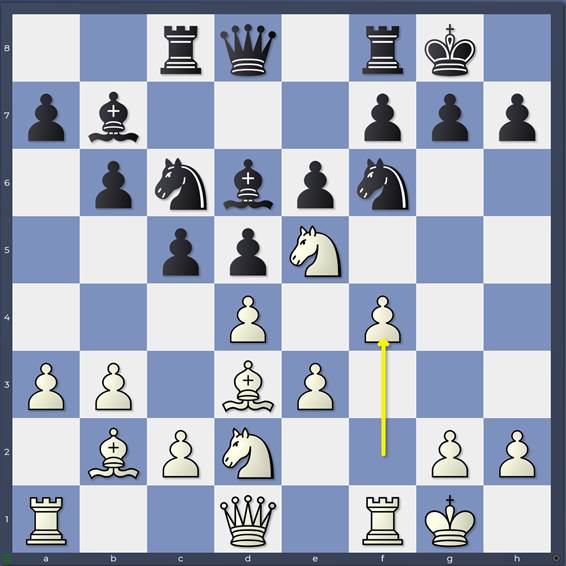
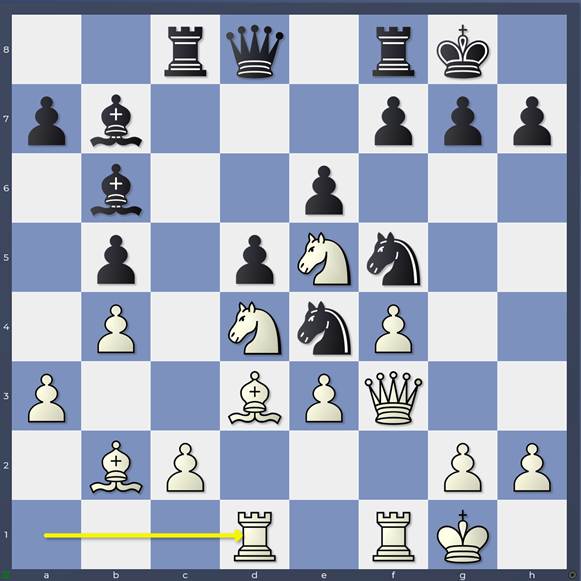
1. b3 Nf6 2. Bb2 c5 3. e3 d5 4. Nf3 e6 5. d4 Nc6 6. Nbd2 Bd6 7. Bd3 O-O 8. O-O b6 9. a3 Bb7 10. Ne5 Rc8 11. f4
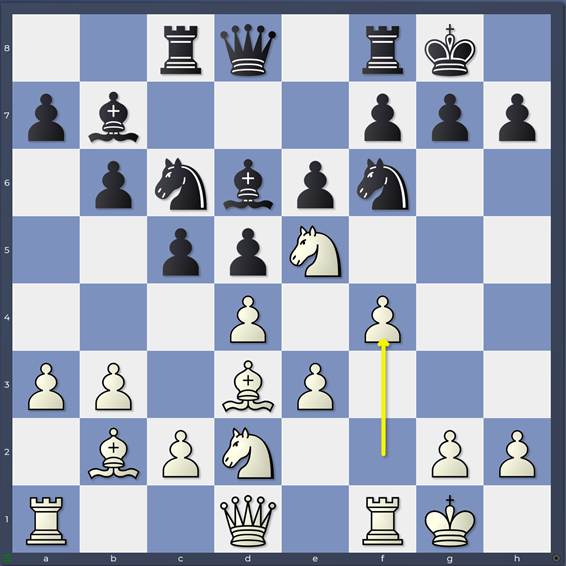
Game: 11.f4
Although Stuart started with 1.b3, the opening might also have arisen from a more standard move order 1.d4 followed by 2.Nf3 and 3.e3 which was a long-time favourite of Russian (now German) grandmaster Artur Yusupov. This opening is called the Colle-Zukertort named after two of its most illustrious historical exponents: Edgar Colle (early 20th century) and Johannes Zukertort (late 19th century).
I love studying games from such tabiyas. You can often extract learning material from such balanced but rich positions that transcends the opening itself, being generally applicable to a wide range of openings and middlegames. We will focus in this series of blogs on the short, sharp battle from the 11th move to the 20th move (when Shreyas unfortunately blundered). `
Let’s start off by considering the salient feature of the position in front of us. White’s setup of a knight on e5 supported by “Stonewall” pawns on d4 and d4 against Black’s central queen’s pawn structure c5-d5-e6-f7 is well known from many openings. For example, the Queen’s Gambit:
Pillsbury, Harry Nelson – Tarrasch, Siegbert
Hastings 1895
1. d4 d5 2. c4 e6 3. Nc3 Nf6 4. Bg5 Be7 5. Nf3 Nbd7 6. Rc1 O-O 7. e3 b6 8. cxd5 exd5 9. Bd3 Bb7 10. O-O c5 11. Re1 c4 12. Bb1 a6 13. Ne5
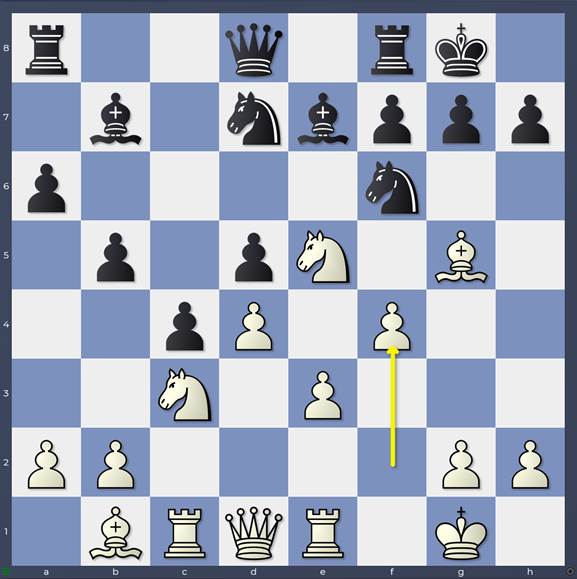
Pillsbury-Tarrasch: 13.Ne5
Also, the Nimzo-Indian:
Sadler, Matthew – Loginov, Valery
Budapest 1993
1. d4 Nf6 2. c4 e6 3. Nc3 Bb4 4. e3 O-O 5. Bd3 d5 6. Nf3 b6 7. O-O Bb7 8. cxd5 exd5 9. Ne5 Nbd7 10. f4 c5 11. Qf3
Sadler-Loginov: 11.Qf3
In general, what does such a strongly supported knight give us? Firstly, it controls certain squares in Black’s position like d7 and c6. It also eyes squares close to the opponent’s king (f7 and g6) which fuels any aggressive thoughts White might be harbouring! The knight is also difficult to shift from e5. Capturing on e5 results in disruption to Black’s key defensive piece – the knight on f6 – after White recaptures; fxe5 even opens the f-file for pressure against Black’s f7-pawn. …f6 is of course extremely desirable for Black: it makes a nonsense of d4 and f4 if a white knight is unable to maintain itself on e5. However …f6 is typically quite cumbersome to achieve and carries the risk of weakening Black’s kingside light squares. White typically has a bishop on d3 pointing towards the king along the b1-h7 diagonal while the dark-squared bishop typically gets to work along the h4-d8 diagonal; in the Queen’s Gambit it is already there while in the Nimzo-Indian, Bc1-d2-e1-h4 is a common manoeuvre. White also has various options to involve his major pieces in a kingside assault , either via Qf3-h3 or Rf3-h3. Finally, White also has the option of a pawn storm with g4-g5.
What’s the downside? It has to be the weakened light squares around White’s central pawn structure, especially e4 of course. Black can target the exchange of White’s light-squared bishop – which also has the benefit of reducing White’s attacking power – as well as White’s knights, leaving himself with an unchallengeable knight on e4 against a passive white dark-squared bishop.
Game: 11.f4
Looking specifically at Conquest-Royal, we see the same general trends but one key difference: White’s dark-squared bishop is on the long-diagonal. Currently it merely supports the d4-pawn, but Black should be aware of the possibility of dxc5 – a favourite engine plan – opening the a1-h8 diagonal for the bishop adding firepower to a white kingside attack. Related to this, the white queenside structure also adds specific features. The b3-pawn covers the c4-square– holding back black queenside expansion with …c4 – but weakens White’s control of the c3-square.
In this blog entry, I’m going to demonstrate the rest of the game and highlight a few points. I’ll focus primarily on the idea of each move and the general gains and concessions each side is making as the game progresses. Our more detailed examination of the key moments will start in subsequent blog entries.
11… Ne7
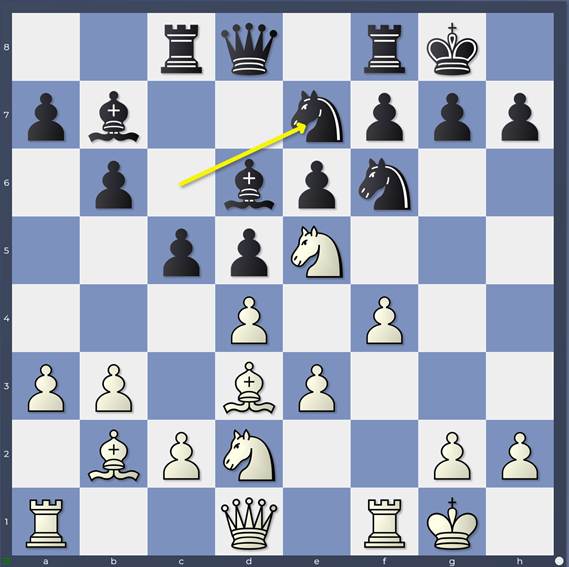
Game: 11…Ne7
This position is well known to chess theory with 263 games in Chessbase and 4651 in the Lichess database! 11…Ne7 is by far the most popular choice and also the choice of the HIARCS book. Black’s choice to place the bishop on d6 has upsides and downsides. The downside is that liquidating the knight on e5 with …Nxe5 is impossible due to the resulting fork. However, the e7-square is left free for the knight and 11…Ne7 has some attractive features. Most obviously, the knight is ready to jump into f5, attacking e3 and also blocking the b1-h7 diagonal. Also importantly, the line of the light-squared bishop on b7 is freed providing extra support for a knight jump into e4 which then introduces the idea of …f6 chasing away the knight on e5. Finally the rook’s support for the advance of the c-pawn or for pressure against c3 and c2 (after …cxd4) is opened.
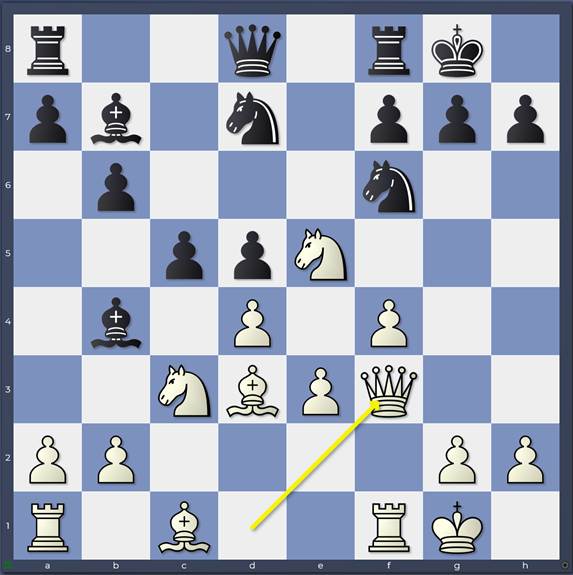
12. Qf3
Again clearly the most popular move though 12.Rf3 has had quite a few adherents in the cowboy world of Lichess, though not impressing the HIARCS book (which gives it ?!) while adorning 12.Qf3 with an exclamation mark! 12.Qf3 adds protection to the e4-square, connects the white rooks and introduces ideas like Qh3 eyeing h7 or g4-g5. 12.Qf3 does have an unobvious drawback and Black exploits it immediately.
12…b5
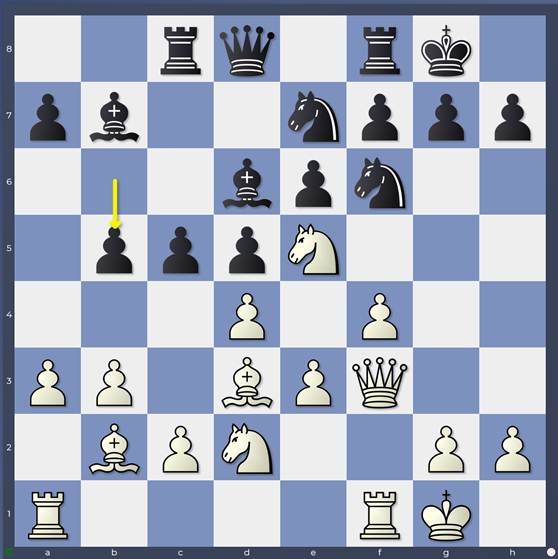
Game: 12…b5
Again by far the most popular move in the databases and one of HIARCS’ top moves too! Doesn’t it just hang a pawn? Well there’s the little matter of the c2-pawn that 12.Qf3 unprotected, as well as the release of the rook’s power realised by 11…Ne7! 13. Bxb5 is met by 13…cxd4 14. Bxd4 Rxc2 which is very pleasant for Black who has created an avenue for counterplay on the queenside with minimal effort. Moreover the white central structure Bd4-Pe3 is vulnerable to unpleasant attack with …Nf5.
What does 12…b5 achieve though apart from setting up this trap? Well it has a strong concrete threat: …c4 driving away the d3 bishop from its attacking position followed by …c3 forking the bishop on b2 and knight on d2! White must react!
13. dxc5
A move that the engines always are looking to play. It may seem a little strange to weaken the support of the knight on e5, but of course in the Colle-Zukertort there’s an upside to doing this: the bishop on b2 is activated, pointing along the a1-h8 diagonal to the f6- and g7-squares close to Black’s king! Moreover, having played 11…Ne7, Black’s pressure against the knight on e5 is minimal anyway. The negative side to 13,dxc5 is the new weakness of the e3-pawn. Once Black recaptures on c5 with the bishop, …Nf5 will be awkward to deal with. There’s also the matter of the white queen and black light-squared bishop facing each other along the a8-h1 diagonal. Once the bishop is protected, then …d4 will become a serious threat.
13… Bxc5 14. b4
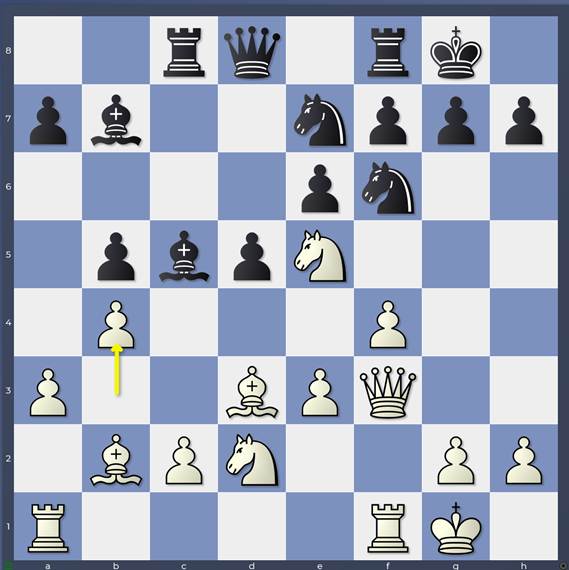
Game: 14.b4
Stuart starts a plan to shield the e3-pawn from attack by Black’s minor pieces without committing major pieces to that task and while simultaneously bringing additional minor pieces into active attacking positions.
14…Bb6
It’s very important to retreat to this square (rather than d6) move for 2 reasons:
- The pressure on e3 is maintained, thus maintaining the power of the follow-up …Nf5.
- The d6-square is kept free for the knight on f5. f5 is not a stable square for the knight as it can be chased away – at some risk to the solidity of White’s kingside – by g4. However, in this case the knight can jump back to d6 eyeing both the c4 and e4 outposts, and in particular strengthening Black’s grip on the e4-square.
15. Nb3 Ne4
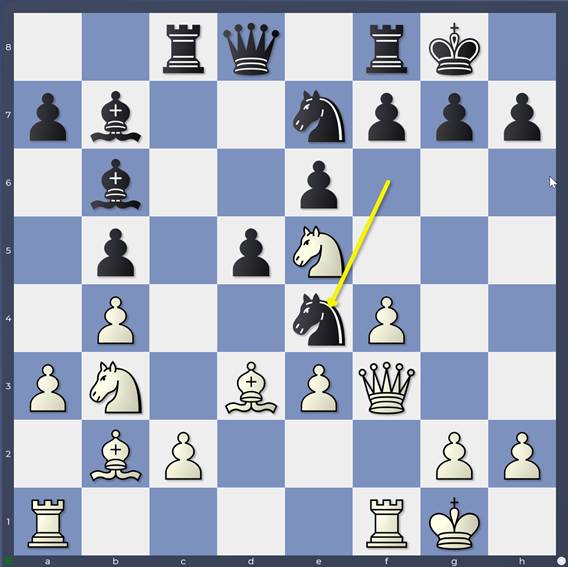
White’s knight has jumped to b3, aiming for the d4-square to shield the pawn on e3 from the bishop on b6. However, the downside to this move is that White loosens his control of the e4-square. Black therefore exploits this at once, also eyeing the c3-square weakened by b3. White now has a new threat to watch out for at every move as 15…Ne4 has vacated the f6 square which means …f6 is now available to Black challenging one of the “crown jewels” in White’s position: the advanced knight on e5. White’s next move will add an extra pressure point on the black e6-pawn to hold this back!
16. Nd4
We leave the Lichess database at this point but we still have 3 games in Chessbase! Amazing how much theory there is on *any* line nowadays isn’t it? The HIARCS book ends here with 2 suggestions: 16.Qe2 and 16.Bd4. This last suggestion 16.Bd4 is well worth reflecting on because it represents a fundamental schism in approach with the current game.
What Stuart is aiming to do is to shield his e3-pawn while maintaining all the (latent) activity in his position. He is foreseeing a glorious future for the Zukertort bishop on b2 and do he is willing to accept the discomfort of Black’s bishop on b6 glaring at the e3-pawn through the knight on d4! He reasons that at a later stage in his attack the knight will jump to f5 or e6, unleash the bishop on b2 and it won’t matter by then whether Black grabs a little pawn on e3!
16.Bd4 takes an opposite approach, sacrificing some potential attacking power to neutralise a black piece exploiting a pressure point on White’s position. The result will be – all things being equal – that both White and Black will become safer. You can also make a positional case for 16.Bd4 as the sequence 12…b5 13.dxc5 weakened Black control of the queenside dark squares: by exchanging the dark-squared bishops, White is starting on the process of removing dark square defenders to better exploit those weaknesses. Note however that 16.Bd4 doesn’t hold back …f6 (unlike 16.Nd4 which did so by attacking the e6-pawn) so White needs to have an answer prepared!
So how do you choose between 2 such options? One may of course be objectively better than another which may influence your choice if you were preparing this line at home to this depth. In a practical game it’s stylistic. I would more often than not plump for Stuart’s approach!
16…Nf5
16… Nd2 is a tempting fork but is easily parried with 17. Qh3 threatening mate on h7.
17. Rad1
Game: 17.Rad1
Still in opening theory and a very natural move. Black now has to watch out for future ideas of Nxf5 and Bxe4 in whichever order, opening the d-file. White’s knight on e5 and rook on d1 could combine very nastily against the d7-square in some scenarios.
17. Nxf5 is a move that may jump into your head, excited by the thought of saddling Black with doubled pawns! 17…exf5 How can such ugliness be bad for White? Well we have one big problem: …f6 is coming and the f5-pawn has taken away the knight’s retreat on g4 away! And be aware that White’s e-pawn is now backward on the open e-file: saddling Black with doubled pawns has also heightened the weakness of one of White’s sensitive points. White would need something quite serious at this point to put against Black’s threat of …f6 but it doesn’t exist! For that reason, Stuart keeps the tension in the position and develops his last piece.
17… Qe7
This finally is the novelty! A previous game continued 17… Nxd4 18. exd4 (0-1 Halkias,A (2094)-Balogh,C (2638) GRE-chT 45th Achaia 2017) We will look at this type of continuation is subsequent blog entries but for now it’s simply enough to remark that Black liquidates White’s most sensitive weakness – the e3-pawn – but also blocks the path of White’s dark-squared bishop towards the black king along the a1-h8 diagonal. Note also that White experiences some difficulty supporting the d4-pawn with a pawn on c3 as Black already has superior control of this square.
It’s obvious that 17…Qe7 is an ambitious move from Black. White’s weakness is left on e3, Black defends the e6-pawn and prepares …f6 driving away the white knight from e5! The middlegame struggle is hotting up!
18. Kh1
Stuart takes his king off the a7-g1 diagonal, ensuring that if the e3-pawn is taken, it won’t be taken with check! It’s a good attacking move in general – the skill is always to play it at the moment you can get away with it!
18…a6
Shreyas reacts in kind with a general strengthening move, solidifying his position by protecting the b5-pawn that was still defended indirectly due to the threats against c2 and e3.
19. Qh3
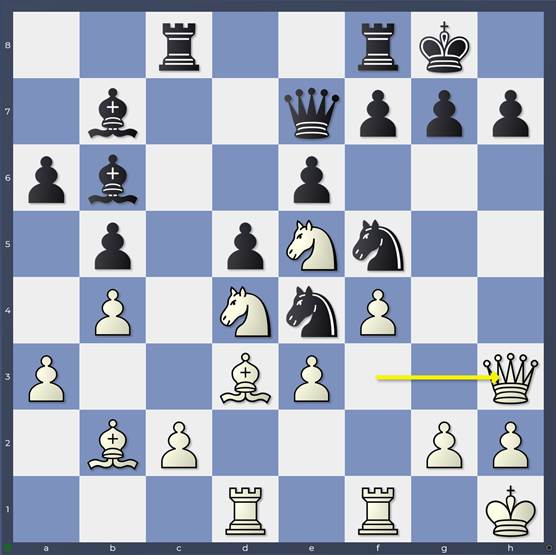
Game: 19.Qh3
A typical attacking move from Stuart: you very often see the white major pieces moving to h3 via f3 in this line. Not only does the queen dream of delivering mate on h7, it also hits the knight on f5 and x-ray attacks the e6-pawn, which may prove useful in preventing Black from realising his threat of playing …f6.
19…Nfd6
Another very sensible move from Black, removing the knight from the attack of the knight on d4 and queen on h3, solidifying the knight on e4 and eyeing the c4-outpost. The one drawback is that the e6-pawn is now exposed to the attentions of the queen on h3 and knight on d4 which makes …f6 once again harder to achieve. However, this matters less because Stuart decides to throw down the gauntlet and light up the chessboard with a sudden attack!
20. f5
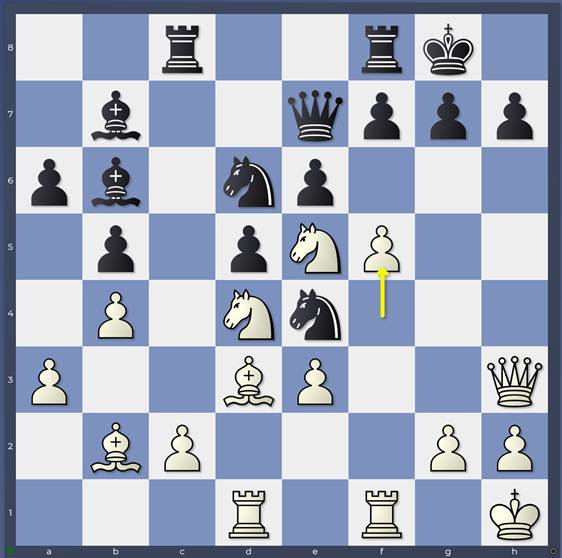
Game 20.f5
20…f6
And the reaction is an immediate blunder! I think that the tension of the tournament situation must have played a part in this hasty move because it isn’t easy to think what else White might do in response!
21. Ng6
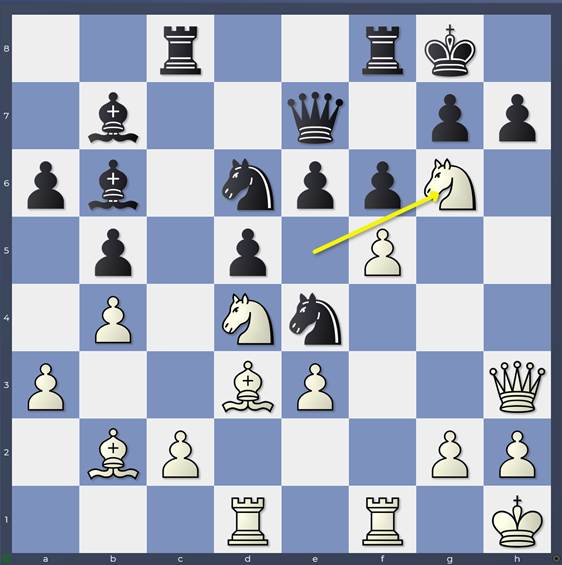
Game: 21.Ng6
A nice sacrifice to make! The horrible point for Black is that he can’t just accept the loss of an exchange and move on because the e6-pawn is hanging too! Sometimes you get lucky with blunders (which everyone makes from time to time) and your position remains basically sound despite losing material – here unfortunately this is far from the case.
21…hxg6 22. fxg6
Black now must scramble round desperately to try and cover the h7-square from mate, The position of the rook on f8 and queen on e7 blocking the black king’s possible flight to the queenside is another big inconvenience.
22…Ng5 23. Qh5 Rfd8 24. Nf3
#
Game 24.Nf3
There are many ways to win – 24.h4 and 24.Rf4 also spring to mind – but Stuart chooses a non-obvious method that is however at the very top of the engine’s list! It is counter-intuitive to abandon the knight’s attack on e6 but Stuart has a different square in mind for the knight to help along the collapse of Black’s kingside. Stuart’s really strong in such non-standard situations and this is yet another example.
24…Ngf7 25. gxf7+ Nxf7 26. Qh7+ Kf8 27. Nh4
Game: 27.Nh4
Really unpleasant! The knight is coming to g6 which forces the black king away from f8 which means the g7-pawn will fall… and that’s not the only thing!
27…Ke8 28. Ng6 1-0
28…Qd6 29. Qg8+ wins a piece
28…Ng5 29. Nxe7 Nxh7 30. Nxc8 wins a rook
A lovely game from Stuart but even these high-level annotations raise a lot of “what-if questions”! We’ll start off in the next blog once again from the end of the game, trying to understand what the objective situation was at the moment that Black blundered with 20…f6.
Dear GM Sadler,
Thank you very much for such an insightful, prolific and detailed review of Stuart Conquest’s splendid victory. it was a pleasure to read and follow, and maybe – though I have resisted for decades – I might pick the Zuckertort in my repertoire, one way or the other – starting with b3! 🙂
Hey Olaf, glad you liked it! Quite a few more articles in this series to come to inspire you some more! Best Wishes, Matthew