
In the previous blog post, we looked through the game Conquest-Royal from the 8th round of the 2025 British Championships in Liverpool at a high level. Now it’s time to dive into the critical positions in more detail, starting as always from the end of the game and working our way backwards!
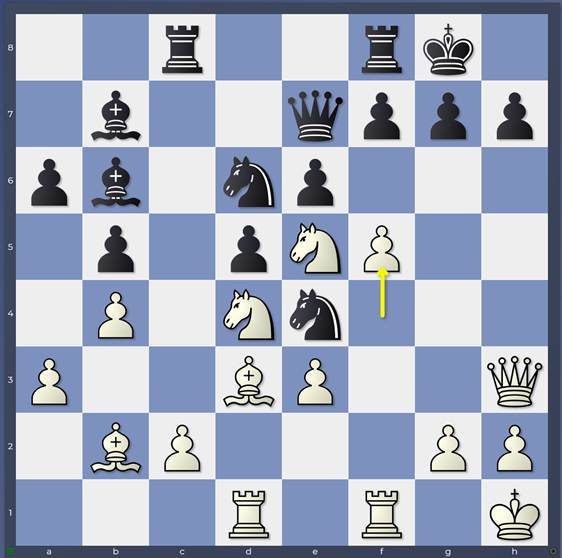
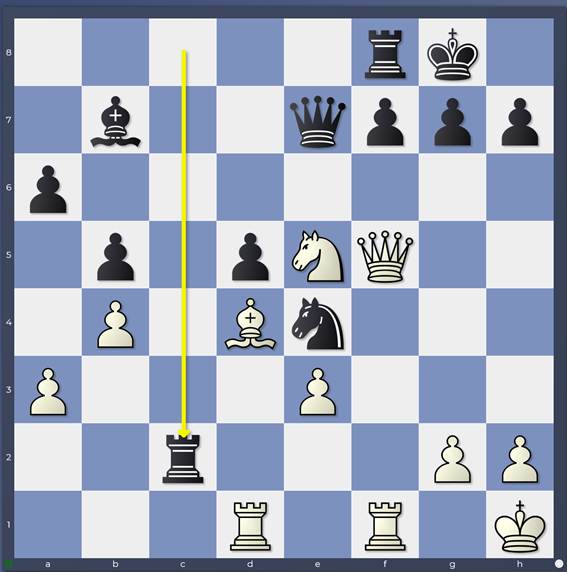
Game: 20.f5
This was the crucial moment in the game when Stuart suddenly upped the pace with the thrust 20.f5 triggering a blunder with 20…f6. What could Black have done better at this stage, and what was the objective evaluation of the position?
The first thing to determine is whether 20.f5 carries a threat. The answer is “absolutely!” but it may not be the first thing you think of! Because White’s biggest threat in this position is 21.f6

Variation giving White the move: 21.f6
21…Nxf6 is met by 22. Rxf6 threatening mate on h7
21… gxf6 22. Ng4
carries the huge threat of Nxf6+. After
22…f5 23. Nh6+ Kh8 24. Ndxf5+
the strategy of keeping the bishop on b2 alive hoping for a future discovery by the knight will have been richly rewarded!
It’s clear therefore that Black needs to take concrete action against this threat (and also against 21.fxe6 which is also in the position). One detail that may also strike you fairly quickly is that 20… Nxf5 loses to 21. Bxe4 dxe4 22. Nxf5 exf5 23. Rd7 picking up a piece.
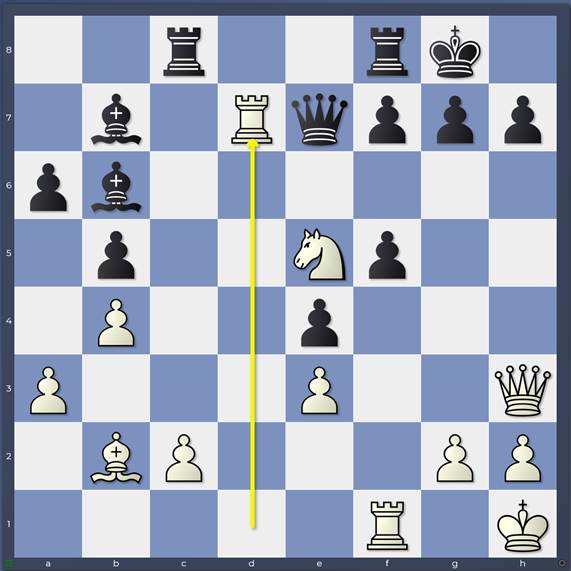
Variation after 23.Rd7
Black’s choices (excluding 20…f6 which – like 20…Nxf5 – we know to be a blunder) are therefore limited in this position to 20…exf5 and 20…Bxd4.
20… exf5
feels a little worrying on general grounds: white’s knight will capture on f5 and the bishop on b2 will be pointing towards the black king! And indeed after
21. Nxf5 Nxf5 22. Qxf5
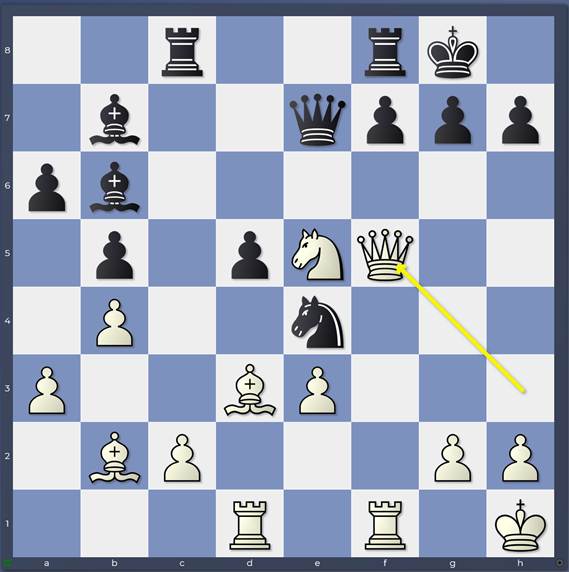
Variation after 22.Qxf5
Black has some difficult problems to resolve as the obvious and desirable
22…f6
Allows
23. Bxe4 dxe4 24. Rd7 once again.
You start to appreciate how dangerous this must have felt on the Black side: everything just seems to lose!
20… Bxd4
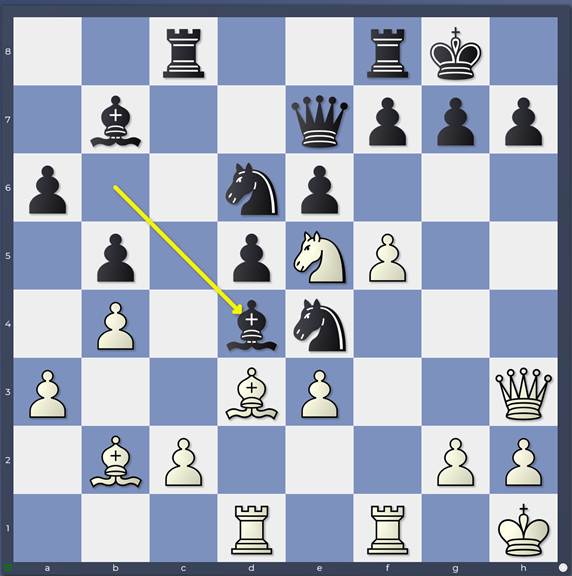
Line: 20…Bxd4
is therefore the final attempt to try but there are a few things to calculate: The caveman attempt 21.f6, 21.exd4 (looks unlikely but White has one idea in mind) 21.Bxd4 and the confusing 21.Bxe4.
21. f6 is simply met by the cold-blooded 21…gxf6. I had one idea: 22. exd4 fxe5 23. dxe5 but simply 23…Nc4 followed by …Kh8 and …Rg8 is completely winning for Black.
After 21. exd4 Nxf5 (21… exf5 with …f6 to follow is even stronger according to the engine) I had the idea of 22. Bxe4 dxe4 23. d5 but 23…Rxc2 24. d6 Qg5 followed by …e3 is a total disaster for White. That seems encouraging: 2 lines, 2 fairly easy refutations!
21. Bxd4 is definitely a bigger challenge.
Line: 21.Bxd4
21… Nxf5 is met by 22. Bxe4 dxe4 23. Bc5
Line: 23.Bc5
winning the exchange. Note that 23…Rxc5 24. bxc5 Qxc5 25. Nd7 nets another exchange though the engine points out that 25…Qxe3 26. Nxf8 Qxh3 27. gxh3 e3+ 28. Kg1 Kxf8 (28… e2 29. Rd8) 29. Rd7 Be4 is only a slight edge for White! Still, White would settle for that I’m sure!
21… exf5 is the best move however and now I wanted 22. Bxe4

Line: 22.Bxe4
Again, there are some choices to work through with Black:
22… fxe4 23. Nd7 is rather nasty: 23…Rfe8 24. Nf6+
22… dxe4 23. Bc5 Rfd8 should survive for Black according to the engine, but no human player would willingly put himself in such a pin!
22… Nxe4 is the key move and now 23. Qxf5 Rxc2
Line: 23…Rxc2
Black is a pawn up. From afar I could imagine that White’s position feels a little threatening with a queen, rook, bishop and knight pointing at the black kingside. However, the black knight on e4 covers a lot of key squares and the rook on c2 gives counterplay opportunities. Black is intending …Bc8-e6 and then …f6 when his kingside will be safe. The engines assess the position at -0.5 to -0.6 which is getting to a clear advantage for Black, though they were managing to save the white position in games I played out.
Finally White has the engine’s favourite: 21.Bxe4
Line: 21.Bxe4
However this just transposes to the previous line after 21…Nxe4 22.Bxd4 exf5 23.Qxf5 Rxc2
Line: 23…Rxc2
It’s clear that Black has to find and play 20…Bxd4: anything else is flirting with disaster!
A couple of questions then:
Do the engines suggest anything better for White on the 20th move?
No, in fact 20.f5 (or first 20,Bxe4 Nxe4 and then 21.f5) is their top move for White. It seems therefore that Black is somewhat better objectively at the 20th move.
How could Black miss 20…f6 21.Ng6?
That’s an interesting question. It’s impossible of course to get inside the mind of another player. For full disclosure, I have even found it very difficult to understand properly what went on in my own mind when looking back on a blunder. From my own experience, typically 1 of 2 things are likely to have happened in such cases:
- A mental “imprint” surviving changes in the position
On several previous occasions, Black had the possibility of capturing on d4 (either with the knight or the bishop) but decided on other plans. Sometimes you make a clear policy decision during a game “Whatever happens, I don’t want to play that move” and this impression or “imprint” remains strong even when the reasons for it have significantly changed. That could make you “blind” or – more likely – too quick to dismiss Black’s best move 20…Bxd4.
- Reasoning according to a highly subjective impression
I feel that this one has tended to be my downfall most often. You go into a position – maybe after an unexpected move like 20.f5 – with the firm – not necessarily rational – conviction that you are better / winning and it should not be too difficult. As you start to analyse, your irritation grows because some obvious lines don’t look easy, let alone good! And then your brain shouts to you “Look, 20…f6 is easy, therefore it must be correct” and before you realise it, your hand has made the move on the board.
Of course normally you have layers of calmness to protect you from such occurrences, but these tend to get eroded in tense tournament situations.
In the next blog entry, we’re going to look at some earlier key moments: the moments when Black might have played …f6 and …B/Nxd4.