
In previous blog posts we noted how important the idea of …f6 – driving away the white knight from e5 – was for Black, and how White tried to prevent it with moves such as 16.Nd4
Game: 16.Nd4
19.Qh3
Game: 19.Qh3
and 20.f5

Game: 20.f5
We saw of course that when 20…f6 finally arrived on the board, it was a total disaster: 20…f6 21.Ng6!

One interesting question is: how (objectively) successful was White in preventing Black from playing this key move from the moment Black moved his knight into e4 (15…Ne4) opening up this possibility?
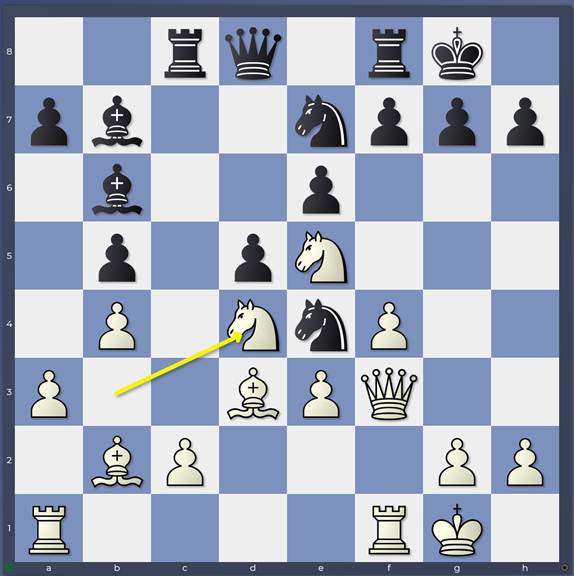
16. Nd4
Game: 16.Nd4
On move 16,… f6 is clearly not possible for Black: actually, preventing it was part of the attraction of the move 16.Nd4!
Let’s move to move 17: 16…Nf5 17.Rad1
Game: 17.Rad1
and now 17…f6

Line: 17…f6
At first sight, nothing has changed: White can still reply with 18. Nxe6

However, appearances are deceptive and Black has many promising (aka winning) replies!
18… Qe7 19. Nxf8 fxe5 is the simplest: the knight on f8 is trapped and the pressure on e3-pawn is very unpleasant to deal with. The engines say -3.17 which is enormous.
18… Nxe3 is the flashiest! 19. Nxd8 Nxd1+ 20. Kh1 Nef2+
#
Line: 20…Nef2+
21. Rxf2 Nxf2+ 22. Kg1 Nxd3+ 23. Kf1
23. Kh1 Nf2+ 24. Kg1 Rcxd8
23… Nxe5
is dreadful for White as
24. fxe5 fxe5 costs the queen.
So it seems that …f6 is possible at this point. White has nothing better than 18. Ng4 but after 18…Qe7 Black is very happy with the result: the knight has been chased away from its strong post on e5 leaving the black king completely safe. The engines give Black a clear advantage here. This one is definitely easy to miss however: allowing a seemingly devastating knight capture with tempo against the queen is not your everyday choice!
Let’s move on further into the game and look at 17.Rad1 Qe7 18.Kh1 f6

Line: 18…f6
…f6 here was very much possible and this is a moment where I didn’t like Shreyas’ choice of the slow 18…a6. I’m not sure whether Black felt he had all the time in the world to play all his moves? In any case, it seems most natural to play a consolidating move like …a6 only after neutralising any potential danger from White on the kingside. After 19. Ng4 a6 (sharper options are possible) Black stands very well: -0.76 according to the engines. Future plans include …Nfd6-c4.
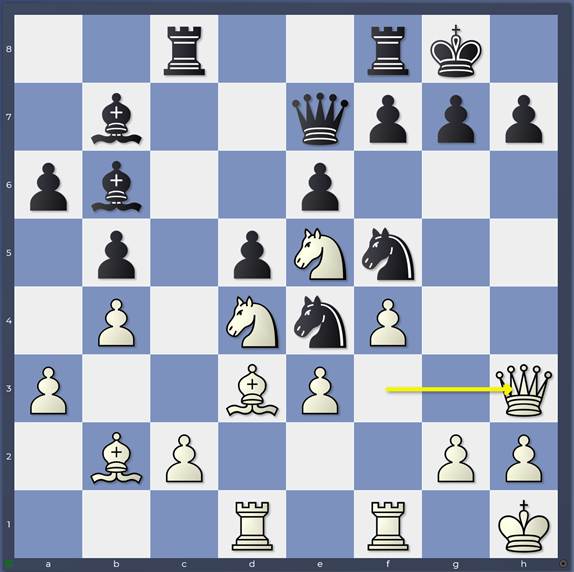
So we have identified 2 opportunities for Black to play the key move …f6 already. Was it still possible in the game after 18…a6 19.Qh3? Let’s examine 19…f6 here too.
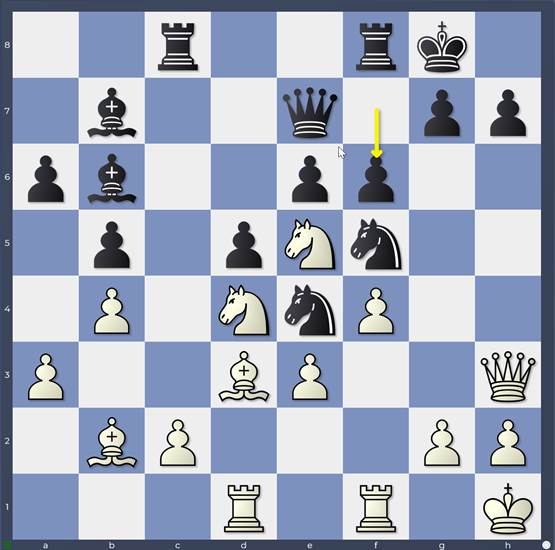
Line: 19…f6
This still looks very reasonable but there is a vicious twist!
20. Bxe4
20. Nxf5 is also strong but a bit more complicated: 20…exf5 21. Bxe4 fxe4 (21… dxe4 22. Rd7) 22. Nd7

Line: 22.Nd7
White forks bishop and rook but there is still some computer-level tactics required after 22… Rxc2 which is why I prefer 20.Bxe4.
20… Bxd4
20… dxe4 21. Nxf5 exf5 22. Rd7
21. Bxf5 exf5 22. Bxd4 fxe5 23. Bc5
Line: 23.Bc5
is the line I would most likely choose in a practical game, but as you can see there are many other good possibilities.
So we can summarise this analysis in the following way:
| Move | …f6 possible |
| 16 | No |
| 17 | Yes |
| 18 | Yes |
| 19 | No |
| 20 | No |
From the White point of view, you would conclude that objectively, you should be looking at an alternative on move 17 that dissuades …f6.

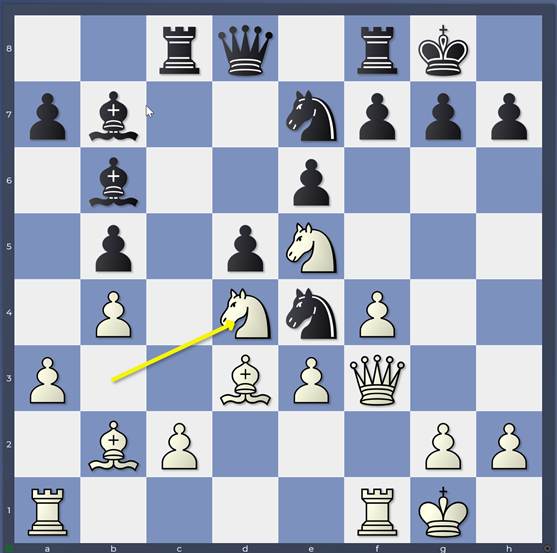
Game: 16…Nf5. Can White prevent 17…f6?
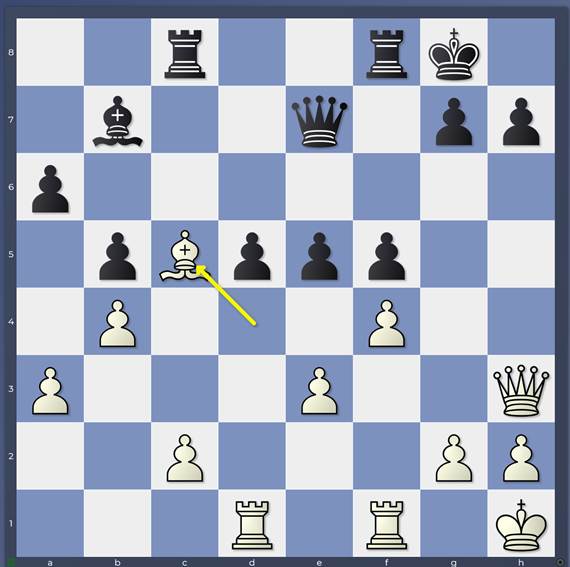
Here it seems that 17. Qh3 would have been a more accurate move order.
Line: 17.Qh3
After 17…f6 18. Nxe6 the knight on f5 is hanging (on top of everything else!)
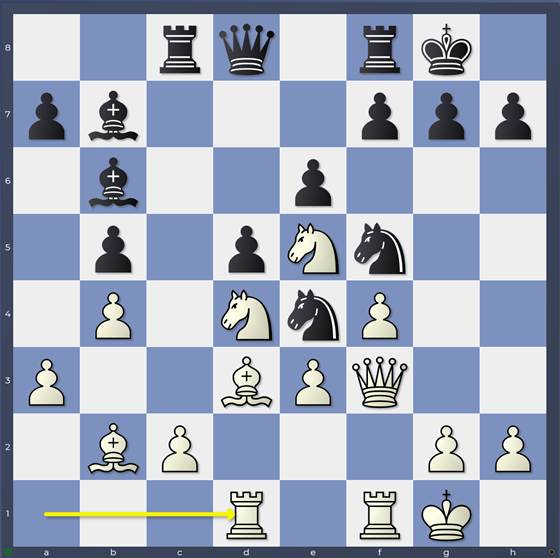
After 17… Qe7 (as in the game) 18. Rae1

Line: 18.Rae1
is a better square for the rook, securing the weak e3-pawn. Playing the rook to e1 is possible here because 17.Qh3 has also sidestepped any forks with …Nd2.
18…f6
is obvious but now White is well-organised and can meet it with
19. Nxf5 exf5 20. Nf3

Line: 20.Nf3
The pawn on e3 is defended, the knight has retreated to f3 rather than g4 (thanks to Qh3) and Bd4 neutralising the pressure on e3 is next.
So that’s quite interesting: it seems that White could have prevented Black from playing …f6 until he was better organised to deal with it. However, …f6 is not Black’s only idea in the position: Black has other trumps up his sleeve and in the next blog post, we’ll examine Black’s plan of capturing the knight on d4.