
In this blog post, having settled the end position, we start a little further back within the game and work our way forwards, trying to understand the course of the middlegame. We’ll get as far as one branch from move 17 and then we’ll finish off the rest in a subsequent post. Let’s go!
1. e4 e6 2. d4 d5 3. Nc3 Nf6 4. e5 Nfd7 5. f4 c5 6. Nf3 Nc6 7. Be3 a6 8. Ne2 Be7 9. c3 a5 10. dxc5 a4 11. Qc2 O-O 12. O-O-O b6 13. cxb6 Nc5 14. h4 Qxb6
Game: 14…Qxb6
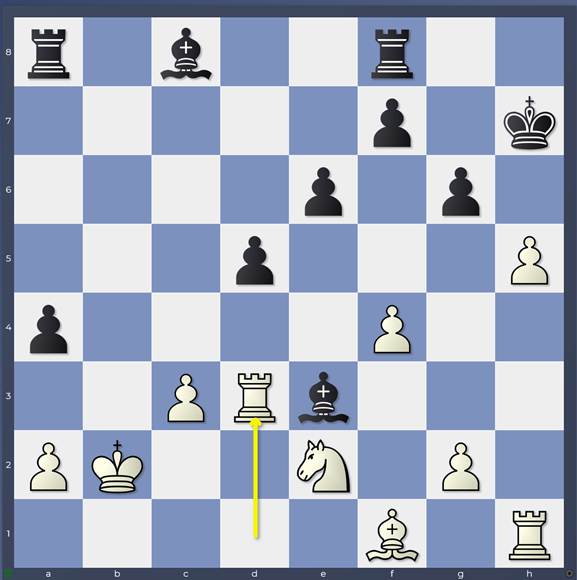
15. Bxc5
Definitely a move that shocked me at first sight! Just giving up a bishop like that and abandoning a pin on the black queen… However there is method in the madness…and how much madness there is depends on Black! We will focus in this article on the engine favourite 15…Bxc5 which would be off the scale insane for a human player!
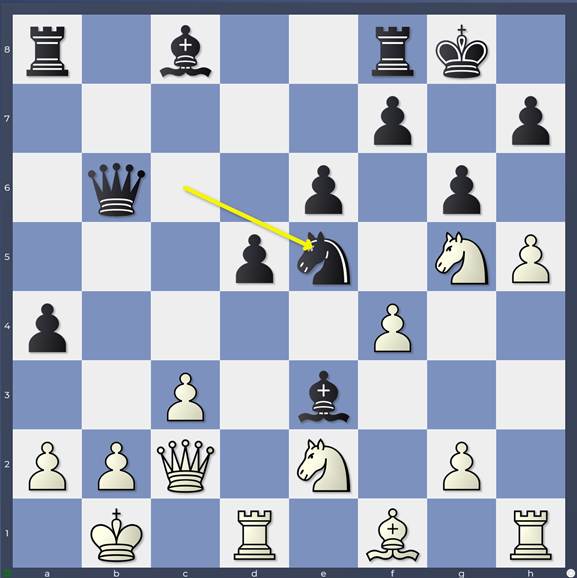
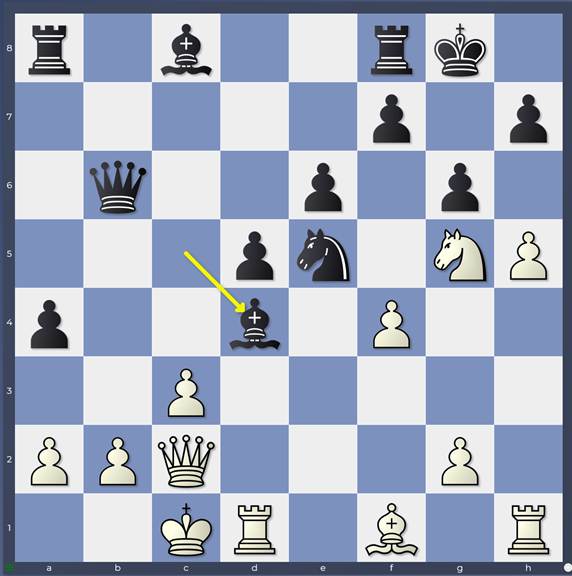
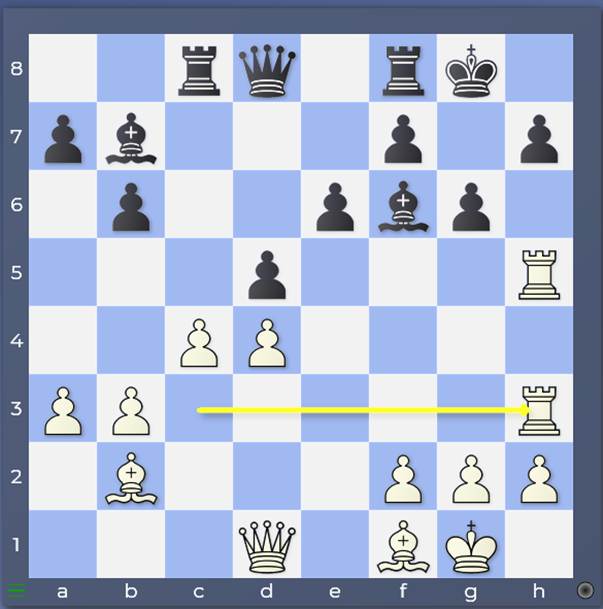
15…Bxc5 16. Ng5 g6 17. h5
Game: 17.h5
White’s attack looks massive. If you showed me this position, my intuitive reaction would be “Black’s totally gone!” Only an engine evaluation could persuade me otherwise…}
17…Be3+
I’ll start off by noting that it’s VERY important for Black NOT to throw in 17… a3 18. b3. It makes the difference between equal and totally lost! You’ll see why later!
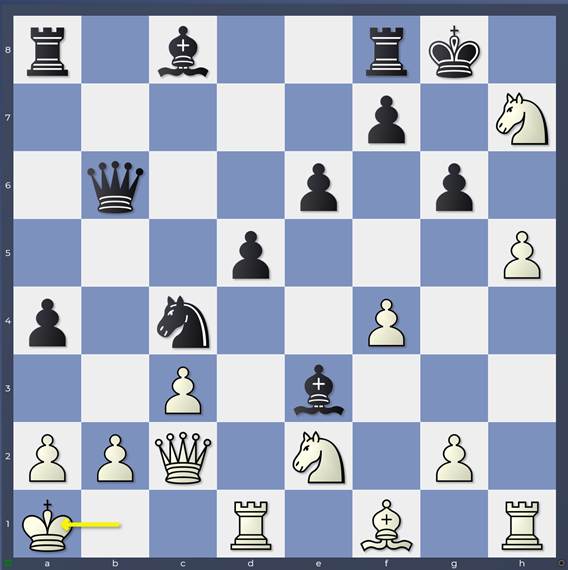
18. Kb1

Game: 18.Kb1
18…Nxe5
Game: 18…Nxe5
I’m always interested when playing through engine games to question which moves I would have / might have found in an over-the-board game. Obviously if you drop me into this position after White’s 18th move, the chances that I find and play 18…Nxe5 are high. Simply because everything else looks dreadful and I can reason out a few positive features to 18…Nxe5 in addition to the simple tactical trick 19.fxe5 Bxg5.
For example, the knight on e5 – while still untaken – shores up the pawns on g6 and f7 which is important given the combination of pressure from White’s queen on c2, knight on g5, pawn on h5 and rook on h1. Moreover, the knight on e5 is ready to jump into c4, creating threats against White’s king (either …Na3+ forking the white king and queen or a desperado with …Qxb2+ to force the exchange of queens and reduce White’s attacking force)
However, am I capable of assessing this properly starting at the position from White’s 18th move? I doubt it! The point is that it costs you so much effort to get even the bad lines assessed right. For example, looking at the position after 18…Nxe5, my go-to riposte for White is 19. Nxh7 . You want to take my knight? I’ll desperado it first and open up your king at the same time. Black has only one good move, and that doesn’t take any time to spot: 19…Nc4
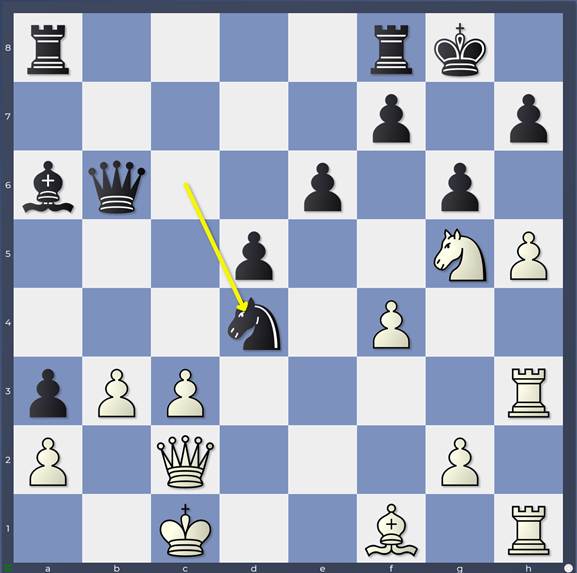
Variation: 19…Nc4
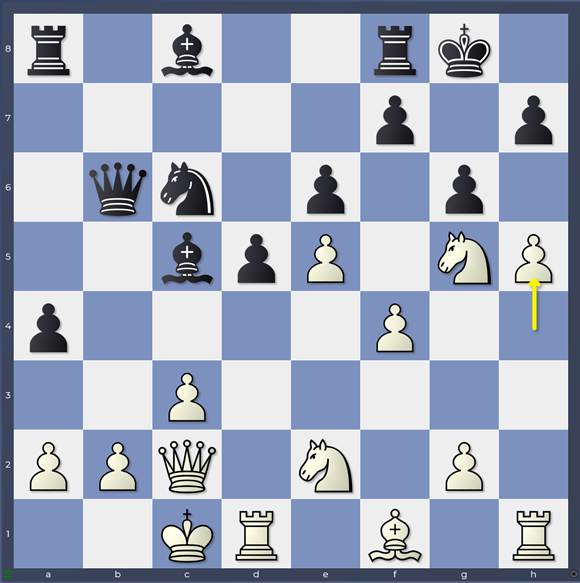
This intermezzo is another only move and threatens …Na3+ forking the white king and queen. You can see why Black mustn’t throw in ..a3, b3 at any time: he needs this tactic! White must reply 20. Ka1
Variation: 20.Ka1
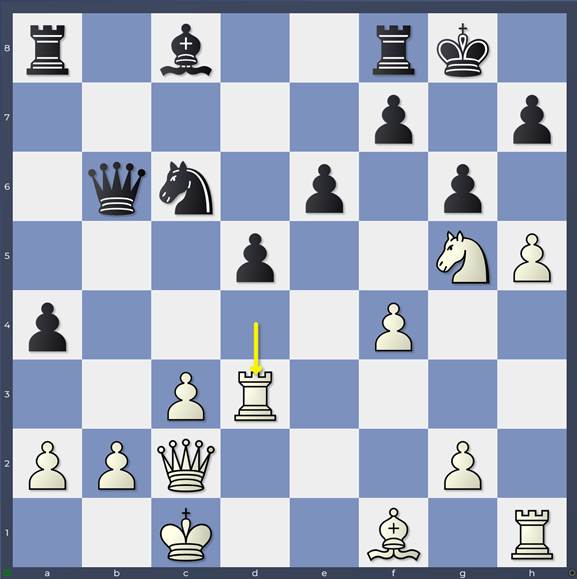
Here my intuition tells me that Black should be ok somehow having forced the defensive move 20.Ka1 and introduced the possibility of …Qxb2+ to force the exchange of queens. But my head is full of question marks! I would assume that 20…Qxb2+ is the way to go but after 21. Qxb2 Nxb2 22. Kxb2 Kxh7 23. Rd3
Variation: 23.Rd3
I still have my doubts about how to assess the position as the rook is swinging over to the kingside and my king’s position can be opened up with hxg6+. It’s very reassuring when you see the engine evaluation of -1.61, but you don’t get to see that during the game!
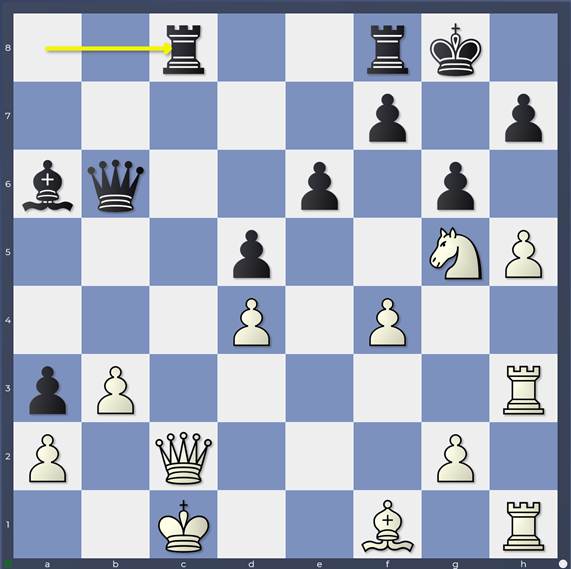
It’s only when you see 20… Qb3!!
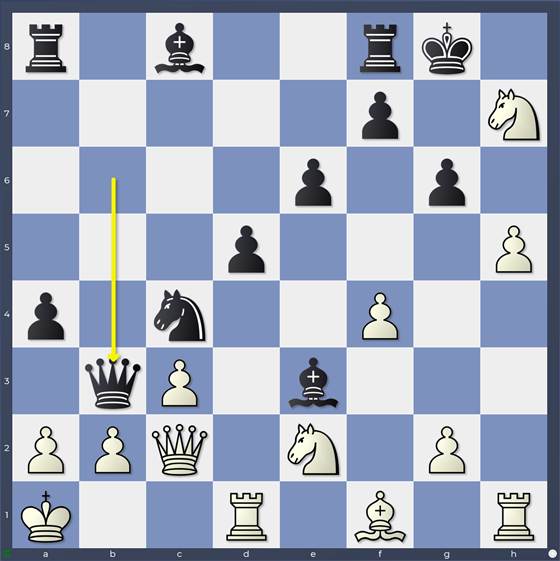
Variation: 20…Qb3
that you *really* start to like the black position! Actually, seeing moves like that in a sub-variation can sometimes pivot your whole view of the merits of a line. Seeing something spectacular and good often feels like a good omen! All of this easily takes you 4-5 minutes to work through properly, especially if you’re worried about your position to start with… and you haven’t even got yet to White’s main attempts!
Go further back, for example to move 15 when deciding between 15…Bxc5 (when this line is virtually forced) and 15…Qxc5 (when you retain the possibility of …Bxg5 against Ng5) and it becomes virtually impossible to assess any of the lines after 15…Bxc5 particularly as 15…Qxc5 is not all that bad! I think the only thing that could persuade you to go into this line is similar opening knowledge: you’ve seen this trick work before and so you believe in the black position. Even then, you need a huge desire to live unreasonably dangerously!
I need to point out now that Black can also start this line with 17… Nxe5
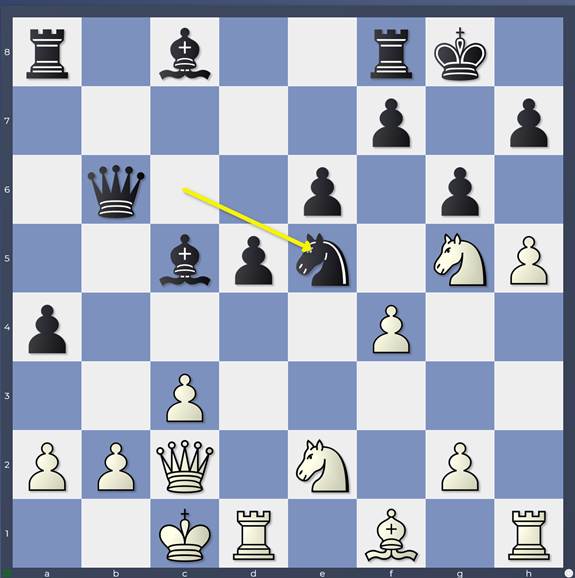
Variation: 17…Nxe5
opting to throw in …Be3+ later. White has an independent option here with 18. Nd4
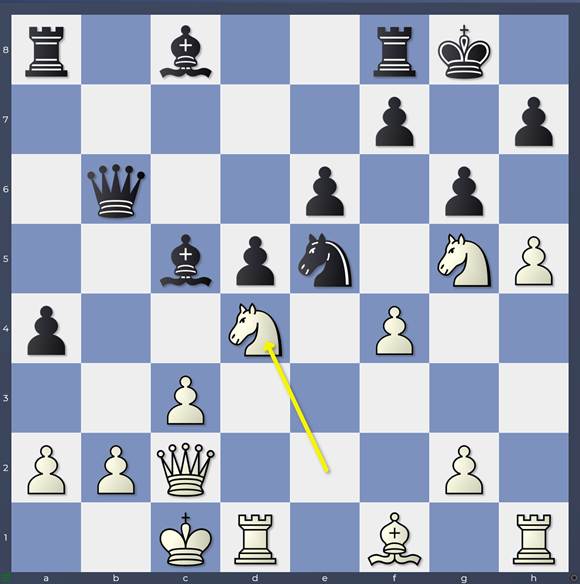
Variation: 18.Nd4
It’s always a dilemma when calculating lines with a possible intermediate check like 17..Be3+. You often only spot such an alternative move-order just as your hand is hovering over the bishop to play 17…Bxe3+! Should you throw it in now while you *know* you can play it, or should you wait to maybe use the possibility of a check later? In a practical game, it’s something that can cause you some stress. You have to get down to analysing one line – you can’t analyse multiple in parallel like an engine – but you’d rather spend your fresh energy on the right one! It’s too early to *know* which one so you have to guess… Worst case you choose wrong and you have to switch to analysing the better line in a tired state after burning ten intensive minutes on a second-rate line. It’s such a stressful moment, you can easily waste minutes agonising over such a decision.
In this specific case, I would most likely go for 17…Be3 after spotting 18.Nd4. That 18.Nd4 has the feeling of a door being slammed shut in Black’s face; after 17…Be3, you feel that Black is better involved in attacking White’s position which gives a better feeling… even if the engine sees both lines as objectively dead equal! Let’s have a look at a couple of lines to give you a flavour!
18…Bxd4
Variation: 18…Bxd4
A far from obvious exchange for me! Giving up one of my developed attacking pieces for a white knight far from the kingside? It’s all about Tal’s maxim in fact: keep on taking stuff to generate or keep the momentum. After 19. Rxd4 Nc6 The threat against the rook forces White to react and gives Black the next move for an attacking gesture. Of course as Spanish grandmaster Jesus de la Villa once pointed out, the easiest pieces to exchange are you active ones so you have to be a bit careful with this too! You can also run out of active pieces to attack with if you exchange too many! 20. Rd3 is one of White’s ideas and looking at it from the black side of the board I am petrified!
Variation: 20.Rd3
20…a3 One of those situations where leaving out …a3 is the difference between a draw and a loss! The reason is umm… not obvious! 21. b3 Ba6
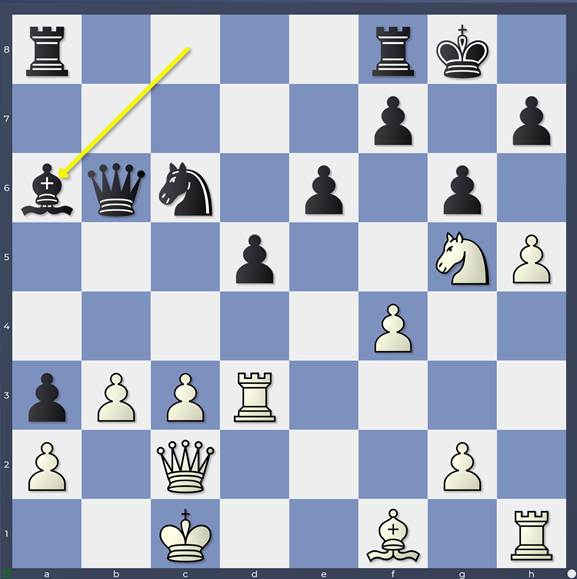
Variation: 21…Ba6
White’s next move that I will show you may be bad… 22. Rdh3
Variation: 22.Rdh3
but it is scaring me some! (It’s actually giving me vibes of
Keres-Smyslov Zurich Candidates 1953!)
Black doesn’t even seem to have much attacking firepower to hurt White… and yet Black is winning!
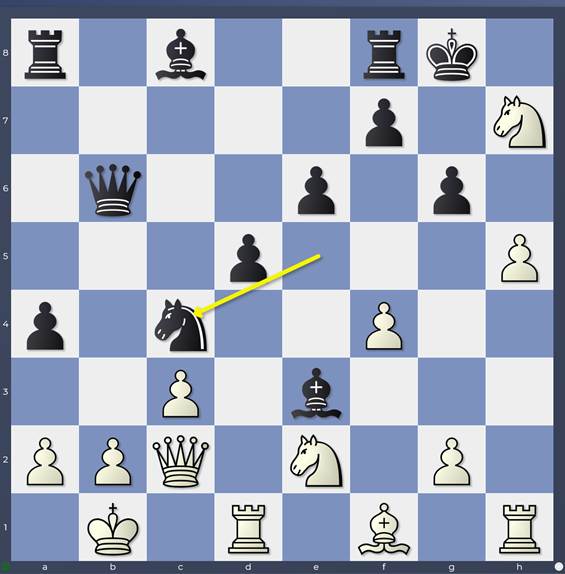
22…Nd4
Variation: 22…Nd4
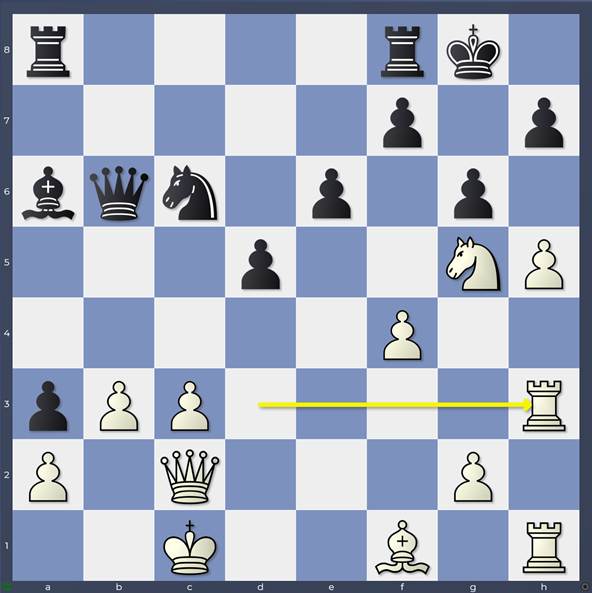
23. cxd4 23. Qb1 Nxb3+ 24. axb3 Bxf1 25. hxg6 a2 26. Qa1 (26. gxf7+ Rxf7) 26… Qf2 It’s as “simple” as that. White’s build up on the kingside is rather useless and Black is going to start munching pawns with …Bxg2 and …Qxf4+ 27. Rxh7 leaving e3 free for the black queen even allows forced mate 27…Qe3+ 28. Kd1 Be2+ 29. Kc2 Bd3+ 30. Kd1 Qe2+ 31. Kc1 Qc2#) 23… Rac8
Without 20…a3 21.b3, White would simply reply Rc3 and meet …Rxc3 with bxc3 with an extra piece. Here 24. Rc3 (24. Bc4 is best but 24…Bxc4 25. hxg6 Ba6 26. gxf7+ Rxf7 is good enough as 27. Qxc8+ Bxc8 28. Nxf7 Qxd4 is very painful for White) 24… Qxd4
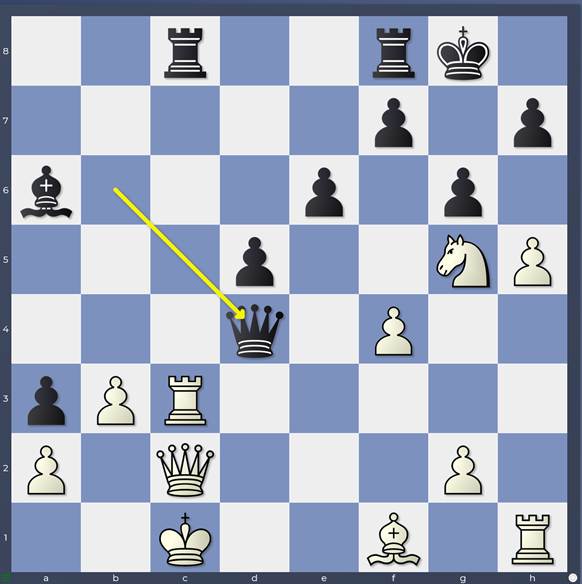
Variation: 24…Qxd4
25. Bc4 dxc4 threatening …cxb3 and …Qxf4+ is simply killing! In this specific line, it wasn’t about the b-file at all (as it usually has been until now) it was about weakening the dark squares around White’s king and in particular White’s control of the c-file!
I think this blog post is by far long enough! In the next blog post we’ll zoom in further on the critical lines after 17…Be3+ 18.Kb1 Nxe5!