
In this blog post we dive a little deeper into the main lines after 17…Be3+ 18.Kb1 Nxe5, focusing on lines that a human player (like me!) might think of while playing through the game!
1. e4 e6 2. d4 d5 3. Nc3 Nf6 4. e5 Nfd7 5. f4 c5 6. Nf3 Nc6 7. Be3 a6 8. Ne2 Be7 9. c3 a5 10. dxc5 a4 11. Qc2 O-O 12. O-O-O b6 13. cxb6 Nc5 14. h4 Qxb6
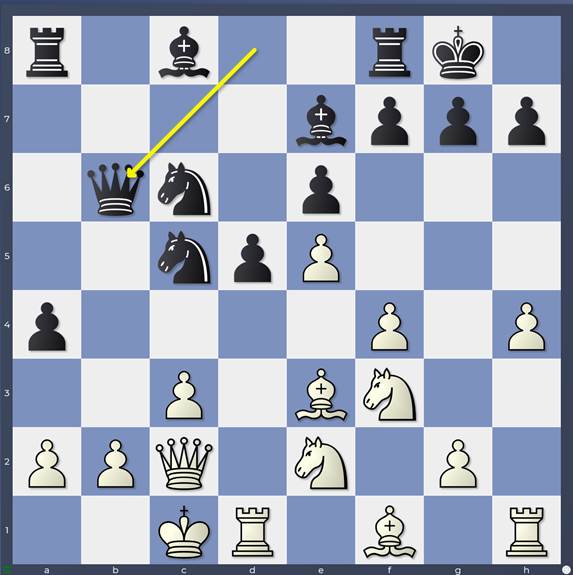
Game: 14…Qxb6
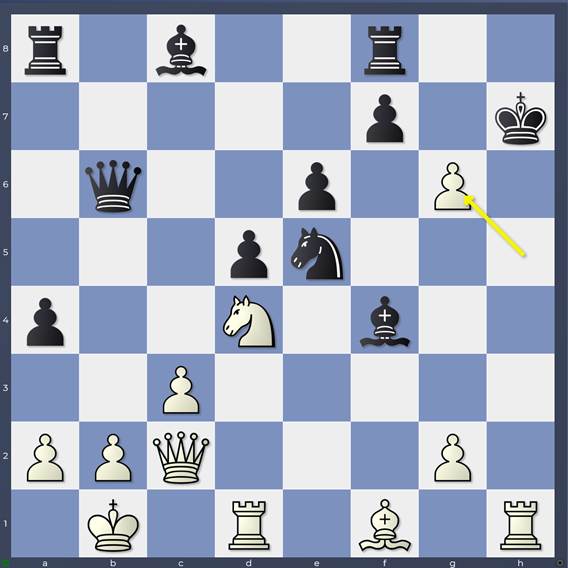
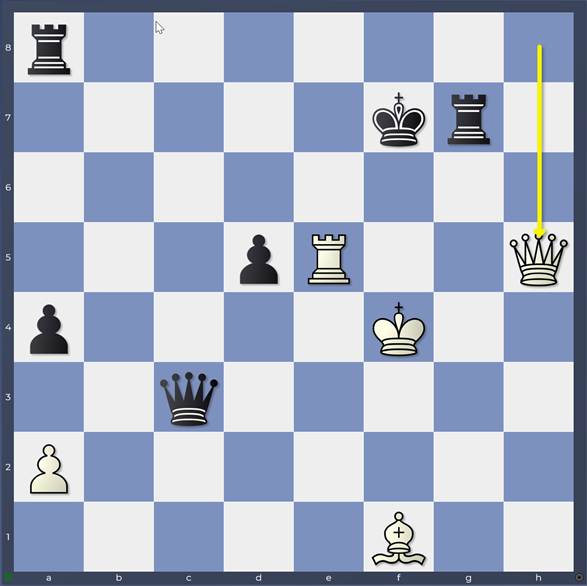
15. Bxc5 Bxc5 16. Ng5 g6 17. h5
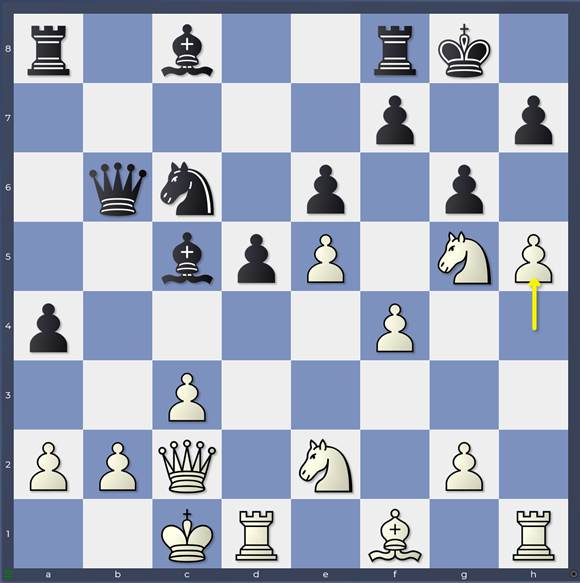
Game: 17.h5
17…Be3+ 18. Kb1
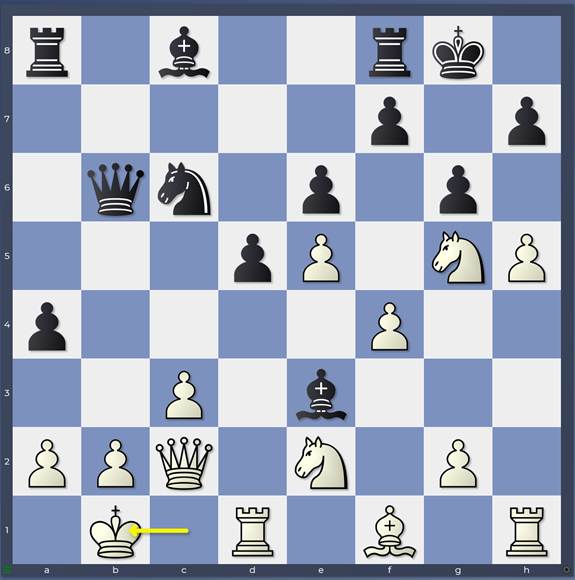
Game: 18.Kb1
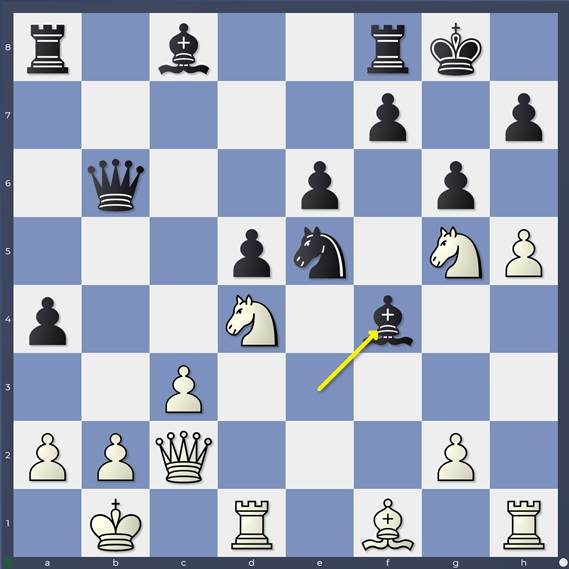
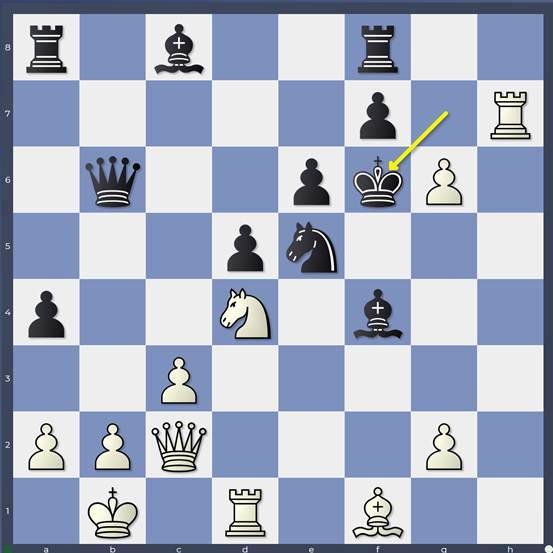
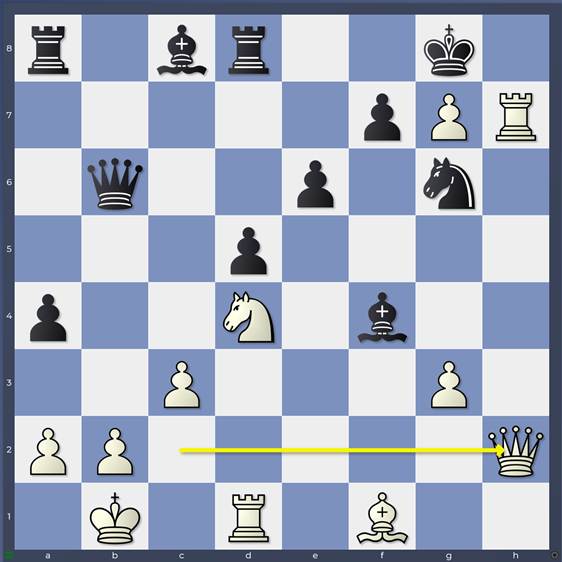
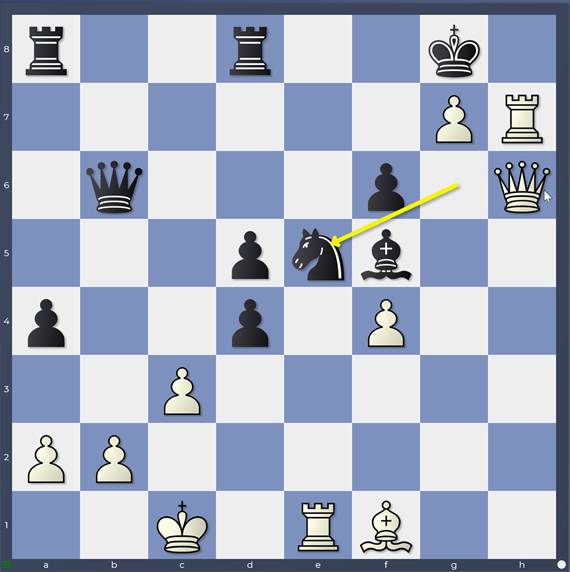
18…Nxe5

Game: 18…Nxe5
Here we are! And now as we saw in an earlier bog post, White’s best idea is 19.Nd4 preventingBlack’s counterattacking jump …Nc4 and keeping all his attacking trumps primed!
19… Bxf4
Game: 19…Bxf4
This is the reason I prefer 17…Be3+ intuitively to 17…Nxe5. This feels more like proper engine defence as I described it in “The Silicon Road to Chess Improvement”: sawing away at the opponent’s ladder as he scales the parapet of your castle!
With his knight on g5 attacked, White has no choice but to launch his attack *now*. If you’re unlucky, then you’re lost; if you’re lucky, then White will not yet be ready enough to deliver mate and the fight goes on!
20. Nxh7
20. hxg6 Bxg5 21. g7 Kxg7 22. Rxh7+ Kf6 is a good example of pushing White to launch his attack before he’s ready. White is missing e.g., a rook on f1 (a couple of extra moves of development in other words) to restrain the black king’s flight. Here White has nothing.
20… Kxh7 21. hxg6+
Opening the h-file with check… there really CAN’T be another move!
Game: 21.hxg6+
As we saw in previous blog entries, the engine choice here is 21…Kg7 after which 22.Rh7+ Kg8 23.g7 followed. Butwhy does Black need to drag the rook to h7 first before retreating to g8? Doesn’t 21…Kg8 make much logical sense?

Variation: 21…Kg8
Your first thought is that White is able to bring the queen rather than the rook to h7 after 21…Kg8 but actually that doesn’t seem to make any difference!: 22. g7 Kxg7 23. Qh7+ Kf6 24. Qh4+ Bg5 25. Qf2+ Kg6 is pretty safe for Black, though 25… Ke7 26. Nf5+ is OOPS!
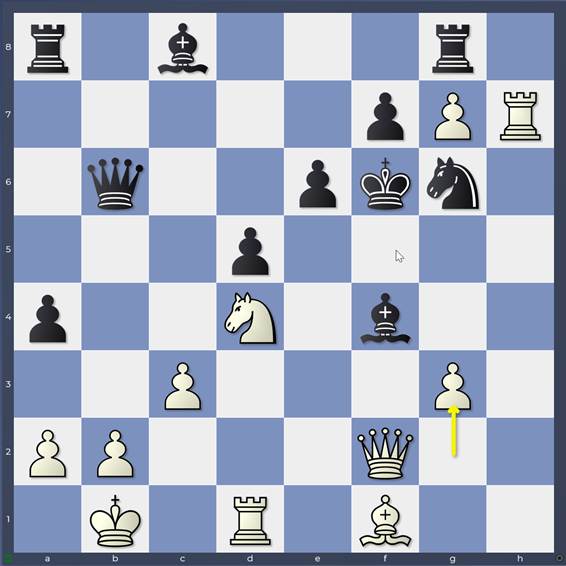
22. g3 is the key move, once again threatening to get the queen quickly to the h-file. 22…Bxg3 The only move to stop 23.Qh2, then both 23. Qg2 and 23. Rg1 are extremely unpleasant for Black. This is Stockfish’s main line: 23…Nxg6 24. Bd3 e5 25. Rxg3 Kg7 26. Rdg1 e4 27. Bb5 Ra5 28. Bxa4 with equal material and a weakened Black king to aim for.
Back to 21…Kg7, We’ve seen how strong 22.g3 was against 21…Kg8, so why not try the same recipe against 21…Kg7? 22.g3
Variation: 21…Kg7 22.g3
Well…there’s a big difference! From g7 the black king supports 22…Bh6
Variation: 21…Kg7 22.g3 Bh6
Blocking the h-file and stopping the white major pieces from targeting h7! So in fact White *has* to play 22.Rh7+ to get in front of this idea!
Note that in similar fashion after 21…Kg7 22. gxf7 think of the added value of putting the king on g7 and you’ll find the right response! 22…Ng6 After this Black is winning! The king on g7 again helps the black pieces to put up a barrier against White’s ambitions for the h7-square!
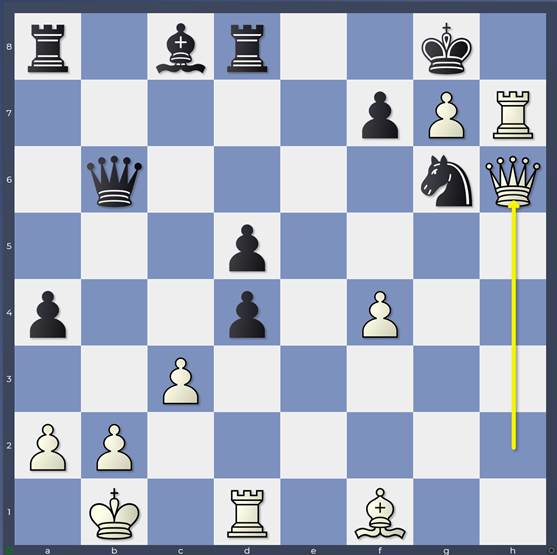
Back to the main line 22.Rh7+.
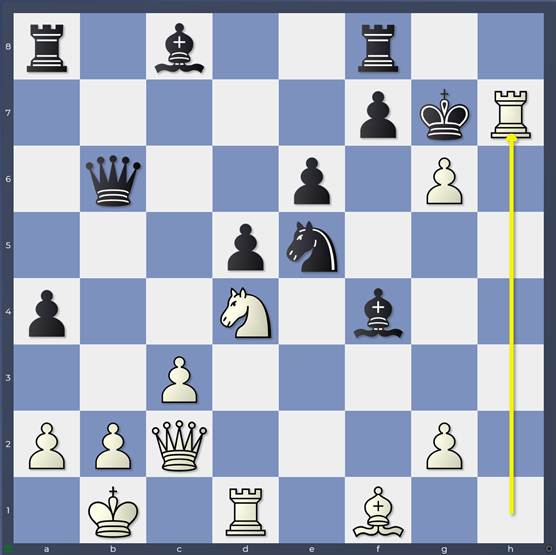
Game: 21…Kg7 22.Rh7+
My first thought was not to stay in the “kill zone” with 22…Kg8 but to run for it with 22…Kf6
Variation: 21…Kg7 22.Rh7+ Kf6
Here there is something “modest” and “simple”: 23. g7 Rg8 24. Qf2 Ng6 25. g3
Variation: 25.g3
and White is going to recover his piece after which Black will still have a lot of worries with his king. As simple as that! Strange as it may seem, such simple variations are often difficult to get your head around during a practical game. You’re very focused on searching for maximalist continuations – mates and big material wins – and regaining material in sidelines can feel a little out of your scope. You get worried you’re missing something better and a little frustrated with your own stupidity! And of course, such lines are never quite as clear and simple for humans as the engines make them look. For example, how about 25…e5? 26. gxf4 Bf5+ (26… exd4 27. f5 is what we’re looking for of course. As long as we are happy with 27…Bxf5+ 28. Bd3 Qe6 29. Rf1 (which we are ;)) then we can assume that we will regain the piece by capturing the knight on g6 and continue with a raging attack against a black king exposed in the centre.) 27. Bd3 Bxd3+ 28. Rxd3 exd4 29. f5 will again regain the piece when White is always much better and nearly always winning!
So Black has to stay in the danger area with 22… Kg8
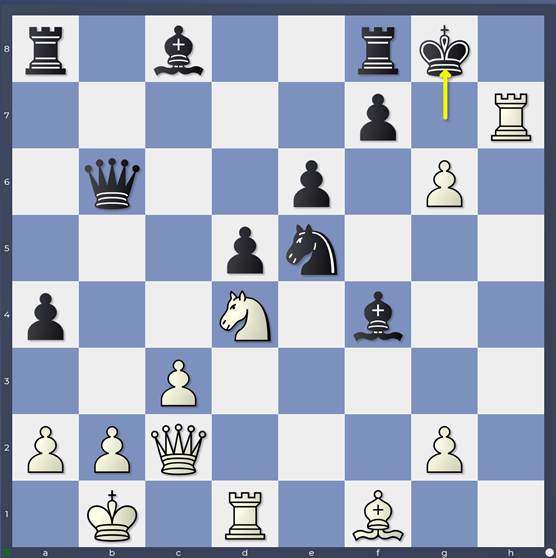
Game: 22…Kg8
The fact that the king has to stay in the “kill zone” is definitely a subjective encouragement for White: an extra piece of evidence that the variation he is pursuing has potential. The ability to influence the opponent and force him to do things he’d rather not is always a good sign
23. g7
It’s more or less an automatic move to gain a tempo on the black rook while gaining access to the h8 square for the rook and access to the h7 square for the queen. However, even 23. gxf7+ is worth a look (at least to a human player) 23…Rxf7 with 24. Rxf7 as the white queen will invade either on g6 or h7 depending how Black recaptures. Checking and taking stuff just as Tal showed! However 24…Nxf7 25. g3 Be3 26. Qg6+ Kf8 leaves Black perfectly safe
23… Rd8
23… Re8 just leaves the rook loose on e8: it’s one of those simple recoup the material lines! 24. Rh8+ Kxg7 25. Qh7+ Kf6 26. Rxe8 wins easily. The rook has to go to d8 where it is protected by the queen.
Game: 23…Rd8
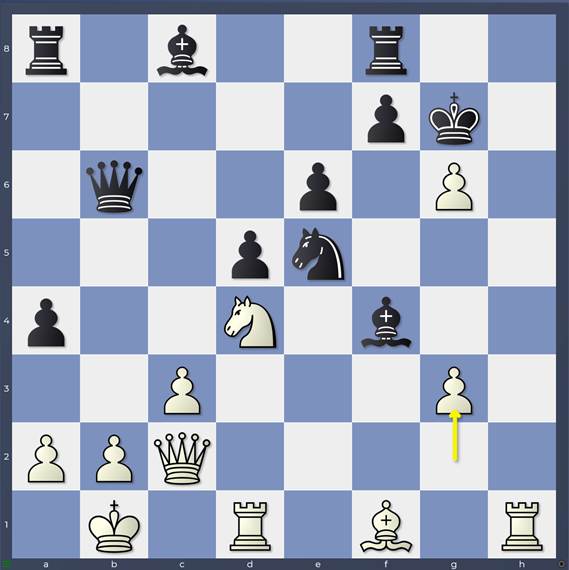
With the knowledge of our first 3 articles, we know the advantages of the move 24.Bb5 very well: the b-file is blocked (slowing down Black’s counterplay against b2), the h-file is freed for White’s rook on d1, the e8 square is taken away from black’s king and the attacking resource Nc6 is introduced. There are other moves however and we will focus now on 24. g3 trying to get the queen across to h2 as quickly as possible without wasting time on Bb5. Black’s task here is just as difficult as against 24.Bb5.

Game: 24.g3
24… Ng6
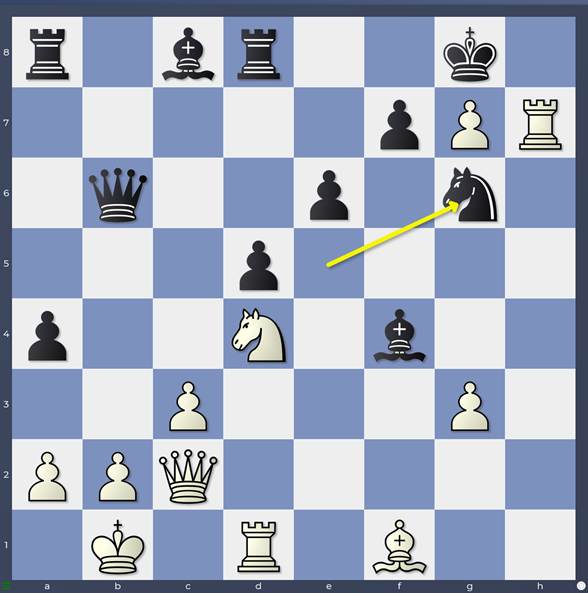
Game: 24…Ng6
This defensive idea cutting the queen’s support of the rook along the b1-h7 diagonal while covering h8 is so important for Black as 24… Bxg3 simply loses the bishop to 25. Rh3 with the double threat of Qh7+ and Rxg3.
However that’s not to say that Black’s task is easy!
25. Qh2
Game: 25.Qh2
Things look critical for Black but amazingly, Rh8+ is not yet a threat!
25…e5
Now this counterattack is best, connecting the black queen with the kingside and freeing the light-squared bishop to join in the defence. From a human point of view however, it barely seems credible that Black is surviving!
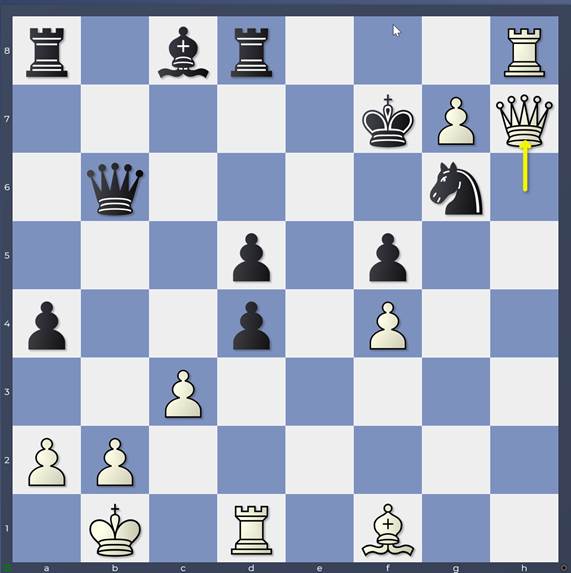
26. gxf4 exd4 27. Qh6
Game: 27.Qh6
27. Rh8+ Kxg7 28. Qh6+ Kf6 29. Qg5+ Kg7 is nothing more than a perpetual as 30. Rxd8 Qxd8 31. Qxd8 Bf5+ wins for Black! Checking the king to b1 with 17…Be3+ proved useful after all!
What is happening here? Well Black’s king needs some room to breathe and the only way that is going to happen is with either …f6 or …f5. However 27…f5 loses to the very neat 28.Rh8+ Kf7 29.Qh7! when g8(Q) is unstoppable!
Variation: 29.Qh7!
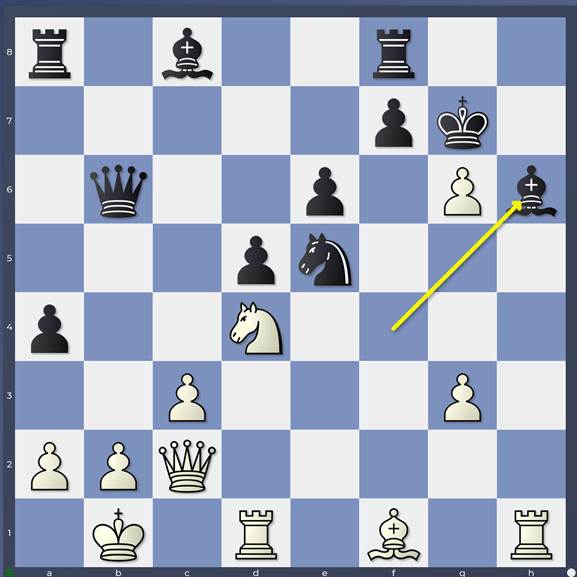
The only way to escape is to use the king’s position on b1 to gain a tempo (thank you 17…Be3+ once again!) with 27…Bf5+
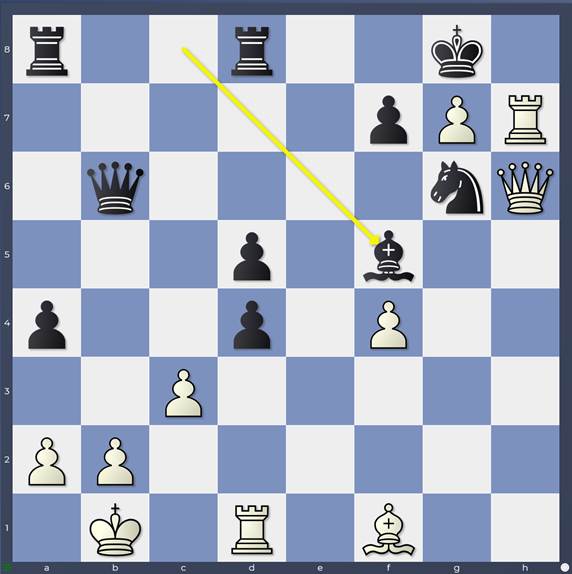
Game: 27….Bf5+
28. Bd3 looks very strong but Black has 28…Bxd3+ 29. Rxd3 f5 30. Rg3 (30.Rh8+ Kf7 31.Qh7 now fails to 31…Rg8 as …Bf5+ connected Black’s rooks along the back rank!) 30…Qe6 31.Rxg6

Variation: 31.Rxg6
Look at those major pieces! 31…Qe1+ with perpetual. This is the slightly scary main line: 32. Kc2 d3+ 33. Kxd3 Qd1+ 34. Ke3 Re8+ 35. Re6 Qe1+ 36. Kd3 Rxe6 37. Rh8+ Kf7 38. Rf8+ Ke7 39. Qxe6+ Qxe6 40. Rxa8 Qe4+ 41. Kd2 Qxf4+ 42. Kd3 as 42…Qe4+ 43. Kd2 Qg2+ 44. Kd3 (44. Ke3 d4+ should be avoided at all costs!) 44… Qxg7 45. Ra7+ Kf6 46. Rxg7 Kxg7 is a drawn king and pawn endgame!
28.Kc1 is White’s best and now 28… f6

Game 28…f6
This creates an escape square on f7 having first defended the knight on g6 with 27…Bf5+! The black king is ready to flee via f7-e7(6) towards the queenside. Since there are no immediate threats yet against his own king, White can play a shogi-style encircling move of his own, preventing the king from fleeing across the e-file.
29. Re1 Ne5
Game 29…Ne5
A stunning resource and Black’s only hope! Blocking the e-file gives the black king a pocket of air allowing Black to attack White’s king.
29… dxc3 loses to 30. Rh8+ Kf7 31. g8=Q+ Rxg8 32. Rh7+ Rg7 33. Qxg7#
30. fxe5 dxc3
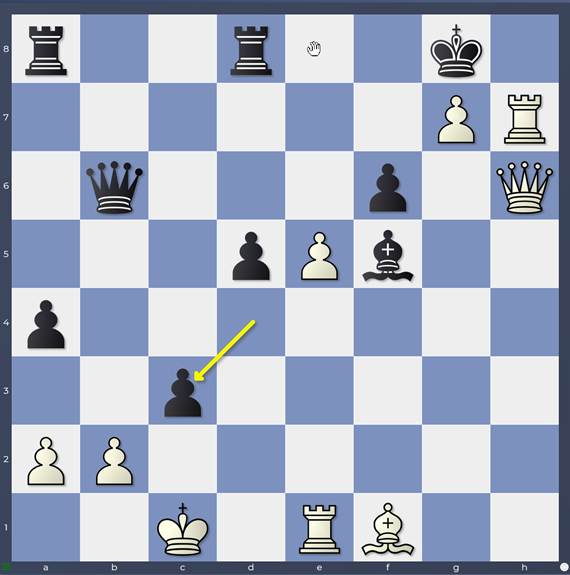
Game 30…dxc3
Both attacks are at their peak. It’s simply incredible that White doesn’t have mate!
By the way, you might think that opening an attack on the rook on h7 was one of Black’s main ideas behind 29…Ne5… but you’d be wrong! 30… Bxh7 is met by the lovely 31. Bd3 Bxd3 32. e6
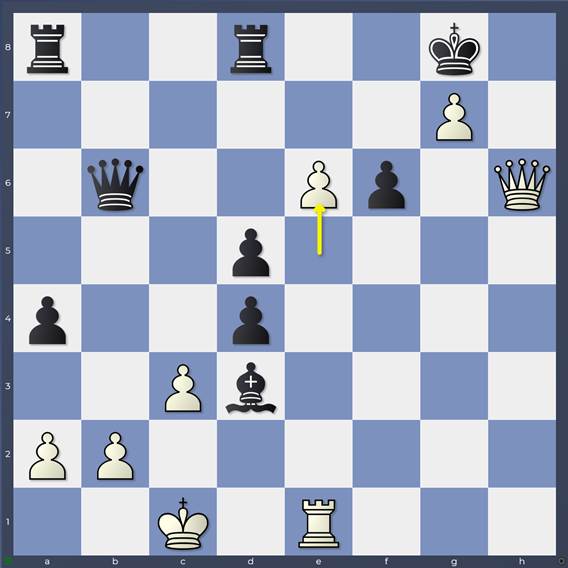
Variation 32.e6
Threatening mate on h8 32…Bh7 33. Rh1 Qxe6 34. Qxh7+ Kf7 35. g8=Q#
Back to the game after 30…dxc3 and now 31. Rh8+ Kf7
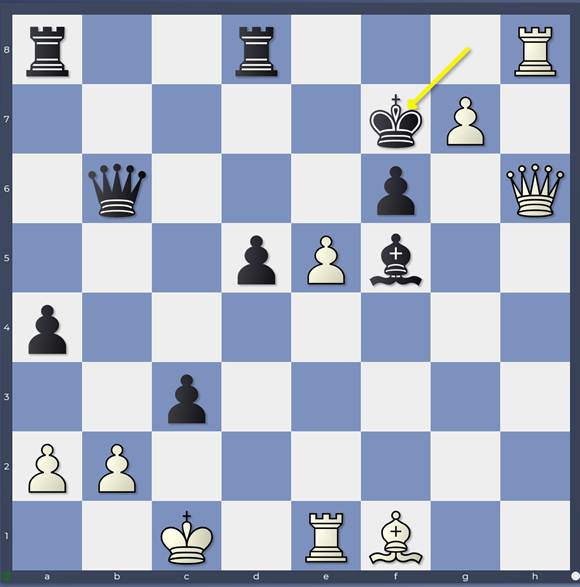
Game 31…Kf7
and now the engines give
32. bxc3
White has to deal with Black’s threats against b2 but now his king is exposed to checks. 32. e6+ Ke7 and the black king is unexpectedly safe from checks! 33. g8=N+ is clever but insufficient 33…Rxg8 34. Rh7+ Ke8 35. Qh5+ Bg6
32… Qb1+ 33. Kd2 Qc2+ 34. Ke3 Qxc3+ 35. Kf4 fxe5+ 36. Rxe5 Bg6
Game 36…Bg6
The bishop is safe and the black queen is ready to check from all directions! Time for White either to find mate… or a draw!
37. g8=Q+ Rxg8 38. Rh7+ Bxh7 39. Qxh7+ Rg7 40. Qh5+ Kf8 41. Qh8+ Kf7 42. Qh5+
Game 42.Qh5
with a draw by repetition!
With this blog we conclude our analysis of the maelstrom of complications unleashed by Black’s choice (the engines’ favourite) of 15…Bxc5. As you can see, you can’t exactly say that the game is forced after that – both sides have alternatives at a couple of points – but the few best lines are very clearly delineated by the engines,,, and completely unfathomable to engine-unassisted humans!
However, understanding the consequences of 15…Bxc5 gives us an insight into the engines’ view of best play from this position. In subsequent blog posts, we are going to zoom in to the play before this point, examining the more human alternative 15…Qxc5 as well as other choices earlier in the game!
Finally, in case you’re wondering, yes I’ve always analysed games like this – from back to front – even in the pre-computer age. I’ve always liked / needed to understand / divine the logic behind chess games. You can’t achieve that unless you understand what happened at the end and whether it was the result of blunders or whether it flowed naturally from previous play. I think it’s a really good way to analyse games, but I don’t know how many other people do it that way! 😊