
I didn’t feel in great shape at the last 4 NCL weekend in March, but I did have an interesting middlegame on the Sunday morning which gave me some nice analysis practice on the early morning flight back to Amsterdam! My preparation for the weekend had mainly consisted of analysing games of HE Atkins and his wonderful game against Prins must have inspired me as I was combining queens and bishops very happily all weekend! My game against the Spanish IM Alberto Real Garcia was a very nice illustration of this. As always, a playable version of this game is available at http://cloudserver.chessbase.com/MTIyMTYx/replay.html
Sadler,Matthew D – Suarez Real,Alberto
4NCL March 2017
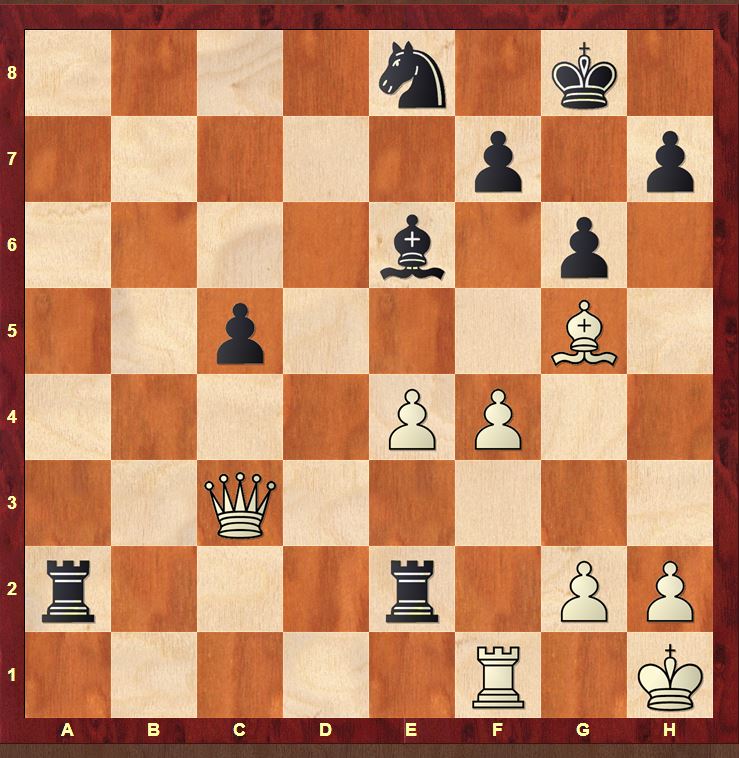
21.Kh1
The opening phase had not delivered any great success apart from a substantial advantage in time. My opponent was down to his last 5 minutes (plus increments) whereas I still had about half an hour left. My last move set a trap that I’d seen a few moves earlier (when I took the decision to play 18.dxe6). I wanted to play 21.Kh1 instantly but both here and on my next move I was assailed by doubts. I started to wonder whether my trap was simply a nudge for Black to make a brilliant queen sacrifice! In the end I decided to take the plunge.
21…Rfb8 22.Qxd6
This was the trap. The natural 21…Rfb8 (or 21…Rab8) lining up on the b2 pawn gives White an unexpected tactical chance…
22…Ne8 23.Qg3 Qxb2 24.Rb1
This is it! The rook on b8 is suddenly in the firing line. As 24…Qxc3 simply loses the exchange to 25.Rxb8, Black must sacrifice his queen… but that’s not necessarily a bad thing!
24…Bxc3 25.Rxb2 Rxb2
When I first saw this idea (while I was pondering over 21.Kh1) I suddenly got very worried about White’s position. The problem is the severely constricted position of the bishop on e2: 26.Bd3 gets hit by 26…c4 while 26.Bd1 Ra1 (or 26…Bc4) looks very uncomfortable for White. It was only when I spotted my next move that I felt confident enough to punt.
26.f4
An evil little move after which White’s position gains a lot of freedom. The threat of f5 (disrupting Black’s light-squared bishop on e6 while putting pressure on Black’s kingside) is in the air while White also gains the h3–c8 diagonal as an escape route for his light-squared bishop. However as always when positional problems are parried with tactical solutions, the whole position accelerates. The commitments of both sides increase and it isn’t clear which will weigh heaviest.
26…Rxe2 27.Qxc3 Raa2
From afar, I’d intended to simply protect the g2 pawn with 28.Qf3 and then push with f4–f5. However, once I got to the position, I became dissatisfied with moves like 28…Bc4 (threatening …Rxg2) with perhaps …Nd6 as a follow-up. Although 26.f4 was an ingenious resource, the downside is that White’s central and kingside light-squares are severely loosened, especially after Black has nabbed White’s light-squared bishop. After a move like 27…Raa2, you don’t need too much imagination to envisage a situation in which Black gets his bishop to the a8–h1 diagonal and a knight to e4 and proceeds to destroy White’s king’s position! The only reason this might not happen is the weakness of Black’s own kingside dark-squares, particularly marked once Black offered up his dark-squared bishop for White’s light-squared bishop.
I thus felt that the best way to curb Black’s activity against my kingside was a show of force on Black’s kingside dark-squares. And for that, I needed all the big pieces I could get: in particular, my queen and dark-squared bishop. That led me to defend the g2 pawn with the meek-looking
28.Rg1 Rxe4
Clearing the a8–h1 diagonal for the light-squared bishop. 28…Nd6 29.Bh6 is a very important point. Note also the typical geometry in the following forced win (we’ll see this a number of times in the ensuing variations) 29…Ne8 30.Qxc5 Threatening mate on f8 30…Ng7 31.Qd4 Ne8 Only move to stop mate on the back rank 32.Qb4 With gain of tempo, White has shuffled his queen to the optimal spot 32…Ng7 33.Qb8+ wins
29.Qxc5
A natural move played quickly, but not the best. Strangely enough, it felt wrong somehow but I wanted to keep the (time) pressure on my opponent so I didn’t question myself too much. I hadn’t yet understood the exact nature of White’s advantage in the position.
29.Bh6
was the best idea, cementing White’s 2 advantages in the position – the weak kingside dark-squares and the weakness of Black’s back rank – before addressing the material situation. Bh6 stops the Black knight from leaving e8 and also prevents Black from giving his king air with …h5 (freeing h7 as an escape route).
29…Ra8
a) 29…c4 30.Qb4 Ng7 31.Qb8+;
b) 29…Rc4 30.Qe5
The c-pawn actually hinders Black’s coordination by preventing the rook on the c-file from returning to c8
30…Ra8 31.Re1
preparing first h3 (to cover the g4 square) and then f5
30.h3
The most accurate move order. 30.Rd1 Bg4 is a bit irritating
30…Rc8
30…c4 31.Rd1 …c4 just gives White an extra avenue of invasion along the dark-squares: the a3–f8 diagonal.
31.Rd1
I don’t really see what Black can do: White can simply strengthen his position with Rd2, Kh2, and then turn to action with g4 & f5.
29…Rc4
A natural way of dealing with White’s threat of Bh6, but again not the best. Black really needed more time to work out a proper plan. Let’s take a look at Black’s alternatives:
a) 29…Ree2 30.Bh6 Ng7 31.Qd4 Ne8 32.Qb4 Ng7 33.Qb8+ wins just as we saw earlier
b) 29…Ng7
White must constantly be on the watch for Black’s attempts to activate his knight, but here Black’s knight can’t escape yet.
30.Bf6
Introducing ideas of retreating along the h8–a1 diagonal followed by the transfer of the queen to the same diagonal.
30…Nh5
30…Rxf4 31.Qe5; 30…Nf5 31.Qc6
31.Be5 Nxf4 32.Qd6 Rxe5 33.Qb8+ is very nasty!
c) 29…h5
Looking at what happens in the game, you start to understand that White’s potential for an advantage rests on 2 factors:
- The (permanent) weakness of Black’s kingside dark-squares
- The (temporary) weakness of Black’s back rank.
It isn’t in Black’s power to change the first factor, but he can address the second factor by playing …h5, giving his king an escape square on h7. This has the additional point of allowing Black to harry a White bishop on …h6 with …Kh7. …h5 is best played at this exact moment, with the centralised rook on e4 holding Black’s position together. For example, 30.Qc6 is met by 30…Bf5 protecting the rook on e4 and the knight on e8 simultaneously. The additional room for Black’s king also robs the break f5 – which can often be played to break up Black’s kingside – of some of its power. White’s best chance to still make some use of Black’s weakened kingside dark squares is to reroute his bishop to the a1–h8 diagonal. This is often achieved most effectively by a pawn sacrifice with f4–f5 followed by Be3–d4.
Back to the game after the weaker 29…Rc4
30.Qe5
Centralising the queen. I will confess that I was greatly influenced by the Atkins games I’d been studying before this 4NCL weekend. I too wanted to coordinate my queen and bishop to the maximum degree!
30.Qe7 Rc8
I was afraid that the knight on e8 would escape too easily to g7.
30…Rcc2
a) 30…Ng7 Black’s typical attempt to get his knight active meets a very neat refutation
31.Bf6
a1) 31…Nh5
Allows a stunning riposte. Who would have thought the rook on g1 was an attacking piece?
32.f5 gxf5 (32…Nxf6 33.fxe6 Ng4 34.exf7+ Kxf7 35.Rf1+ Nf2+ 36.Rxf2+ Rxf2 37.Qd5+ Kg7 38.Qxc4) 33.g4
33…Nxf6 34.gxf5+ Ng4 35.fxe6
No tricks for Black amazingly. Really proud I spotted this idea!
a2) 31…Ne8 32.f5 gxf5 (32…Bd7 33.Qd5 Rac2 34.Bb2 Komodo 34…Rc7 35.Qd4 f6 36.fxg6 hxg6 37.Qb4 Black is really loose) 33.g4
Again!
33…f4 34.Qg5+ Kf8 35.Be7
a3) 31…Nf5
32.Rd1 Rc8 33.g4
This feels airy, but there is no way for Black to exploit this. White is just winning
b) 30…h5
A move later than required, but still worth trying
b1) 31.f5 gxf5 32.h3
is pretty tempting. The only thing I didn’t like was that Black can place his rook back on the wonderful square e4 which helps keep his position together 32…Re4 33.Qg3 Kh7;
b2) 31.Re1 Rcc2 forces White to take a step back according to Komodo. I couldn’t see why though!
31…Ra8 32.f5 Bxf5 33.Bc1 Rd8 34.Bb2 (34.Qe7 Rcd4 35.Bb2 Rd1 should enable Black to hold I thought) 34…f6 35.Qe7 (35.Qb5 Re4) 35…Rcc8 36.Ba3 Rd7 37.Qf8+ Kh7 38.h3 wins (38.g4 was my first thought but it fails surprisingly to 38…Bxg4 39.Rxe8 Rd1+ 40.Kg2 Rc2+ 41.Kg3 Rd3+ 42.Kf4 Rc4+ 43.Re4 Rf3#)
32.f5 gxf5 (32…Rxg2 33.fxe6 f6 34.Qb8 Rxh2+ 35.Qxh2 Rxh2+ 36.Kxh2 fxg5 37.Rf1 wins) 33.Qb8 Kh7 Komodo (33…Rc8 34.Qxc8 Bxc8 35.Rxe8+ Kg7 36.Rxc8 is the same trick as in the game; 33…Bd7 34.Rxe8+ Bxe8 35.Qxe8+ Kg7 36.Qe5+ Kg8 37.h4 Rxg2 38.Bf6 wins) 34.Qxe8 Re2
Komodo… wow! That just hadn’t remotely occurred to me! (34…Rxg2 35.Rxe6)
35.Bh4 (35.Rg1 Rxg2 wins!; 35.Rd1 Rxg2 36.Bf4 Rgf2 is fine for Black 37.Bg3 Bd5+) 35…Rxe1+ 36.Bxe1 Ra1 37.h3 Rxe1+ 38.Kh2 Re4 is OK for Black;
b3) 31.h3
Very sensible, preparing f5
b31) 31..Rcc2 32.f5 gxf5 33.Be3 I’d spotted this idea rerouting the dark-squared bishop to tha a1–h8 diagonal and it’s very strong;
b32) 31…Ng7 32.Bf6 Nf5 (32…Ne8 33.f5 gxf5 34.Qb8 (34.Be7 was my idea which also looks strong) 34…Rc8 35.Qg3+ Kf8 36.Qg5 Nxf6 37.Qxf6 with a clear advantage according to Komodo)
33.Rb1 Rc8 34.Rb8 Rac2 35.Rxc8+ Rxc8 36.g4 Rc1+ 37.Kg2 (37.Kh2 hxg4 38.hxg4 Nh6) 37…Rc2+
b321) 37…Bd5+ 38.Kf2 (38.Qxd5 Ne3+) 38…Rc2+ 39.Ke1;
b322) 37…hxg4 38.hxg4 Nh6 39.Qd4 Komodo (39.Bh8 Bd5+ 40.Qxd5 Kxh8 41.g5 Nf5 42.Qxf7 offered White good winning chances I thought) 39…Rc8 40.Bh8; 38.Kf3 hxg4+ 39.hxg4 Nh6 40.Bh8 Bxg4+ 41.Kg3;
b32) 31…Rac2 Looking for …Rc5 driving away the queen from e5 32.Be7 (32.f5 Rc5 33.Qb8 (33.Qe4 R2c4) 33…Rc8) 32…Rd2 33.Rb1 (33.Qg5 with the dual threat of f5 and Qh6 looked very attractive to me, but Komodo finds a cool defence 33…Bd5 (33…Kh7 34.f5 Rd5 35.fxe6 Rxg5 36.exf7) 34.Qh6 Rc3 Threatening …Rxh3+ with mate 35.Kh2 Rcc2 By forcing the king onto the second rank, Black ensures he captures on g2 with check! 36.Qf8+ Kh7 37.Qxe8 Rxg2+ 38.Rxg2 Rxg2+ 39.Kh1 Rg3+ 40.Kh2 Rg2+ draw) 33…Rd5 (33…Bd5 34.Bb4) 34.Qe1 with Ba3–b2 to follow 34…Rxf4 35.Rb8;
b33) 31…Rd2
I’d spotted this. It felt a little weird and risky to put a rook on a dark-square! From d2 however, the rook prepares …Rd5 driving the queen away from e5 while also supporting …Bd5 & …Nd6. If Black isn’t able to gang up on g2 square, then chasing away the White queen from its dominating post and trying to activate the knight is a good substitute plan.
32.Rb1
b331) 32.Re1 Rc8 (32…Rd5 33.Qb8 Rc8 34.Qxc8 Bxc8 35.Rxe8+ The same trick as in the game!)
b332) 32.f5 Rd5 33.Qb8 (33.Qe2 Rxf5) 33…Rc8;
32…Rd5 33.Qe1 Rc8 34.Kh2 Nd6 35.Bf6
The struggle goes on but White is definitely on top
31.Bh6
31.f5
I thought Black had prevented this, but White has additional resources I hadn’t spotted in the game
31…Re2 32.Be3
I’d missed this but after
32…Bd7 Black is not done yet!
32…gxf5 33.Qg3+ Kh8 34.Bd4+ f6 35.Qg5; 32…Ra3 33.fxe6 Raxe3 34.exf7+ Kxf7 35.Rf1+ Kg8 36.Qf4
33.Qe7 Bc6
looks totally scary but…
34.fxg6 hxg6 35.Rf1
Komodo
35…Bxg2+ 36.Kg1 Bxf1 37.Qxe8+ Kg7 38.Qe5+ Kg8
38…Kh7 39.Qe7 Rxe3 40.Qxf7+ Komodo seems to feel he is picking up a rook and bishop almost by force! 40…Kh6 41.Qf4+ Kh7 42.Qxe3 Be2 43.Qe7+ Kh6 44.Qf8+ Kg5 45.Qd8+ Kh6 46.Qh8+ Kg5 47.Qe5+ Kh6 48.h4 Kh7 49.Qe7+ Kh6 50.Qf6 Ra7 51.Qe5 when the dual threat of Qe3+ and Qxe2 wins a piece 51…Rf7 52.Qxe2
39.Qb8+ Kg7 40.Bd4+ f6 41.Qd6 Pretty impossible for a human to evaluate correctly! I’m OK with my choice which pins Black’s king to the back rank.
31…Rc8 32.Re1 Rac2 33.Kg1
33.f5 R2c5
33.h3
was stronger according to Komodo. I couldn’t decide which way to give my king some room. In the end I decided to put my king on a dark-square away from Black’s light-squared bishop…
33…R2c5 34.Qa1 Rh5
35.Bg5
Played with a heavy heart. Unfortunately, I failed my genius test here!
35.f5
A stunning idea from Komodo
35…Rxf5 It took me a while to understand Komodo’s idea. All of a sudden, the geometrical motifs we saw earlier are all in play!
a) 35…gxf5 36.Bf4 The rook on h5 is now offside 36…Rh4 37.g3 Rg4 38.Qa6 Rd8 39.Qb6 Ra8 40.Qb7 Rd8 41.Qe7 Ra8 42.Rd1 is appalling for Black
b) 35…Bxf5 36.Rxe8+
36.Qa3
Threatening Qf8+
36…Ng7 37.Qb2 Ne8 (37…Nh5 38.g4) 38.Qb7
Threatening Rxe6
38…Nd6
38…Rfc5 39.Rxe6 fxe6 40.Qe7 Rc1+ 41.Kf2 R1c2+ 42.Kg3 R2c3+ 43.Kh4 R3c4+ 44.g4; 38…Rd8 39.Qe7
39.Qe7 The threat of Rxe6 cannot be stopped! Amazing!!
35…h6 36.Be7 Rf5 37.Qd4
Black has ejected the White bishop from h6 but his pieces are awkwardly-placed and the dark-squared bishop is already on its way to the a1–h8 diagonal
37…Rc4 38.Qd8 Rc8 39.Qd2 Rc4 40.Ba3
Played with seconds to spare. It fits White’s plan of transferring the bishop to the a1–h8 long diagonal, and it also sets a venomous trap!
40…Rfxf4
Here Alberto gave me a heart attack by claiming a win on time as my flag fell, but thankfully he’d missed a move out on his scoresheet! His move falls right into my trap!
41.Qd8 Rc8 42.Qxc8
Neatly winning 2 pieces on the back rank!
42…Bxc8 43.Rxe8+ Kh7 44.Rxc8 g5 45.Bb2
Black’s challenge is to get some stability in his kingside structure without allowing the exchange of rooks. During the game, I thought that Black needed to play 45…Rb4 followed by …Rb6 to stand any chance of survival and then try to hold his structure with …f6 and …Kg6. In the game, White achieves the exchange of rooks without any problems, and remember, White has the right-coloured bishop for his rook’s pawn!
45…h5 46.Rc5 f6 47.Rc2
The Black rook cannot leave the f-file without leaving f6 hanging… But that means that the exchange of rooks is unavoidable.
47…h4 48.Rf2 Rxf2 49.Kxf2 Kg6 50.Kf3 f5 51.h3 Kh5 52.Bf6 Kg6 53.Bd8
53.Bd8 Kh5 54.Ke3 Kg6 55.Kd4 followed by Ke5 wins
1–0
Brilliant post. Thanks for the detailed analysis. I especially enjoyed your comments about how the position “accelerates” after f4 and how the play becomes more committal.
Hi Rob, thanks for that! It’s funny how analysing your own games – or at least the critical moments – brings out insights like that. My first impression after the game was that I’d played it pretty accurately but still lots to discover once you get thinking about it! Best Wishes, Matthew