
A rare tournament outing at the 2017 Limburg Open, a 7-round international open, was a reasonable success, ending in shared first place on 6/7 with GM Roeland Pruijssers (winner on tie-break) and GM Christian Bauer. I played with a lot of spirit, but I lacked some accuracy and calculation speed. That’s fortunate in a way as it gives me plenty to discuss in this blog!
The first interesting episode I’d like to discuss is from my 3rd round game against the young German player Rick Frischmann. After an interesting opening in which I offered first the bishop pair and then my structure in return for activity, we reached the following unbalanced position:
As always, a playable version of this game is available at http://cloudserver.chessbase.com/MTIyMTYx/replay.html and you can download a pgn at http://cloudserver.chessbase.com/MTIyMTYx/replay.pgn
Frischmann,Rick – Sadler,Matthew D
BPB Limburg Open 2017
1.e4 e6 2.d4 d5 3.Nd2 Be7 4.Bd3 c5 5.dxc5 Nf6 6.Qe2 0–0 7.Ngf3 a5 8.0–0 Na6 9.e5 Nd7 10.c4 Naxc5 11.Bc2 b6 12.Nd4 Ba6 13.Nc6 Qe8 14.Re1 f5 15.Nxe7+ Qxe7 16.b3 Nb8 17.Qe3 Nc6 18.cxd5 exd5 19.Nf3 Nb4 20.Bb1 f4 21.Qd2 Nbd3 22.Bxd3 Nxd3 23.Rd1 Rac8 24.Bb2
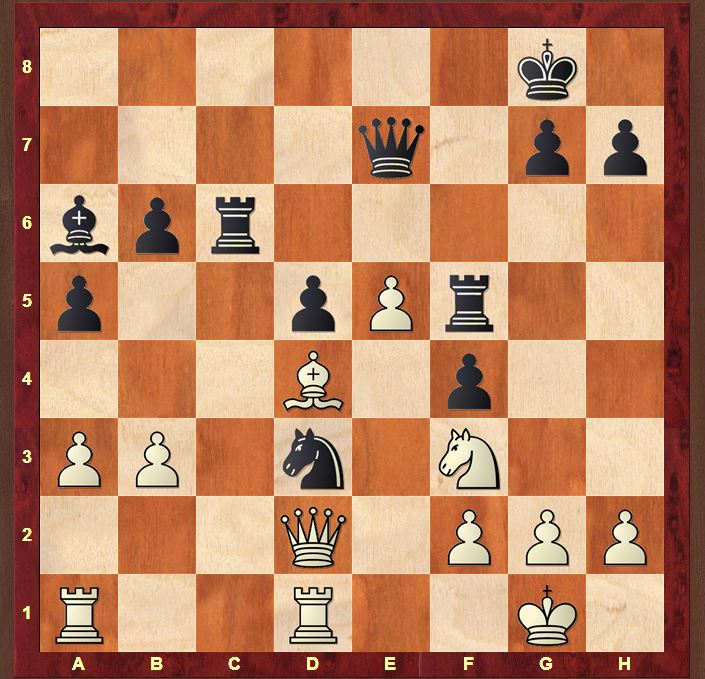
We’ll start getting into the game from this position. After a fraught period a few moves earlier, I felt that it was my turn now to make the running.
24…Rf5
My first task was to forestall White’s attempts to exchange my beautiful knight on d3 with Ne1. 24…Rf5 achieves this goal for now, and moreover supports 2 goals on the kingside:
- The advance of my g-pawn with …g7–g5–g4
- The transfer of the rook to h5, attacking h2.
25.Bd4
Ne1 is again on the agenda, as …Nxb2 is no longer possible. My loose pawn on b6 is also under attack.
25.Ne1 Nxb2 26.Qxb2 Qxe5 (26…Rxe5 both pick up the e5 pawn while maintaining Black’s activity.)
25…Rc6
A multi-purpose activation of the rook, defending b6 and preparing a double rook swing (as described by Ivan Sokolov in his recent book “Chess Middlegame Strategies”) to the kingside. Moreover, Black also gains the idea of …Qc7 with the big threat of ..Rc2 trapping the White queen.
26.a3
This move caught me by surprise. I’d expected White to take his (temporary) opportunity to evict the Black knight from d3 with the obvious 26.Ne1 or the very risky 26.Qe2.
26.a3 ups the stakes considerably by taking away the b4 square from the Black knight. It adds venom to 27.Qe2 as after 27…Nb4 28.Qb2, the knight is hanging on b4. After 28…Rc2 29.Qb1, all of Black’s pieces (Nb4, Rc2 and the Rf5 behind it) are hanging on a thread which will start to unravel on the next move after axb4. Black gets one shot to strike or his whole position collapses. On the downside, White gives Black a whole move to improve his attacking posture and with so many pieces poised to move to the kingside, you feel that has to count for something!
Let’s take a little look at the alternatives:
- 26.Ne1 Nxe1
26…Nxe5 27.Bxe5 Rxe5 (27…Qxe5 28.Nf3 followed by Nd4 forks the rooks! An unusual tactic that I was happy to spot quickly!) 28.Nf3 Black has not profited from winning the e5 pawn: the weakness of his pawns on d5 and f4 is obvious while White can make better use of the open centre. 28…Rh5 29.Qxf4 Rf6 30.Qg3 with Re1 to follow 30…Rg6 31.Qb8+
27.Rxe1
My opponent was very pessimistic about this position, excessively so I felt during the game . Black has attractive attacking chances with 27…f3, 27…Rh6 or 27…Rg6 but White will get counterplay with e5–e6, even as a pawn sacrifice. However, the more I look at it at home, the less I feel like taking the White side!
27…Rh6
a) 28. Rac1 Rxh2 29.Kxh2 Qh4+ 30.Kg1 Rh5 31.f3 Qh2+ 32.Kf2 Rg5
b) 28.f3 Qh4 29.h3 Rg5 30.Bxb6 An amazing shot which I was pleased to spot, as well as the refutation! 30…Rxg2+ (30…Bb7 31.Bd8; 30…Rxb6 31.Qxd5+ Kf8 32.Qd8+ Kf7 33.Qxb6 Rxg2+ is only a draw by perpetual) 31.Qxg2 Rg6 32.Bf2 Qxh3 A very important idea 33.Qxg6 hxg6 34.e6 Kf8 with …Qxf3 to follow
c) 28.e6 Rxh2
Strangely enough, Komodo only assesses this as a win after you make the move! 29.Kxh2 (29.Bf6 Rxf6 30.Kxh2 Rh6+ 31.Kg1 Qh4) 29…Qh4+ 30.Kg1 Rh5 31.f3 Qh2+ 32.Kf2 Rg5 I hadn’t seen during the game that this was mating. I thought I only had a draw with …Qg3+
d) 28.g3 was the umm…amazing Komodo suggestion for a very long time. 28…Qe6 Umm… what is White doing here? Suddenly Komodo switches to losing for White!
e) 28.h3 Rg6
28…f3 29.Be3 is an annoying resource. 29…Re6 (29…Rg6 30.Qxd5+ Kh8 31.g3 (31.Qa8+ Rf8 32.Qxa6 Rxg2+ 33.Kf1 Qxe5 followed by …Qh2) 31…Bb7 32.Qd3 Rxe5 I thought this might be an edge for Black but Komodo of course disagrees. If White’s kingside is holding, then his position is more solid than Black’s and of course Komodo will hold! 33.Kh2 is his recommendation which is very sensible) 30.Qxd5 Bb7 31.Qd3 Rfxe5 is Komodo’s better version when I would rather be Black. He looks very active: you can’t imagine White challenging the e-file for a while.
29.Kh2 f3 Now that Be3 with tempo has been sidestepped. White faces an uphill defensive task.
- 26.Qe2
This looks and is exceedingly risky, but if it works concretely, then Black’s pieces could get into an terrible mess! I can understand that my opponent didn’t believe it – it looks awful – but from the Black side, it was a constant worry!
26…Nb4 27.Qb2
a) 27..Nd3 My first thought was that I had a draw by repetition at least, which is always a comforting thought… but then I spotted 28.Qb1 which wins on the spot. It reinforced my feeling that this position was much closer than I had believed.;
b) 27…Nc2 28.Rac1 Be2 29.Rxc2 is the annoying tactic due to the loose rook on c6. (29.Rd2 Bxf3 30.Rdxc2 Qg5 31.g3 Qh5 would make Black very happy of course!) 29…Bxf3 30.gxf3 Rg6+ 31.Kf1;
c) 27…Rc2
This was the line I really wanted to play of course.
28.Qb1 Be2
was the focus of my feverish calculations while my opponent was thinking.
29.Rd2 Rxd2
29…Bxf3 30.Rxc2 Nxc2 31.Qxc2 Qg5 (31…Rg5 32.Qc8+ Kf7 33.g3 is perfectly safe for White; 31…Be4 followed by …f3 was my bail-out line, although Komodo likes White after 32.Qc8+ Rf8 33.Qg4 f3 34.Rc1 e6 will follow) 32.Qc8+ Rf8 33.Qe6+ Kh8 34.Qh3 (34.g3 fxg3 35.fxg3 (35.hxg3 Qh5) 35…Qd2 36.Bf2 Qxf2+ 37.Kxf2 Bg4+ wins, thank you Komodo!) 34…Be4 35.e6 is pleasant for White according to Komodo.
30.Qxf5 (30.Nxd2 Rg5 looked very dangerous with White’s major pieces so awkward on the queenside) 30…Bxf3 31.gxf3
and unbelievably after
31…Rxd4
White has
32.Rc1
winning!
In general, I’m pleased for spotting that, but during the game I was at the muttering-curses-under-my-breath phase of my analysis when my opponent surprised me by playing his move 26.a3.
26…Qe8
I was a little off the pace during the Limburg tournament. I chose this move after ending my thought process a little too quickly. It was a reasonable practical decision – I’d spent about 20 minutes on my move, and I wanted to ensure I didn’t fritter away my time advantage – but just a few minutes’ extra reflection might have led to a better decision.
Let’s take a moment to understand the position. First of all, how good is Black’s attacking posture? The most notable feature of Black’s position is the Kasparov “Octopus knight” on d3 named after the famous 16th game of the 1985 World Championship match.
Back to my game, my own “octopus knight’s” foundations are not impregnable – it is only supported by the bishop on a6 – but the knight is nonetheless difficult for White to attack in a concerted manner.
Ne1 is an obvious idea, but this also exchanges a key defender of White’s kingside. White would like to attack the knight with queen and rook, but Qe2 invites a discovered attack from the knight on d3, while Qc2/c3 is impossible while Black maintains his rook on the c-file. What only occurred to me during home analysis is that 26.a3 has also introduced the “snooker shot” Qd2–a2–b1 getting past Black’s control of c2 to attack the knight on d3 with queen and rook!
Note that the bishop on a6 – as well as protecting the knight on d3 – also dissuades the White king from running away from the kingside by covering the a6–f1 diagonal. That’s a nasty psychological feeling for White to contend with.
As we’ve mentioned, the rook on c6 plays a dual role. It should stay on the c-file as long as possible in order to prevent Qc2/c3. It should only move to the kingside once Black has a tactical win.
Let’s move on to the kingside, and start with the most problematic factor: the pawn on f4. Whenever this structure arises, I always think back to a game from my last tournament as a professional, or rather after which I decided to look for a proper job: Tilburg 1998. I had just drawn with Joel Lautier from this position.
Anand came to me after the game and said “You took a draw? With that pawn on f5?” What did Vishy mean? In some ways, the pawn on f5 is very impressive. It dissuades Black from playing …g6 which can be useful if White can exert pressure against g7. Moreover, if White can advance a pawn to g5, then the f- and g-pawns support each other in a subsequent thrust against the pawns in front of the Black king.
However, the pawn on f5 also gets in the way of White’s pieces. Look at that light-squared bishop! Without the pawn on f5, it would be giving the Black king a very unpleasant itch on h7! Think about the rook on f1: without the pawn on f5, it would be putting pressure against the knight on f6 (which defends the pawn on h7). From an attacking point of view, you’d give anything to be able to pick up the pawn and hand it to Black! Because the f-file is blocked, Black’s knight feels pretty safe on f6 which means that the squares that White has most weakened by moving the f-pawn from f2 to f5 – the e4 square and then the a7–g1 diagonal / f2 square – are easily within Black’s reach. A remark about White’s reduced king safety was part of Vishy’s follow-up sentence after I’d replied non-commitally to his first comment!
In my game, the pawn on f4 does perform the important task of preventing Qe3 but… imagine if that pawn wasn’t there! I’d have threats of …Rxf3, if chased away my knight could retreat to the monster square f4, attacking g2 and e2. Once again I would happily offer my pawn to my opponent if I could! As for the option of …g5–g4, in some ways this looks pretty tempting: it’s easy to achieve (I could play it now) and it gains a tempo against the White knight while gaining kingside space. However, I thought back to my comments I made on the 25th move of my game against Adam Ashton at the 4NCL (http://matthewsadler.me.uk/the-endgame/lessons-4ncl-may-2017–part-ii/). When you advance pawns to gain space, you must be aware that you are losing the opportunity to attack the opponent’s pawns on that wing with your pieces. And that was the crux. After White plays Ne1, I would really want to start hitting on g2 and h2 with rooks and queen on the g- and h-files, but then I don’t want my g-pawn in the way. Moreover, …g5 opens my own king and I was worried about a future e5–e6 followed by a White occupation of the e- or c-file or God forbid, a queen and bishop battery along the a1–h8 diagonal.
While thinking about these things, the outline of a plan gradually formed in my head. Tactically, I needed to be ready for Qe2 on the next move, I needed a way of transferring my major pieces to the kingside (making sure to move the c6 rook as last to prevent White counterplay with Qc2/c3 – and I was going to avoid playing …g5 unless it was part of a decisive final onslaught.
Thinking about 27.Qe2, I spotted the tactical idea 27…Nxe5 28.Qxa6 Nxf3+ 29.gxf3 in a flash, but for some reason, it took me way too long before I stumbled on the way to mate White if he ran to the centre with his king and this led to my hasty choice for 26…Qe8 later. The key problem was that my king is exposed (a consequence of …f5–f4!) If my major pieces are poised on the g- and h-files and White’s queen gives a check from the back rank, then it’s perpetual at best, disaster at worst! I don’t want to give my king an escape square with …h6 because that takes away the h-file from my rook on c6, and after some agonising I understood that I really needed it!
In the end, I got a grasp of all the tactics and I realised that 26…Qe8 – covering the back rank – would refute 27.Qe2. I was also very happy about …Qe8 because it placed the queen on a light-square and I had gradually become convinced that I needed my queen on a light-square – together with both rooks – to open up White’s kingside.
That’s all logical… but the implementation sucks! The point is that after …Qe8, the most natural attacking formation (I’d also thought about the possibility of playing the queen to g6 just to support the knight on d3) is to bring my queen to h5 and then my rook to g6. That’s great but I’m only putting 2 major pieces in play: I’m not activating my rook on f5 at all. It’s not enough. So what would have been the most effective regrouping? Well I also spent a lot of time on
26…Rh5
I found some interesting lines during the game, but my biggest problem was that 27…Rch6 was not a threat. Imagine that it is Black to move and he plays 27…Rch6:
27.– Rch6 28.Qc3 Rxh2 29.Nxh2 Qh4 30.Rxd3 Qxh2+ 31.Kf1
At my first look at the position, my heart leapt at
31…Rh3 32.gxh3 f3
and the audience is allowed to shower the board with gold coins! Unfortunately, simply 33.Ke1 wins!
It was around here that I started to understand how solid White’s minor pieces were. Look at that bishop on d4, covering the rook on a1 and covering the f2 pawn, together with the rook on d3 giving the White king an umbrella to escape the storm on the kingside. After this variation, I rather lost interest in 26…Rh5, got into 26…Qe8 and never looked at it again. I do wish that after working out 26…Qe8, I’d just tried another sweep of my ideas to see whether the themes I’d found there could also work in other lines. If I had, I’d have seen that 26…Rh5 also refutes 27.Qe2 and that it also offers me a much more powerful method of coordinating all 3 major pieces against White’s kingside along the light squares.
After 26…Rh5
a) 27.Qe2 Nxe5 28.Qxa6 Nxf3+ 29.gxf3 Rg6+ 30.Kf1 (30.Kh1 Rxh2+) 30…Rhg5 31.Qc8+ Kf7
b) 27.Ne1 Rxh2 28.Kxh2 (28.Nxd3 Qh4) 28…Qh4+ 29.Kg1 Rh6
c) 27.Ra2 as in the game 27…Rg6 (27…Qd7 is also strong) 28.Qc3 Rxg2+ 29.Kxg2 Qe6 After I found this, it took me a while to really believe I’d seen all the defensive possibilities! 30.Ng1 (30.Rxd3 Qh3+ 31.Kg1 (31.Kh1 Rg5) 31…Bxd3 32.Qxd3 Rg5+ 33.Nxg5 Qxd3) 30…Qg4+
d) 27.b4
Komodo. A fantastic defensive resource. I didn’t understand at all what his idea was so I took on the challenge to prove Komodo was an idiot. Bizarrely enough, I succeeded in a few lines, but – as always – not completely!
27…Qd7
Not one of Komodo’s main lines, but definitely the strongest in my opinion. Black connects his queen to the kingside light squares while keeping his knight safe from attack by Qc2/c3 for as long as possible. All 3 of Black’s major pieces will get involved on the kingside: rooks on the g- and h- files, and the queen on g4 or even h3.
27…Rg6 Dangerous, but this releases Black’s control of the c-file 1 move too early 28.Qc2 Even stronger than 28.Qc3 (28.Qc3 Qe6 29.Rxd3 Qh3 30.Kf1 Always the key resource (30.g3 fxg3 31.fxg3 Rxg3+ 32.hxg3 Qxg3+ 33.Kf1 Qxf3+) 30…Qxg2+ 31.Ke2) 28…Qe6 29.Rxd3 Qh3 30.g3 fxg3 31.fxg3 Rxg3+ 32.hxg3 Qh1+ (32…Qxg3+ 33.Qg2) 33.Kf2 Rh2+ 34.Ke3 wins)
28.b5
The fantastic idea behind 27.b4
a) 28.bxa5 Rg6 just wins;
b) 28.Rab1 Bc4 is an additional possibility (28…Rg6 29.b5 is a transposition to 28.b5) ;
28…Bxb5 29.Rab1 Rg6
29…Bc4 30.Rxb6 Prevents Black from adding the c6 rook into the attack which is enough to keep White’s kingside safe. That means it’s time to go all-in!
30.Rxb5 Qh3
31.Kf1
The key resource… which I’d missed in my analysis!
31.g3 fxg3 32.fxg3 Rxg3+ 33.hxg3 Qh1#
31…Qxg2+ 32.Ke2
and amazingly Black has no better than a draw
32…Nxe5 33.Bxe5 Rxe5+ 34.Nxe5 Qe4+ 35.Kf1 Qh1+ 36.Ke2 Qe4+ Amazing!
27.Ra2
This looked all wrong to me. With so much going on in the position, it didn’t seem right to undefend the rook on d1 and weaken the back rank, especially with Black’s queen coming to the d1–h5 diagonal! Despite that, Komodo is still OK with it.
27.Qe2 Nxe5 28.Qxa6 Nxf3+ 29.gxf3 Rg5+ 30.Kh1 (30.Kf1 Rcg6
It took me a long time to spot this idea) 30…Rh6 …which is why I don’t want a pawn on h6! 31.Qf1 (31.Rg1 Rxh2+ 32.Kxh2 Qh5#) 31…Qh5 and mate cannot be stopped
However
27.b4
is again what Komodo wants, and he’s claiming a clear White advantage.
27…Qh5 28.Qa2
Hitting the weakness on d5 (which would exploit the open position of the Black king due to the position of the f-pawn on f4) and thus preparing Qb1 with tempo to evict the knight on d3 by a concerted attack of queen and rook. Note that the better plan of 26…Rh5 and 27…Qd7 kept the d5 pawn defended! When you put your pieces on harmonious squares, you get unexpected benefits! 28.h3 Rg6 29.Kh2 may be just as strong: with the White rook still on a1, none of the …Qxf3 tricks work
28…Bc4
28…Rg6 29.Qxd5+ Rf7 30.Rxd3 Bxd3 31.Rc1 turns the tables: White is attacking! 31…Qg4 32.Nh4 Rh6 33.e6 Qxe6 34.Qa8+ Rf8 35.Qb7 Amazing tactics: White is better! 35…Rhf6 36.Bxf6 Qxf6 37.Qd5+ Kh8 38.Qxd3 Qxh4 39.Qd6
29.Qc2 Bb5 30.Qb1
Cleverer than the immediate 29.Qb1. In this way, White also threatens bxa5, hitting the bishop on b5
30…Rg6 31.Rxd3 Qh3 32.Kf1 Qxg2+ 33.Ke1
White is safe and just better
27…Qh5 28.e6
Another surprise, but not an unwelcome one. While my opponent was thinking, I was getting a bit upset about 28.h3
While I was considering 26…Qe8, I’d spotted that this would not be easy to break but I’d dismissed it with the typical Dutch expression “Dat zien wij dan wel” (We’ll deal with that when it happens). The closer I got though, the less gung-ho I felt. Black’s major pieces are just not coordinating. Without access to the g4 square, Black must show additional ingenuity to involve all 3 major pieces into the attack. There is a way though!
28…Rg6
28…Rf8 29.Rc2 Rfc8 30.Rxc6 Rxc6 was what I was considering in the end (I didn’t think my attack on the kingside was working) but this fails to a diabolical tactical stroke 31.Bxb6 Rxb6 32.Qxa5 Re6 33.Qxd5 Kf7 34.Qd7+ Re7 35.e6+ Kf6 36.Qd4+ Kg6 (36…Kxe6 37.Qb6+) 37.Rxd3 Bxd3 38.Ne5+ Kf5 39.Nxd3 just wins for White
29.Kh2 Rh6
Introducing a massive cheapo that isn’t easy to counter!
a) 30.Qc3 Qxf3
31.gxf3 Rfh5 32.Kg2 Rxh3 Threatening …Ne1+ followed by mate 33.Rxd3 Rh1 You notice how crucial 27.Ra2 is to the success of this tactic: nothing would work if White was still covering his 1st rank!;
b) 30.e6 Qxf3;
c) 30.Bxb6 Qxf3 (30…Rxb6 31.Qxa5) 31.gxf3 Rfh5 32.Qxa5 Rxh3+ 33.Kg2 Ne1+ 34.Rxe1 Rh2+ 35.Kg1 Rh1+ 36.Kg2 R6h2# is mate;
d) 30.Rg1 Qg4 followed by …Rfh5;
e) 30.Rh1 g5 looks very dangerous: …g4 is a threat and White can no longer exert concerted pressure against the knight on d3.;
f) 30.Rc2 Qxf3
I tried all sorts of ways to make …Qxf3 work during the game but I don’t think I got this one. In particular, I missed one tactical theme
31.gxf3 Rfh5 32.Kg2
32.Rc8+ Bxc8 33.Qxd3 Bxh3 is killing 34.Qc3 Bf1+ 35.Kg1 Rh1#
32…Rxh3 33.Rc8+
33.Qxd3 Bxd3 34.Rxd3 Rh1 This was the tactical point I’d missed. I thought that Qxd3 would always just refute my attack
33…Kf7
33…Bxc8 34.Qxd3
34.e6+ Ke7 35.Rc7+ Kd6
I’d missed this was legal in my analysis!
35…Ke8 36.Rc8+ Ke7 is a draw by repetition
35…Kd8 36.e7+ Kxc7 37.Be5+ Nxe5 38.Qxf4 Rh2+ 39.Qxh2 Rxh2+ 40.Kxh2 Nxf3+ 41.Kg3 Kd7 42.e8Q+ Kxe8 43.Kxf3 Ke7 44.Ke3 is better for White according to Komodo
36.Be5+
36.Rc4 Rh2+ 37.Kf1 dxc4 38.bxc4 Rh1+ 39.Ke2 Bxc4 Well done Komodo!
36…Kxe5 37.Qc3+ d4 38.Re1+ Kf5 39.Rf7+ Kg6 40.Rxg7+ Kxg7 41.Qxd4+ Kg6 42.Qe4+ Kg7 43.Qd4+ is the amazing Komodo main line!
28…Rxe6 29.Qc3
The natural follow-up to 28.e6 (which distracted the Black rook from the c-file) but a tactical blunder which wasn’t difficult to refute.
29…Rg5 30.Kh1
30.Rxd3 Bxd3 31.Qxd3 Qxf3
is the gorgeous refutation of White’s idea, and an indictment of White’s weakening of the back rank with 27.Ra2.
30…Rxg2 31.Rxd3 Bxd3 32.Qxd3 Reg6
32…Re1+ 33.Kxg2 Qg4# would have been a quicker mate as my opponent pointed out to me after the game.
33.Ra1 Qh3 34.Qe2 Rxh2+ 35.Nxh2 Qg2# 0–1
After the game, I started thinking about the position, wondering what general lessons I could draw. One unexpected point was how relatively poor Komodo 11.01 was at analysing the position (by its standards). A number of tactics escaped its attention and there were quite a few situations where its evaluation only corrected itself when a move was played on the board. I was very glad that I took the time after the tournament to analyse the position for myself and offer some resistance to Komodo’s evaluations. I was a bit depressed after checking my moves quickly with the engine directly after the game! It had looked as if all my feelings about the position had been completely wrong, which was not the case.
The most intriguing thing however is that the position after 26…Rh5
is apparently only a draw with best play. What could be the reason for this? Is a secret of perfect defence hidden somewhere in the position?
To be honest, I don’t think so. White has to tread a claustrophobically narrow path and find a creative defensive idea (b4–b5 with the idea of Rb1xb6 swapping off a pair of rooks) backed up by flawless calculation to pull it off. And if the Black queen had coincidentally been on d7 in the position after 26.a3 instead of on e7, it’s an easy win for Black! The tactics are very very close! In general, it’s a dangerous position for White and he should feel lucky he has a way to escape.
However, let’s just look at it from the practical point of view. Imagine you’re White, thinking about your 26th move in this specific position.
How might you be able to find this narrow path to a draw? In general, you only find good defensive resources if you’re looking for them. You have to believe that the position offers something for you or you’ll stop halfway, and not muster all your creativity to find a difficult solution (which is definitely required here).
So perhaps the first question is: what general positional factors in the position does White need to notice to give him hope? I came up with the following list:
- Black’s attacking structure with the pawn on f4
You know that the pawn on f4 will get in the way of Black’s attack with the pieces which should slow down Black’s attack just a little
- Black’s king is open
A check on the back rank, or the capture of the d5 pawn, and Black’s king is very embarrassed.
- Black’s weakened queenside and central structure
The pawns on b6 and a5 are targets for White’s bishop on d4, the pawn on d5 is isolated and the pawn on f4 is also within range of White’s pieces. White’s structure is excellent. You could imagine entering an endgame a pawn down as White and still standing well because of the range of Black weaknesses to attack.
- Invasion channels are available.
Although the c-file is currently under Black’s control, there are possibilities to invade into Black’s position once the c6 rook moves to the kingside. On top of that, White also has the break e5–e6 to open both the e-file and the a1–h8 diagonal. In other words, Black has temporary control of the invasion channels (due to his knight on d3), but not absolute lasting control.
- White’s stable minor pieces
This is a very important point. We have seen a number of lines in which the bishop on d4 is an absolute rock, defending f2 and a1. The bishop is impregnable, shielded by the Black pawn on d5. The excellent knight on f3 is very difficult to attack with the major pieces that Black has at his disposal as a kingside attacking force (due to the Black pawn on f4!) and keeps the Black pieces out of h4 and g5 while defending h2.
- Black’s most important piece is the most fragile
The knight on d3 is Black’s key piece, keeping White off the e- and c-files. However, it is also a very fragile factor, defended only by the bishop on a6. If that piece gets into trouble, then Black’s position gets into trouble because the knight is effectively shielding the underlying weaknesses in Black’s position.
The last point is perhaps the most important: it means that there is an underlying danger to Black’s position. If he gets things wrong, it’s not just shrug -your-shoulders-and-agree-a-draw, it’s see-White-pick-up-all-your-weaknesses-one-by-one! That fact alone makes it worth fighting with all your might to put pressure on Black’s position.
All in all, there’s enough positional ammunition for White to keep him from becoming too hopeless about his position.
The second question is: what tactical factors could White discover which might point him in the right direction?
First of all, calculation should give you the feeling that Black needs all his major pieces in play for a successful attack against the kingside. That means 2 things:
- The attack will take a little time as Black needs 3 moves at least to activate all his major pieces on the kingside
- If Black is having to divert all his major forces to one wing, there should definitely be some chances to hit all the weak squares within the rest of Black’s position.
Secondly, if you’re really into things, it might dawn on you that White’s pieces are already pretty well-placed from a defensive point of view. In particular, the position of both rooks on the back-rank is a key part of the solidity of White’s structure.
With those sort of thoughts in your head, with the hope that springs from noticing flaws in the opponent’s position, and with a dogged and resolute determination to strike back at those flaws before Black activates his major pieces, you might have a chance of defending this position successfully in a practical game. It’s anything but easy though: even Komodo isn’t flawless!