
A little while back, Natasha and I commentated on the 6th round of the English Chess Championships. One game that round made a huge impression both on us, and on many of the other professionals we talked to afterwards: Michael Adams’ victory against Shreyas Royal on the white side of a Petroff with a symmetrical structure (is there any other kind?)
I’d like once again to make a small series of blogs about this game and the opening tabiya that arose. In this first blog, I’ll start as always by sketching out the general parameters of the game, drawing on the impressions that Natasha and I had while commentating. And then in subsequent blogs, we’ll dive into some important aspects in more detail.
One further thing – I suddenly realised while writing up my analysis that I will have featured two of Shreyas’ losses in my recent blogs. My sincere apologies and please read nothing into it – it’s an indication I think that Britain’s youngest GM is continually in the mix during big tournaments and involved in interesting games. I’m sure victories of his will feature in subsequent blogs too!
Adams,Michael (2654) – Royal,Shreyas (2484) [C42]
English Championship Kenilworth 2025
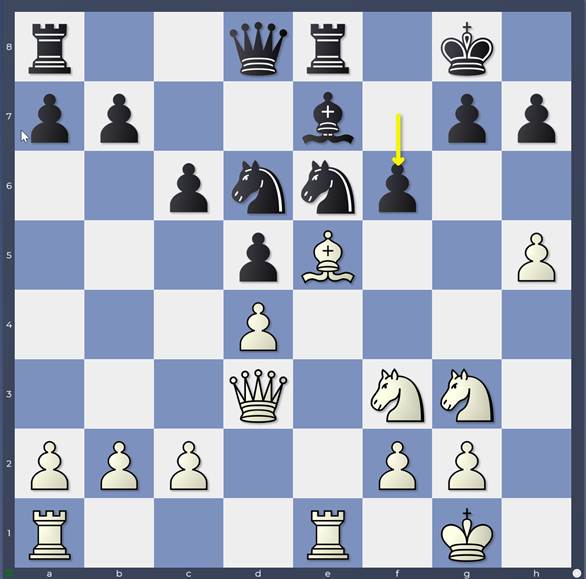
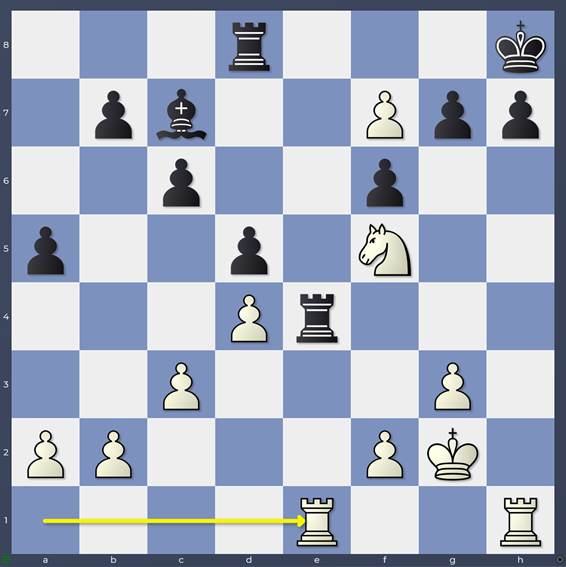
1. e4 e5 2. Nf3 Nf6 3. Nxe5 d6 4. Nf3 Nxe4 5. d4 d5 6. Bd3 Bf5 7. O-O Be7 8. Re1 O-O 9. Nbd2 Nd6 10. Nf1 c6 11. Bf4 Bxd3 12. Qxd3 Na6
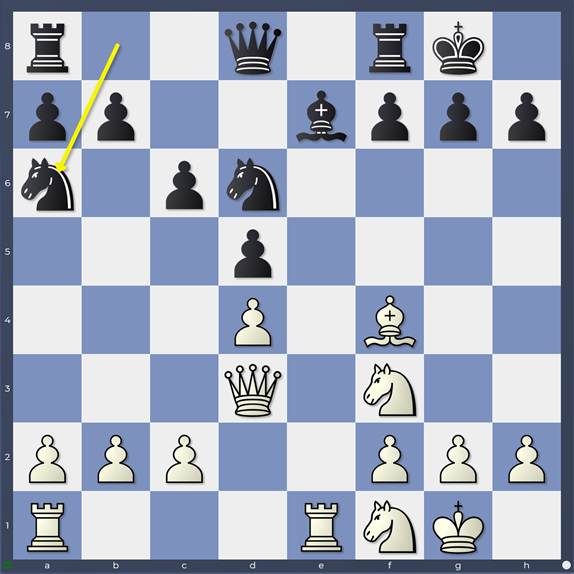
Game: 12…Na6
A topical line of the Petroff, with currently 100 games in my database, many of them high-level ones. In the commentary, I was sceptical about this choice of opening against Mickey. Both sides require a high-level of accuracy in such sterile positions: White to maintain his minimal advantage and Black to remain in the safe harbour of his drawing margin and Mickey is simply superb in such situations. Against Mickey I would tend to recommend Black openings where there is some margin for irrational play and less emphasis on high accuracy to hold a draw.
I do have to show some self-awareness here however as while preparing a foreword for a planned “Best of British” book, I discovered that I had never made a single half-point as Black against Mickey in an appreciable number of attempts (I scored my 3 wins against him as White). I had never actually realised that before! So you might want to take my advice on Black openings against him with a hint of scepticism!
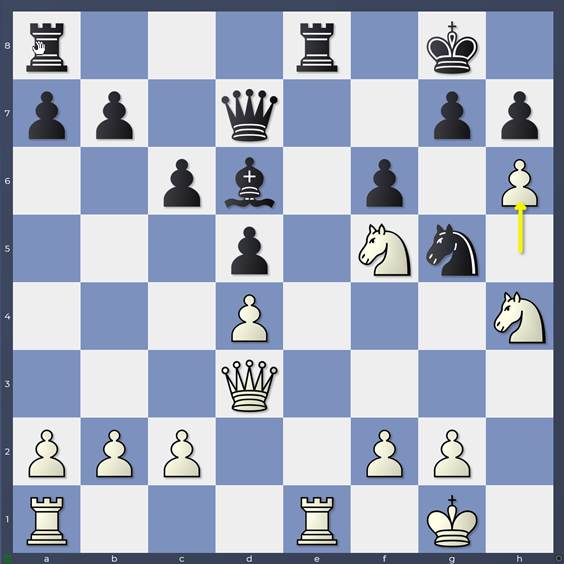
13. Ng3 Nc7 14. h4
Game: 14.h4
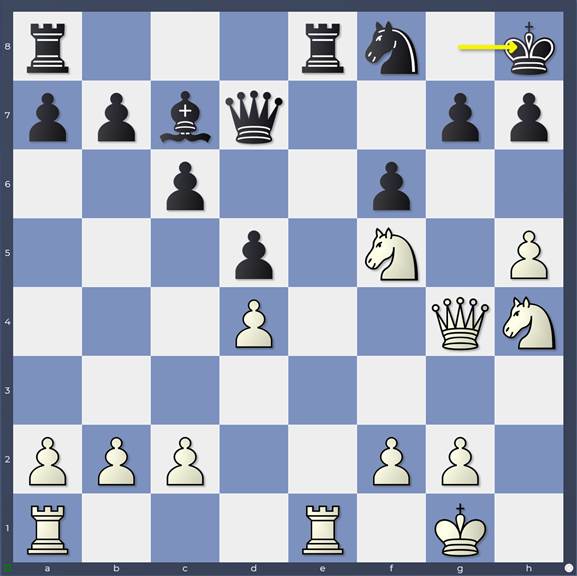
First played in 2023 (also first played in 2020 on move 13) so I guess we can say this is inspired by modern engines! In such sterile pawn structures with mass exchanges along the only open file looming, each side must work to find a gain to tip some of the lines in their favour. Gaining kingside space, exploiting the temporarily loose constellation of black minor pieces on c7, d6 and e7 is a good way of making use of White’s development advantage. Getting ahead of ourselves a bit and looking forward into the game, the position at move 23 would be a touch better for Black with the pawn on h2…
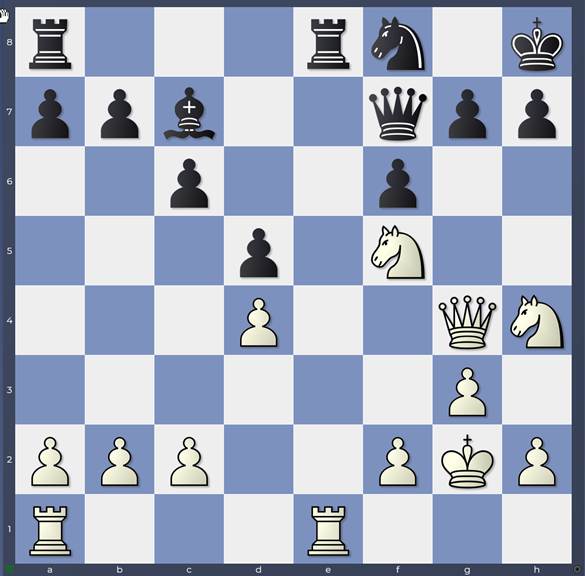
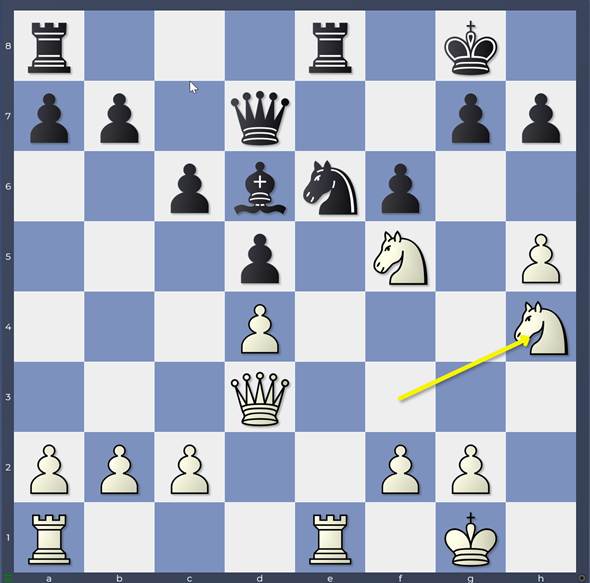
Imagined position on move 23 with the h-pawn still on h2
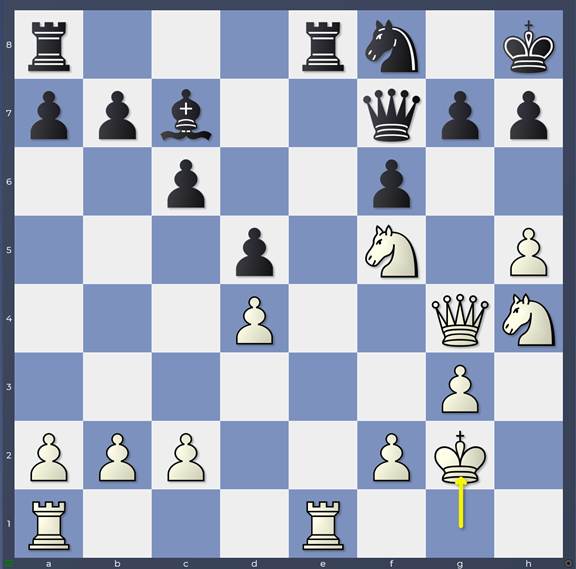
With the pawn on h5, it’s completely winning for White!
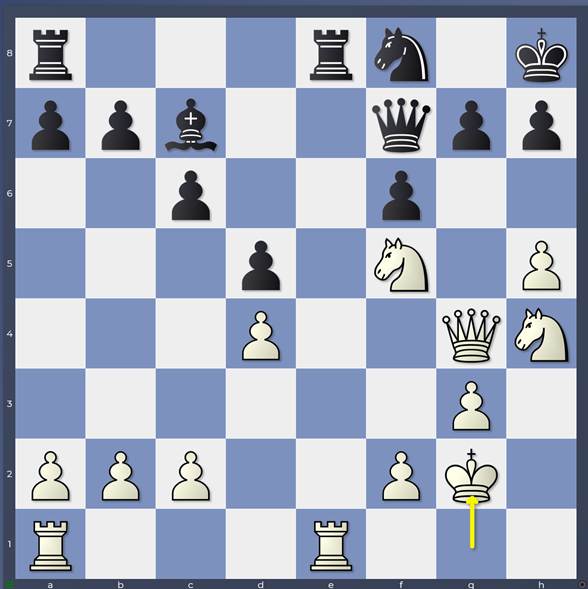
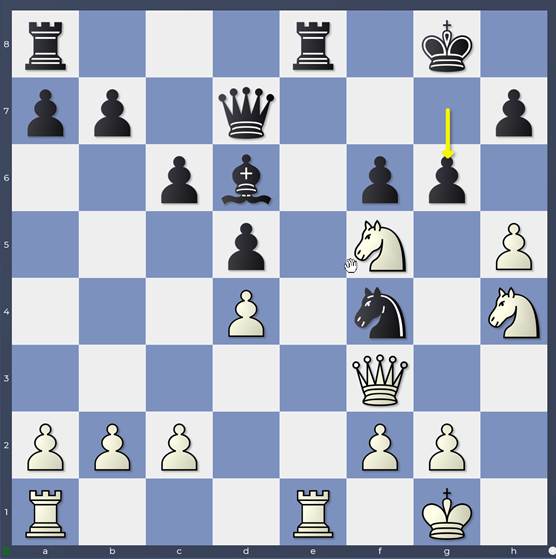
Real game position after move 23 with the h-pawn on h5
Space on a wing through advanced rook’s pawns really can make a massive difference to a position’s evaluation.
14…Ne6 15. Be5
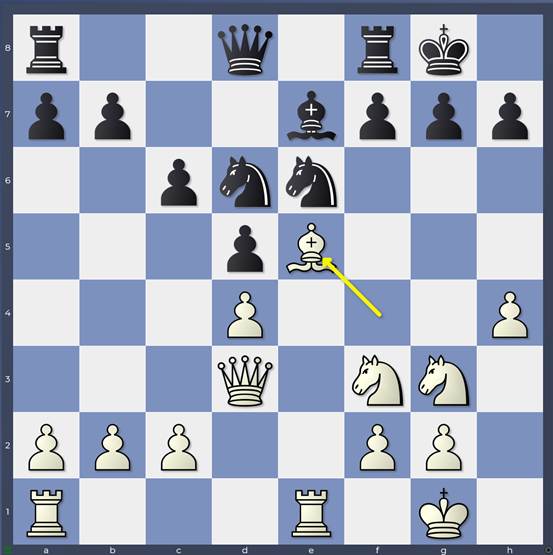
Game: 15.Be5
This will be the starting point for our analysis of this game in this and subsequent blog entries.
15… Re8
This gets an exclamation mark in the HIARCS book which is normally a good sign!
15… Nc4 was played some 10 days later in a high-level blitz game: 16. Nf5 (16. h5) 16… Nxe5 17. Nxe7+ Qxe7 18. Rxe5 f6 19. Re3 Rae8 20. Rae1 Qd6 21. h5 Nc7 22. Nh4 Rxe3 23. Rxe3 Re8 24. Nf5 Rxe3 25. Qxe3 Qd7 26. Qh3 Kf7 27. Qg4 Ne8 28. Qf4 Qe6 29. Kf1 g6 30. Ne3 gxh5 31. Qb8 Nd6 32. Qxa7 h4 33. Qb8 h3 34. gxh3 Qxh3+ 35. Ke2 Qe6 36. a4 Kg6 37. b3 h5 38. Kf1 Ne4 39. Qh2 Ng5 40. Qg2 Qe4 41. Qxe4+ Nxe4 42. f3 Nd6 43. c4 dxc4 44. bxc4 Kg5 45. a5 ½-½ Erigaisi,A (2776)-Firouzja,A (2766) Riyadh Esports World Cup blitz 2025 (2.1)
Note that 15… f6 chasing away the bishop from e5 already, is a blunder due to 16. Bxd6 Qxd6 17. Nf5 Qd7 18. Rxe6 Qxe6 19. Re1)
16. h5 f6
Game: 16…f6
During commentary, this move (a novelty) made me nervous already. It’s definitely a natural – almost instinctive you would say – reaction to take the opportunity (before it disappears) to nudge a piece off its central outpost and force the exchange of another set of pieces. The downside to this move however is the loosening of the kingside light squares e6 and g6. The removal of support from the knight on e6 means that the knight is no longer a solid barrier on the e-file: put under enough piece pressure, it will have to move. The lessening of Black’s control over the g6-square means that …g6 (to eject a white knight when it lands on f5) will be harder to achieve.
However, I have to nuance this exclusively negative view. You do see …f6 popping up in quite a few of the engine lines so it certainly doesn’t always lead to disaster! The HIARCS book also qualifies this move with !? which isn’t perfect but it’s not the worst! However, my feeling is that this move wasn’t really necessary immediately. Black might be able to consolidate further (16…Qd7 or 16…Bf8 come to mind) to be better prepared when / if the moment for …f6 arrives. When 16…f6 is played immediately, the structure is clarified in White’s mind and he can deploy his pieces directly without needing to worry about any other possibilities.
Previous experience was 16… Bf8 which gets an exclamation mark in the HIARCS book 17. b3 f6 18. Bxd6 Qxd6 19. Qf5 Rad8 20. Qh3 Qd7 21. Nf5 g6 22. hxg6 hxg6 23. Nh6+ Bxh6 24. Qxh6 Qh7 25. Qxh7+ Kxh7 26. Re3 Kg7 27. Rae1 Kf7 28. c3 Nc7 29. Rxe8 Nxe8 30. Nd2 Nd6 31. Re3 Nf5 32. Rh3 Re8 33. Kf1 Kg7 34. g4 Nh6 35. Rg3 g5 36. b4 Kg6 37. a4 b6 38. Rg2 a5 39. bxa5 bxa5 40. Nb3 Rb8 41. Nxa5 Rb6 42. f3 Ra6 43. Nb7 ½-½ Tsaruk,M (2435)-Nesterov,A (2597) Khanty-Mansiysk Governor Cup 19th 2023 (6)
17. Bxd6 Bxd6 18. Nf5
Game: 18.Nf5
The knight jumps at once to the outpost, emboldened by Black’s softened support for …g6.
18…Qd7
Very natural, connecting the black rooks and even threatening …Nf4 winning the knight on f5 by forcing the white queen away from its defence. It does make you think however that it would have been useful to have that move on the board already (before playing …f6) Looking at Black’s position, you have the feeling that you’re running a move behind events because White parries Black’s threat easily while making a move he wants to make, and then Black has to find a new idea.
19. N3h4
Game: 19.N3h4
Protecting the knight on f5, adding more weight against the possibility of …g6 and opening a path for the white queen to the kingside via f3-g4.
It’s important to check first of all that Black cannot achieve …g6 anyway despite White’s efforts.
19… Nf4 20. Qf3 g6
Line: 20…g6
is the direct attempt. However it fails simply to 21. Qg4 with the double threat of Nh6+ (winning the queen) and hxg6. Black’s pieces are too loose to offer any defence. Black therefore needs another setup.
19…Nf8
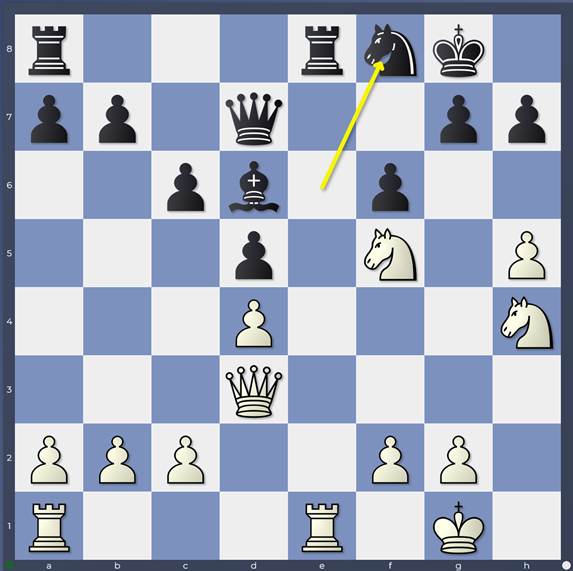
Game: 19…Nf8
Once again, armchair-quarterbacking from the commentary room, 19…Nf8 felt strange: in essence giving up a little on Black’s position (The HIARCS book pinpointed this move as the key mistake, giving it a question mark). However, you know only too well how pressure exerted by a strong opponent causes you to take such decisions. The move has some good points: it fights to achieve …g6 and it also defends the queen on d7 which takes away some of the tactics we saw after 19…Nf4. However, it doesn’t interfere in any way with White’s build-up which makes you very nervous about what White might achieve given a free hand.
It feels natural to me that the black knight should move to g5 to interfere with the activity of white’s queen on the kingside and to target the e4-square. Note that the knight can also retreat to the good defensive square f7 from g5. It also seems natural to me that the dark-squared bishop should retreat to f8 (towards the kingside) to assist with its defence, notably by shoring up the dark squares. I wonder whether that instinct is correct though as from c7 (as in the game) the bishop stops Qg3 and also f4 if Black plays …Ng5 so those 2 moves (…Bc7 and …Ng5) might combine together quite well.
Note however that though 19… Ng5 is the active move that you want to play, it runs into 20. h6
Line: 20.h6
20…g6 During a game I would definitely wonder about 20… gxh6 21. Nxh6+ Kh8 simply because the white king is a little airy and I might be able to sneak some chances along the g-file or by transferring my queen to the kingside somehow. However, I guess that objectively it is always going to be White who has gained from this rather than Black. 21. Nxg6 hxg6 22. Rxe8+ Rxe8 23. Nxd6 uncovering the attack of the queen on the g6-pawn with devastating effect. In subsequent blogs we’ll take a look at a few other alternatives here.
20. Qf3
A very strong move, bringing the queen closer to the very unpleasant square g4. We’ll look in subsequent blog entries why this is clearly superior to 20.Qh3 (which seems trickier and would certainly attract me) If you like, you can take this as a quiz question to be answered later!
20…Bc7
Black needs to do something about the loose bishop on d6 which – for example – prevents him even attempting to exchange the rooks with 20… Rxe1+ 21. Rxe1 Re8 22. Rxe8 Qxe8 due to 23. Nxd6. c7 doesn’t feel like a great square for the bishop: it takes g3 away from the white queen, but the queen has g4; it removes protection from a possible white invasion / interference square on e7 and it moves the bishop further way from the defence of Black’s kingside where the storm clouds are gathering. Sensible options by now however are long gone.
20… g6 21. Qg4 is once again completely catastrophic. 21…g5 22. Rxe8 Rxe8 23. Nh6+ Kh8 (23… Kg7 24. Qxd7+ Nxd7 25. N4f5+ wins a piece) 24. Qxd7 Nxd7 25. Nf7+ Kg8 26. Nxd6 Re6 27. Nhf5 wins a piece.
21. Qg4
Game: 21.Qg4
Black’s situation is really horrific now. The list of what he can’t do in the position is getting alarmingly long. For example, he can’t exchange rooks: 21… Rxe1+ 22. Rxe1 Re8 simply loses to 23. Rxe8 Qxe8 24. Qxg7# He also has to be careful where he puts his queen: Black therefore has to waste another tempo burying his king further in the corner to be able to play …Qf7.
21…Kh8
Game: 21…Kh8
21… Qf7 allows the fork 22. Nh6+
22. g3
A really clever move, and again White is one step ahead of Black.
22…Qf7 23. Kg2
Game: 23.Kg2
These last 2 White moves seem quite anodyne at first glance but they contain so much venom. Without the idea of …g6, Black has nothing positive to do. In fact he can only wait for White to pull the trigger.
23…Rad8
23… g6 is what Black has been hoping to achieve, but the moves 22.g3 and 23.Kg2 have freed the space to the right of the white king (normally a dead space) for the white rooks. Black’s king will be subject to a mating attack after 24. hxg6 hxg6 (24… Nxg6 25. Nxg6+ Qxg6 (25… hxg6 26. Rh1+ Kg8 27. Nh6+) 26. Qf3 is Black’s best but the follow-up Rh6 and Rah1 is terrible for Black.) 25. Rh1 gxf5 26. Nxf5+ Nh7 27. Rxh7+ Qxh7 28. Rh1 As you can see, 22.g3 and 23.Kg2 effectively open another channel of attack on the black position!
23… Ne6 is met decisively by 24. Ng6+ again leveraging the power of g3 and Kg2. 24…Kg8 (24… hxg6 25. hxg6 leads to rapid mate along the h-file.) 25. Ne5 fxe5 26. Nh6+ wins the queen.)
24. c3
Calmly consolidating the d4-pawn before prosecuting the attack.
24…a5 25. Rh1 Re4
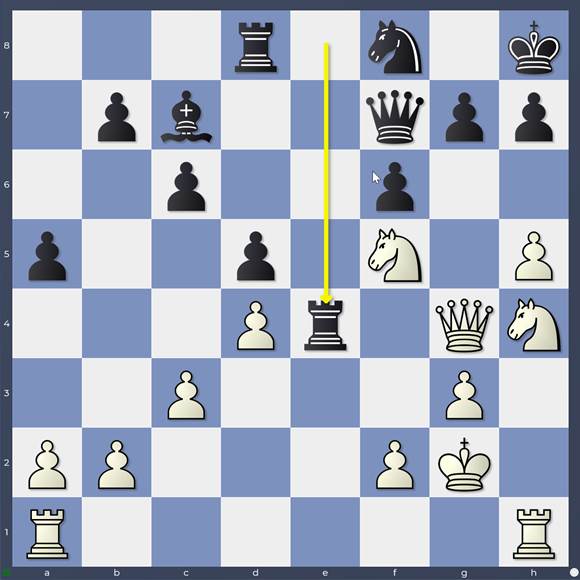
Game: 25…Re4
26. Ng6+ Nxg6
26… Kg8 was Black’s best chance but the position resulting after 27. Qxe4 dxe4 28. Nfe7+ Qxe7 29. Nxe7+ Kf7 30. Nf5 is completely winning for White.
27. hxg6 Rxg4 28. gxf7 Re4 29. Rae1
Game: 29.Rae1
The threat is simply f3 after which Black has to concede occupation of the e-file with terminal effects.
29…g6
Allows a neat finish but the position is lost anyway.
29… Rf8 30. f3 Rxe1 31. Rxe1 g6 32. Re8 wins
30. Rxh7+ 1-0
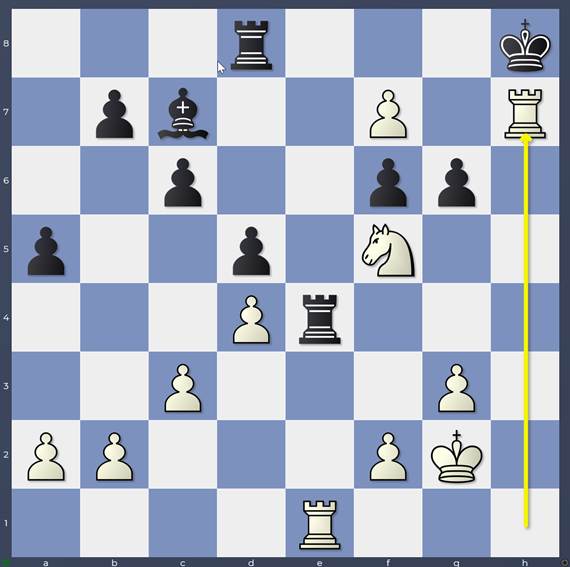
It’s mate in 2: 30…Kxh7 31. Rh1+ Rh4 32. Rxh4#