
The last game in this series was a Marshall near-miss: the exciting game where Marshall was White against Lasker in New York 1924. The game featured an Exchange Slav – a favourite of Marshall’s (“A capture I have favoured throughout my career, and with very good results”) which was later taken up with great success by Botvinnik. It’s another example of Marshall’s knack for discovering interesting opening systems!
A video of this article is also available at
As always, a playable version of this game is available at
http://cloudserver.chessbase.com/MTIyMTYx/replay.html
Marshall,Frank James – Lasker,Emanuel [D10]
New York International Masters–01 New York (9), 27.03.1924
[https://matthewsadler.me.uk]
1.d4 d5 2.c4 c6 3.cxd5 cxd5 4.Nc3 Nf6 5.Qb3
[A little exotic but based around a good positional concept. White aims to turn the tempo advantage in this symmetrical structure into a more active positioning of his queen’s bishop (outside the d4–e3 pawn chain) relative to Black’s (inside the d5–e6 pawn chain). The queen prevents the light-squared bishop from developing to f5 by targeting the b7–pawn. It’s a common concept in the Exchange Slav but played here at an unusually early stage!]
[5.Nf3 Nc6 6.Bf4 e6 7.e3 Be7 8.Bd3 0–0 9.0–0 Nh5 10.Be5 f5 11.Rc1 Nf6 12.Bxf6 gxf6 In a later game, Capablanca repeated Marshall’s concept and Lasker recaptured with a pawn on f6 to keep control of the e5–square that had caused him such discomfort against Marshall. Capablanca defeated Lasker in that game after a thrilling fight, so we can safely say that Lasker struggled against the Exchange Slav! 13.Nh4 Kh8 14.f4 Rg8 15.Rf3 Bd7 16.Rh3 Be8 17.a3 Rg7 18.Rg3 Rxg3 19.hxg3 Rc8 20.Kf2 Na5 21.Qf3 Nc4 22.Qe2 Nd6 23.Rh1 Ne4+ 24.Bxe4 fxe4 25.Qg4 f5 26.Nxf5 exf5 27.Qxf5 h5 28.g4 Rc6 29.g5 Kg8 30.Nxd5 Bf7 31.Nxe7+ Qxe7 32.g4 hxg4 33.Qh7+ Kf8 34.Rh6 Bg8 35.Qf5+ Kg7 36.Rxc6 bxc6 37.Kg3 Qe6 38.Kxg4 Qxf5+ 39.Kxf5 Bd5 40.b4 a6 41.Kg4 Bc4 42.f5 Bb3 43.Kf4 Bc2 44.Ke5 Kf7 45.a4 Kg7 46.d5 Bxa4 47.d6 c5 48.bxc5 Bc6 49.Ke6 a5 50.f6+ 1–0 (50) Capablanca,J-Lasker,E New York 1924]
5…e6 6.Bf4 Nc6 7.Nf3 Be7 8.e3 Nh5 9.Bg3 0–0 10.Bd3 f5 11.Be5 Nf6 12.Bxf6
[A strange, yet typical episode of play during which both sides have tried out the exchange of knight for bishop on various squares! Marshall did not want the knight to establish itself on e4 and this decided to exchange it on f6.]
12…Rxf6 13.Rc1 Bd6 14.Na4 Qa5+ 15.Nc3
[15.Ke2 Nb4 16.Bb1 b6 is given by Marshall. The retreat back to c3 is a little embarrassing for White but doesn’t materially affect the position. In fact, Black should simply bring the queen back to d8 on one of the ensuing moves!]
15…Rb8
[15…Qd8 16.0–0 Bd7 would be a sensible way to develop. By trying to exploit the queen’s presence on a5 – it’s understandable that Black should try to punish White for (probably) missing …Qa5+ – Black ends up misplacing his pieces slightly.]
16.0–0 a6 17.Na4 Bd7 18.Nc5 Qc7
[18…Be8 19.Nxb7 Qc7 20.Nxd6 Rxb3 21.Nxe8 is the clever line given by Alekhine in the tournament book!]
19.Ne5
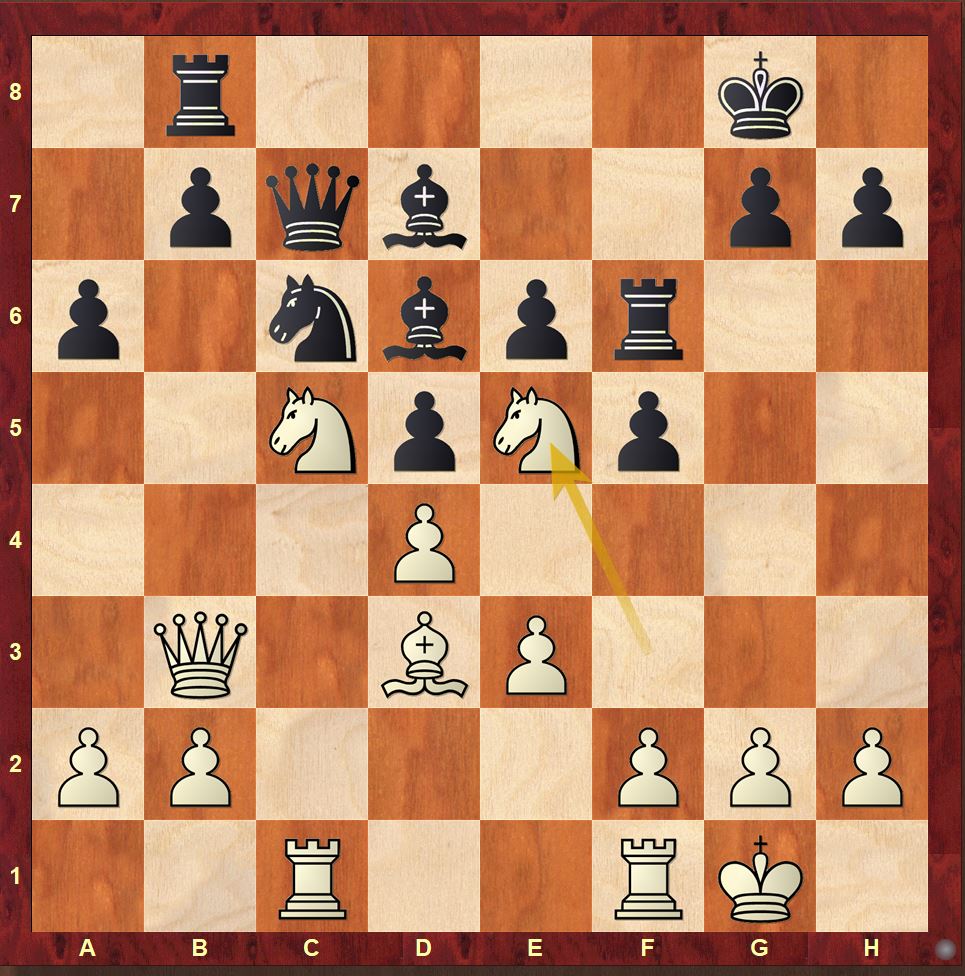
Position after Marshall’s 19th move: 19.Ne5
[Opportunistically exploiting the queen’s exposed position on c7: the knight on e5 exerts strong pressure on the Black queenside, and after 20.f4, White’s knights are both entrenched on the central dark squares around Black’s light-squared pawn centre. The one advantage to 20.f4 from Black’s point of view is that the f-pawn is brought closer to the Black position. This brings Black’s counterplay with …g5 into contact with White’s position much quicker than before!]
19…Be8 20.f4
[20.Nxe6 Rxe6 21.Qxd5 Bf7 (21…Qe7 22.Bxf5 Nd8 is dismissed for White by both Alekhine and Marshall but my engine is very enthusiastic after 23.f4 Kf8 24.Bxe6 Qxe6 25.Qxe6 Nxe6 26.Rfd1) 22.Nxf7 Qxf7 23.Bc4 Nd8 is a better way for Black to defend, losing just one pawn in return.]
20…Qe7
[This is a very interesting position from the strategical point of view and it is well worth paying attention to the coming developments in the game. Perhaps the first odd thing to me is that White seems to stand
well when it feels as if White has wasted quite a bit of time:
i. The bishop manoeuvre Bf4–g3–e5xf6 in order to exchange a bishop for a knight (albeit with a purpose: to stop a black knight from occupying the outpost on e4 that Black had prepared for it with …d5 and …f5).
ii. The misstep Nc3–a4–c3 followed by Na4–c5.
However, both these two manoeuvres involved a cost for Black as well:
i. Black also wasted time with his knight: …Nf6–h5–f6
ii. Although 14…Qa5+ checked White’s plan, White’s basic position was not disrupted by the check. The white knight was able to retreat to a good central square while the black queen was actually poorly-placed on a5 once it had completed its disruptive purpose. It’s an example of a frustrating practical episode in which the opponent misses a move but the move you gain is of no use for your plan!
In the game, Lasker tried to exploit White’s loss of time by leaving the queen out on a5 and eventually bringing it to c7 rather than d8 (although you could argue that the latter was forced upon him by circumstances). The net result was that Lasker allowed 19.Ne5 which would not have been possible if his queen had been retreated safely to d8 earlier!
vWhite has arranged his pawns and pieces as Capablanca recommended in “Chess Fundamentals”, placing his pawns on squares opposite to that of his bishop. This has led to an ideal structure against the two bishops: White’s pawns on dark squares restrict Black’s dark-squared bishop while Black’s light-squared bishop struggles to get past its own central pawns on light squares. The danger to White’s structure is that the strain of restraining Black’s position falls on the pawn structure on dark squares which misses the support of the dark-squared bishop. This weakness is not visible while White’s pieces are so solidly entrenched on dark-square outposts – as are the knights on c5 and e5 – but when White attempts to expand his position (which may necessitate moving or exchanging one of the knights) then White’s position will be more exposed and thus more vulnerable. Black should also contribute to the erosion of the foundations of White’s structure by organising breaks against White’s structure where possible. The break …g5 – as Lasker played – is the obvious candidate in this position. We will play through the next few moves quickly and then assess what happened.]
21.a3
[A logical move. As Alekhine points out, “Should Black now remain passive, White withdraws his queen from b3, plays b4 and quietly prepares b5 which would hold out an easy game with pressure on b7”]
[21.Be2 g5 22.Qd1]
21…Rh6 22.Rf2 g5 23.g3 Kh8
[23…gxf4 24.gxf4 (24.Nxc6 bxc6) 24…Nxe5 25.fxe5 Rg6+ 26.Kh1 Bxc5 27.Rxc5 Qg5]
24.Qd1 gxf4 25.Nxc6
[25.gxf4 Nxe5 26.fxe5 Qg5+]
25…bxc6
[25…Bxc6 would be better but White is still better. The queen comes to e3 and the white knight will be rerouted to e5 when White is solid and is ready to gain space on the queenside by pushing the a- and b-pawns. 26.exf4]
26.exf4

[Such a lot has happened! What have both sides achieved? Black has clearly achieved some success in shaking the foundations of White’s position: White has exchanged off his knight on e5 – which blocked the attack of the dark-squared bishop against the f4–pawn – and accepted an isolated d4–pawn which is also no longer shielded along the h8–a1 diagonal by a knight on e5. Why did White play these 2 moves 25.Nxc6 and 26.exf4? First of all, the move 25.Nxc6 was essentially forced from a tactical point of view: 25.gxf4 would have lost on the spot to 25…Nxe5 26.fxe5 Qg5+ winning the e3–pawn. However, apart from this, gxf4 is a fundamentally wrong reaction to …gxf4. With his rooks split apart – one on the queenside and one far away and with poor mobility on h6 – Black cannot challenge effectively for the one open file on the board: the c-file. Opening the g-file on the kingside is a great result for as it activates the rook on h6 and also gives the rook on b8 an extra route into the game.
White might have taken better precautions earlier against the threat of …gxf4 as on the 23rd move, Black could have taken on f4 when 24.exf4 loses the pawn on d4 and the intermediary 24.Nxc6 is met by 24…bxc6 opening the attack of the rook on b8 on the queen on b3. For example, 21.Be2 g5 22.Qd1 would defend the d-pawn and allow White to recapture on f4 with the e-pawn without needing to exchange on c6. However, even after the capture on c6 in the game, White’s position after 26.exf4 is still very strong. The d-pawn can be well-defended by a queen on e3, while Black’s counterplay against the kingside is surprisingly hard to prosecute, not least because his queenside pawns and e6–pawn are so weak.]
26…Qg7
[26…a5 as pointed out by Alekhine, feels more natural as it will at least force White to use his queen to capture the a-pawn. In the game, it’s really no effort at all for Marshall.]
27.Bxa6 Bh5 28.Qd2 Rg8 29.Be2 Be8 30.Qe3 Rf6 31.Bf1 Qe7 32.a4 h5 33.Rg2 h4 34.Nd3
[Alekhine calls this “artificial” but I really like this move. The knight occupies its strongest central post, blocking any diagonal attacks of the central or kingside dark-squares. It makes White’s position completely safe and leaves White in control with an extra passed a-pawn.]
34…Qa7 35.b3 Rg7 36.Ne5 hxg3 37.hxg3 Qb6 38.a5
[This feels odd when White still has a number of moves he could play to improve his position further. I’m also not too thrilled about exchanging that wonderful knight on e5 for the bishop on e8!]
38…Qxa5 39.Nxc6 Qb6
[39…Bxc6 40.Rxc6 Qb4 looks much more like it: you feel that there will always be chances with such a vulnerable d-pawn.]
40.Ne5 Rc7 41.Rxc7 Qxc7 42.g4 fxg4 43.Nxg4 Rxf4

This position is given as a puzzle in John Nunn’s Chess Course! White to play and win!
44.Qxe6
[Despite a lot of thought, Marshall misses the win… and Lasker’s defence!]
[44.Bd3
Threatening Qh3+
44…Bh5 45.Nh6
Threatening Rg8+
45…Rf8

(45…Qc8 46.Nf7+ mates in 3 (even 46.Rg8+ Qxg8+ 47.Nxg8 Rg4+ 48.Kf2 Rf4+ 49.Kg2 (49.Ke1 Bb4+ would be embarrassing) 49…Rg4+ (49…Bf3+ 50.Kg1 Rg4+ 51.Kf1 Bg2+ 52.Ke2) 50.Kh3 Rg3+ 51.Qxg3 Bxg3 52.Nf6 Bf2 53.Nxh5 Bxd4 54.Nf4 wins too, so this defence doesn’t hold out much hope!) 46…Bxf7 47.Qh3+)
46.Nf7+
(46.Qg5 which Marshall gives, quoting Alekhine in the tournament book, would give Black some amazing chances to resist with 46…Bg6 when the only way to an advantage is 47.Rc2 (47.Qxg6 Qc1+; 47.Bxg6 Bf4 48.Nf7+ Kg7 followed by …Qc1+ gives Black sufficient compensation for a draw according to my engine! 49.Qh4 Qc1+ 50.Kf2 Qd2+ 51.Kf3 Qe3+ 52.Kg4 Kxg6 53.Nh8+ Rxh8 54.Qxh8 Kf7 White’s precarious king stops him from undertaking anything serious) )
46…Rxf7 47.Qh6+ Rh7 48.Bxh7 Qxh7 49.Qf6+]
44…Rxf1+ 45.Kxf1 Bb5+ 46.Re2 Bxe2+ 47.Qxe2 Qf7+
[A few more mistakes were made but Marshall was unable to capitalise on his chances and Lasker held on for a draw.]
48.Qf2 Kg7 49.Ne3 Bf4 50.Ke2 Qc7 51.Qg2+ Kf8 52.Nxd5 Qc2+ 53.Kf3 Bd2 54.Qf1 Qxb3+ 55.Ke2+ Ke8 56.Qf5 Qc4+ 57.Kxd2 Qxd4+ 58.Ke2 Qc4+ 59.Kf2 Qc5+ 60.Kg2 Qd6 61.Kf3 Kd8 62.Ke4 Qe6+ ½–½
[62…Qe6+ 63.Qxe6 is stalemate. As Marshall commented: “What a superb fighter Lasker was!”]
I enjoy the new layout 🙂 I am just reading “Game Changer” – great book! I thought until now that Lasker lost to Capablanca in New York 1924 due to a clock dispute but the reason was that Lasker struggled against the Exchange Slav.
Hey, thanks for the comment and glad you like the new layout… and more importantly the book! So much of your life goes into these things 😉 I actually didn’t know about the clock incident so just reading now! But despite that, in both cases, I do think he was struggling in the opening (and thus probably spending more time than he should). Best Wishes, Matthew