
The most intriguing part of a game is the turning point: exactly which moves shifted the objective balance of the game and put one of the players on the back foot? With complex games, I start analysing close to the end of the game from a position in which I can demonstrate a clear advantage for one side. I then work my way back until I can no longer do this. Somewhere in that moment is the key to the course of the game!
I’d like to demonstrate this by analysing the fascinating game Lundin-Bogolyubow Stockholm 1930, again taken from Soloviov’s excellent book “Bogoljubow: The Fate of a Chess Player”
Lundin,Erik – Bogolyubow,Efim
Stockholm, 1930
1.c4 Nf6 2.Nf3 c6 3.d4 d5 4.e3 e6 5.Nbd2 Be7 6.Bd3 Nbd7 7.0–0 0–0 8.b3 b6 9.Bb2 Bb7 10.Qc2 c5 11.Rad1 cxd4 12.exd4 g6 13.Ne5 Rc8 14.Ndf3 Nxe5 15.Nxe5 Nd7 16.Ng4 Nf6 17.Ne5 Rc7 18.Qd2 Qa8 19.f4 dxc4 20.bxc4 Be4 21.Rde1 Rd8
A typical hanging pawns structure which has proved instructive to analyse. I’ll first demonstrate the game continuation, focusing on the tactics which were exceptionally interesting. We’ll then try and draw positional lessons from the course of events and hopefully work out how to improve Black’s play in this phase.
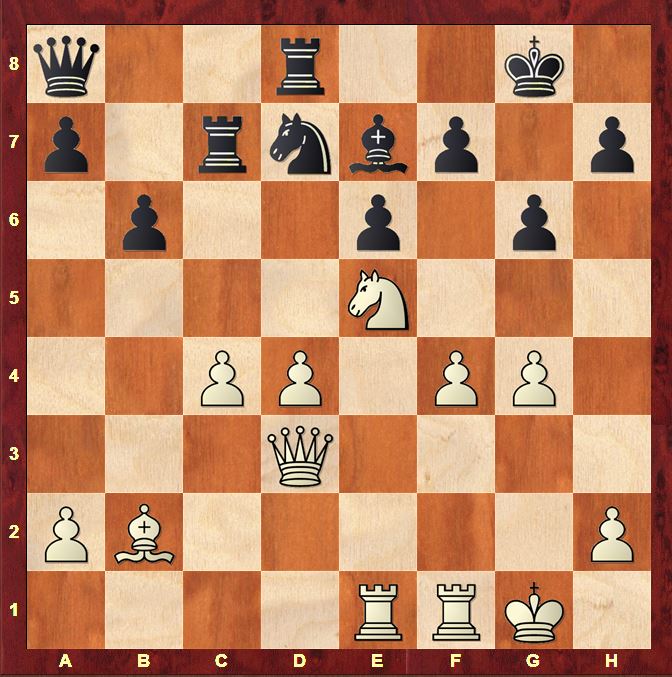
22.g4 Bxd3 23.Qxd3 Nd7
This diagram in Soloviov’s book first caught my attention. White’s next sacrifice is not easy to evaluate.
24.Nxf7 Kxf7 25.f5
I was surprised by the power of this continuation. It is true that Black’s major pieces offer little direct assistance to their king. The rook on c7 might have offered lateral coverage of the 7th rank on the kingside were it not for the interference of Black’s minor pieces on d7 and e7. However, White’s pieces are still far from the Black king, while after f4–f5, the risk for White’s own king increases due to the probable opening of the g-file. Once that happens, Black’s queen on a8 comes into its own as an attacking force, slicing through the long diagonal a8–h1.
Black has 4 possibilities:
1) 25…gxf5 26.Rxe6
26.d5 was recommended by Spielmann, but the text is far cleaner
26…Kxe6 27.d5+
A surprising follow-up. 27.Qxf5+ Kd6 isn’t clear at all! 28.Qf4+ Kc6
27…Kf7
27…Kd6 28.Qg3+ Kc5 29.Ba3+ Kxc4 30.Qb3+ Kd4 31.Rf4+ Ke5 32.Rxf5+ Ke4 33.Qf3+ Kd4 34.Rf4+ Ke5 35.Qe4#
28.Qxf5+ Nf6 29.Bxf6 Bxf6
29…Ke8 30.Bxe7 Rxe7 31.d6
wins neatly: 31…Rxd6 (31…Re2 32.Qf7#) 32.Qf8+
30.Qxh7+ Ke8 31.Qg8+
wins by force
31…Ke7
31…Kd7 32.Qe6#
32.Qe6+ Kf8 33.Rxf6+ Kg7 34.Rg6+ Kh7 35.Rh6+ Kg7 36.Qf6+ Kg8 37.Rh8#
2) 25…Kg8 26.fxg6
The imminent opening of the long diagonal for White’s bishop on b2 with d4–d5 makes this position untenable for Black. He cannot hide his king anywhere on the a1–h8 diagonal.
26…Bf6
26…Nf6 27.gxh7+ Kh8 28.d5
27.gxh7+ Kh8 28.Rxf6 Nxf6 29.d5
wins
3) 25…Nf6 26.fxg6+ hxg6 27.d5 Rd6
27…exd5 28.Rxe7+
28.g5
is just killing
4) 25…exf5
The game continuation
26.gxf5 Rg8
26…Nf6 27.fxg6+ hxg6 28.Qh3 Kg7 29.d5 Rf8 30.Re6 was the best defence according to Komodo, but still awful for Black: his king is caught in the middle of an onslaught of White pieces.
Bogolyubow’s defence is very cute: he both reminds his opponent of the vulnerability of the White king while starting the Black king’s dash for safety for the queenside! From a practical point of view, I like it much better than 26…Nf6.
27.fxg6+ Ke8
28.Rf7
A brilliant idea…that turns out to be a blunder. 28…Rxg6+ 29.Qxg6 hxg6 30.Rexe7+ Kd8 31.Rxd7+
31…Rxd7 32.Rf8+ is the idea as Spielmann points out.
28…Ne5
Turns the tables completely! The rook on c7 is activated by sacrificing the knight on d7. White’s vulnerable king does the rest.
29.Rxe5 Rxg6+ 30.Qxg6 hxg6 31.Rh7 Qf3 32.d5 Qg4+ 33.Kf2 Qf4+ 34.Ke1 Qxe5+
0–1
However, instead of 28.Rf7,
28.d5
is recommended by Spielmann, and it’s indeed very strong. The immediate threat is g7.
28…Rxg6+ 29.Kh1
Looking at the position for the first time, I was unsure how strong White’s position was. The open position of the White king is protected primarily by the central pawn chain c4 and d5 which is already under pressure from the rook on c7 and queen on a8. With Black to move, my intuitive reaction was that things might get a little thrilling. However, the position is a pretty trivial win for White!
a) 29…b5 The move my hand went for as soon as I saw the position! 30.Qf3
Threatens Qf7+
30…Kd8 31.Rxe7 Kxe7 32.d6+ picks up the queen on a8;
b) 29…Nc5 30.Qh3 Spielmann (30.Qf3 was my move which also wins comfortably) 30…Qc8 31.Rxe7+ Kxe7 32.Qxh7+;
c) 29…Qc8 30.Qd4
Komodo’s simple line. Qh8+ is an enormous threat (30.Qf3 Kd8 31.Rxe7 Kxe7 32.Qe4+ Kd8 33.Qh4+ Ke8 34.Qxh7 Nf8 35.Re1+ winning was my line which also works)
d) 29…Kd8
Continuing the king’s flight
30.Qe2 Nc5 31.Rf8+ mates.
Why was White’s attack so strong after 28.d5? The answer lies in 2 factors:
- The disposition of the major pieces of both sides.
All Black’s major pieces have active potential and they are united by the common goal of attacking the White king (the rook on g6 cuts the king off along the g-file, the rook on c7 and queen on a8 attack the c4 and d5 pawns which block the a8–h1 diagonal.) However, they are not combining together: each major piece is attacking a different target which allows White to cover Black’s pressure with minimum means (the protection of the c4 pawn by the queen nullifies all Black’s pressure for now). Compare White’s major pieces after 29…Kd8 30.Qe2.
White’s major pieces are concentrated together and exercise a huge amount of pressure in one area of the board.
- The support of the bishop on b2.
This fantastic bishop takes away the f6 and g7 defensive squares from Black’s pieces. Compare Black’s minor pieces: the bishop on e7 is either pinned or unable to move while the knight on d7 is just in the way.
We can conclude that the position after 23…Nd7 is more or less winning for White after the brilliant 24.Nxf7. Let’s go back to Black’s 23rd move and try to find a better alternative. We need to understand whether the single move 23…Nd7 turned a good position into a lost one, or whether it just made an already difficult position worse.
In this position, Soloviov suggested 23…Bd6 instead of 23…Nd7. When I saw it, I wasn’t sure whether there was any deeper idea behind it than threatening …Bxe5 and …Nxg4. In any case, it doesn’t stop White’s fun!
23…Bd6
24.f5
24…Bxe5 25.Rxe5
25.fxg6 A useful idea to spot, though it doesn’t quite do the trick in this position 25…Nxg4 (25…hxg6 26.Rxe5 is very strong for White as 26…Nxg4 27.Rg5 Nh6 28.d5 is catastrophic for Black) 26.gxf7+ Rxf7 27.Rxf7 Bxh2+ 28.Kf1
I assumed this was winning for Black! I was wrong!
28…Qh1+ 29.Ke2 Qg2+ 30.Kd1 Kxf7 31.Qxh7+ Kf8 32.Qh8+ Kf7 33.Qh5+ is a draw by repetition
25…Nxg4
1) 26.fxg6
hoping for 26…hxg6 27.Rg5
26…Nxe5 27.Qg3
looked interesting but
27…f6 28.Rxf6 Qe4
ruins White’s day
2) 26.Re4 exf5
26…Nf6 27.d5 was the big idea and looks strong too 27…Nxe4 28.fxe6 (28.Qxe4 Rxc4 29.Qe5 Rg4+ 30.Kf2 Rg2+ 31.Kxg2 Qxd5+ 32.Qxd5 Rxd5 33.fxe6 was my line but Komodo’s is (of course) much better) 28…fxe6 29.Qd4 mates in 3!
27.Rxg4 fxg4 28.d5
was an idea I got very excited about. Unfortunately Black can kamikaze his way to a draw again
28…Rxc4
Also best I thought. Komodo agrees. 28…f6 29.Qd4 (29.Rxf6 Qb7 30.Qd4 Rg7 seems to hold) 29…Qc6 Komodo! (29…Rf8 30.Rxf6; 29…h5 30.Rxf6 Kh7 31.Qf4 followed by Bc1!) 30.dxc6 Rxd4 31.Bxd4 f5 should hold for Black
29.Qxc4 Qxd5 30.Qc3 Qc5+
should end up equal
3) 26.Re2 exf5 27.h3 Nf6 28.d5
28.Rxf5 (Soloviov) Ne8 29.d5 f6 offers White compensation but the text is much stronger. White is just powering through.
28…Nh5
28…Ne8 29.Qd4 f6 30.Rxe8+ Rxe8 31.Qxf6
29.Rxf5 gxf5
29…Ng7 30.Qd4
30.Rg2+ Kf8 31.Qxf5
is just winning
So what do these variations tells us about the state of the game at the 23rd move? Clearly that Black’s position is critical. Rather than wait to be hit with f4–f5, it’s time for Black to hit the standard “panic button” in hanging pawns structures:
23…b5
24.cxb5
What does Black achieve with …b5? The most obvious benefits are:
- Access to the d5 square, in particular for the knight
- The open c-file for Black’s major pieces
- A damaged White structure due to the isolation of White’s d-pawn.
The negative side is bound up with White’s powerful knight on e5. The pawn sacrifice gives White a strong new outpost on c6. A future Nc6 can easily cost Black the exchange.
Note that often White’s main response to …b5 in such positions is c4–c5. True Black does gain the outpost on d5 for his pieces, but at the same time, White’s c-pawn is no longer a target and Black loses the ability to open further lines on the queenside. Black runs a risk of being unable to generate any further counterplay on the queenside while White merrily does his thing on the kingside. In this position, 24.c5 loses a pawn to 24…Bxc5 although as I write this, I suddenly realise that 25.f5 is still quite tricky for Black!
25.f5 Bb4 26.fxe6 fxe6 27.Rxf6 Bxe1 28.Rxg6+ hxg6 29.Qxg6+ Rg7 30.Qxe6+ Kh7 31.Qf5+ Kg8 32.Qe6+ is Komodo’s draw by repetition. It’s a good illustration though of how danger looms at Black from every corner in this position!
After 24.cxb5, I was keen to prevent a knight entry onto c6. I felt that achieving …a6 as soon as possible to liquidate the b5 pawn was the way to go.
24…Rb8
Prevents Nc6 due to …Rxc6, and intending …a6 on the next move.
White has 2 possibilities now:
1) 25.Ba1
Preparing Nc6
25…a6 26.f5
26.bxa6 Rb6 is the idea with a perfectly good position for Black: White’s extra pawn on a2 is not threatening
26…Rxb5
26…exf5 27.Nc6
27.fxe6 fxe6
This looks very dodgy for Black, but White’s exposed king (due to the advanced g-pawn on g4) gives Black lots of chances.
28.a4
28.Nxg6 Nxg4 (28…Rg5 29.Nxe7+ Rxe7 30.Rxf6 Rxg4+ 31.Kf2 Qg2+ 32.Ke3
From afar I thought Black must be fine here in some way; once I got closer, I couldn’t find anything… and that seems to be true! 32…Qxh2 33.Rf3 My line which Komodo confirms) 29.Qe2 (29.Nxe7+ Rxe7 30.d5 Qxd5 I couldn’t find a clear path to victory) 29…Ne3 30.Nxe7+ Rxe7 31.d5 exd5 32.Rf3 is Komodo’s line with a clear advantage!! Needless to say, this is very confusing stuff!
28…Rd5 29.h4
is a simpler way to maintain White’s advantage.
2) 25.f5 exf5 26.gxf5
26.Nc6 Rxc6 27.bxc6 Rxb2 28.Rxe7 Qxc6 is good for Black
26…Qd5 27.a4 a6 28.fxg6 hxg6 29.Re3
29.Nxg6 Qg5+ 30.Kh1 fxg6 I assumed this was just good for Black, as 31.Rg1+ is met by …Qd5+ however… 31.Re5 Qh6 32.Qb3+ Kg7 33.b6 is better for White according to Komodo
29…axb5 30.Nxg6
leads to a very big advantage for White.
Does Black have anything better than my 24…Rb8? Analysis with the computer led to a couple of extra options:
a) 24…Bd6 25.Nc6 Rxc6 26.bxc6 Qxc6
was one of Komodo’s solutions. At the cost of a full exchange, Black removes White’s strongest piece and gives himself the room to attack White’s airy and damaged pawn structure. My worry about this was that White’s kingside initiative still exists and is not particularly difficult to play.
27.h3 Nd5 28.f5
still seems to leave Black with more headaches than White.
b) 24…Qd5 25.Nc6 Re8
was Komodo’s cool recommendation after more thought. This type of decision is very hard to take in a practical game: Black leaves a White piece on a strong outpost and defends passively leaving White with a range of attacking options of which f5 (possibly after a prior g5), and Re5 followed by d5 are the most obvious.
Whatever the merits of this line, it’s clear that Black is struggling to stay on his feet on his 23rd move, even after the best idea 23…b5. The conclusion is that 23…Nd7 made a difficult position worse. The real turning point must have come earlier
We’ve seen how fraught Black’s position is after 22…Bxd3 23.Qxd3. I’d like now to return to the 21st move to understand some positional aspects and to try and draw some lessons from the tactics we have analysed.
Let’s start by taking a look at the placement of Black’s pieces. Black’s pieces are fairly logically and harmoniously placed. Both rooks eye White’s hanging pawns while the rook on c7 combines both attack (against the c4 pawn) and defence (lateral defence of the 7th rank). However, just as we saw in the game continuation, the pressure Black’s pieces exert on White’s position is diffuse: at the moment, White isn’t remotely struggling to defend any of his vulnerable points.
The queen on a8 is a double-edged factor. From its hypermodern post on a8, it exerts influence on the d5 and e4 central squares and the a8–h1 long diagonal. However, taken together with the rooks on c7 and d8, it is noticeable that Black’s major pieces have abandoned the defence of the kingside. The risk of this configuration was increased by Black’s 19th move 19…dxc4 which created the targets of hanging pawns on d4 and c4 but also liberated White’s bishop on b2: the central break d4–d5 is a recurring menace at every turn, creating threats on the a1–h8 diagonal.
Bogolyubow’s play in the game was purposeful and thematic. By exchanging the light-squared bishops with 20…Be4 & 22…Bxd3 and with the attempt to exchange knights with 23…Nd7, Bogolyubow started to remove the natural defenders of the pawn on c4. With these minor pieces gone, White would find it harder to deal with the pressure that Black can exert on the c4 pawn with his queen and 2 rooks. Removing the knight on e5 also substantially reduces White’s attacking potential. However, the weakness of his kingside got in the way of his logical play!
22.g4
This sharp move supporting the f4–f5 push on the kingside is possible due to 2 factors:
- White’s position is not under direct threat from Black’s pieces. White’s pawns feel the gaze of Black’s pieces upon them at the moment, but nothing more. White has the freedom to develop his own kingside initiative further.
- The strength of the knight on e5. We see it constantly: the knight on e5 is a huge piece. We’ve seen the knight shatter White’s kingside by sacrificing itself on f7, occupying a strong outpost on c6 after Black’s attempt to free himself with …b5, protecting c4 against the attack of Black’s rook on c7 and now supporting White’s kingside pawn onslaught with f5.
Note also that as well as White’s main goal of f4–f5, 22 g4 also threatens 23.g5 winning material after 23.g5 Bxd3 24.gxf6 hitting the bishop on e7. The clumsiness of the bishop on e7 is another theme we saw in the game continuation. The bishop on e7 continually seems to be in the wrong place at the wrong time. However, having opened the centre with 19…dxc4 and with the gathering storm on the kingside after 22.g4, Black doesn’t have the time to spend a couple of moves redeploying it to a more natural square like g7.
However, g4 is not without risk. On the one hand, the push f4–f5 is now a reality; on the other hand, the weakening of White’s kingside gives Black a range of new defensive possibilities. We have already seen one example of this in the line 22…Bxd3 23.Qxd3 b5 24.cxb5 Rb8 25.Ba1 a6 26.f5 Rxb5 27.fxe6 fxe6 28.Nxg6 Rg5
Black would never get counterplay as scary as this if White’s pawn was still on g2! In other words, 22.g4 doesn’t only make additional things possible for White!
22…Bd6
This is the improvement I spent most of my time on. As a general rule, unless you have a concrete goal in mind, you should maintain tension for as long as possible. If an exchange such as …Bxd3 is not yet forced, then it is normally correct to delay it. Such tension exerts a restraining effect on the opponent’s plans and possibilities; once the tension is resolved, you often notice that the opponent is closer to implementing his plans.
This position is a case in point. Bogolyubow exchanged on d3 because he had a specific follow-up in mind – 23…Nd7, exchanging off knights and weakening White’s defence of the c4 pawn. He couldn’t play …Nd7 immediately of course as the bishop on e4 would hang. All very logical of course but he had reckoned without the power of tactics and 24.Nxf7! Once he’d taken on d3, we saw how close White was to achieving his plan of f4–f5. We saw how ineffective 23…Bd6 was (instead of 23…Nd7) as White could just power through with 24.f5.
Playing 22…Bd6 while maintaining the piece tension in the centre leads to a completely different picture. The bishop on e4 interferes with White’s support of the knight on e5 which means that 23.f5 simply loses a piece due to 23…Bxe5.
(Just as a little digression, you might also say that Bogolyubow’s 19…dxc4 also released the tension prematurely: why didn’t he simply play 19…Rd8 first and keep …dxc4 in reserve. In fact 19…dxc4 was a choice dictated by concrete tactical considerations: Bogolyubow was probably afraid (with reason) that the immediate 19…Rd8 or 19…Rfc8 would be met by 20.f5 exf5 21.Bxf5
opening the f-file as 21…gxf5 22.Qg5+ Kf8 23.Qh6+ Kg8 24.Rxf5 is simply killing. So Bogolyubow took on c4 and then played …Be4 to inhibit a quick f4–f5 from White. Note also that 19…Ne4 20.Bxe4 dxe4 21.d5 exd5 22.f5 is also unpleasant for Black)
Back to 22…Bd6.
As well as temporarily slowing down White’s kingside initiative, …Bd6 also introduces the positional idea of …Bxe5. Weakening the dark-squares in this way can be risky, but it’s another way of achieving Bogolyubow’s goal in the game: to weaken the c4 pawn by exchanging off White’s knight and light-squared bishop. I’ve looked at the position after 22…Bd6 quite a lot but this article is now getting rather lengthy so I’ll just show you a couple of lines that interested me:
23.Re2
The move that makes the most sense to me. The rook on e2 improves White’s position greatly after a future Bxe4 …Nxe4. First of all the rook covers d2 which covers an invasion square of the Black knight. Secondly, after a future …f5, gxf5 …gxf5, White is able to fight at once for the g-file with Rg2. Black needs to come up with a concrete plan as White is again ready to force matters with Bxe4.
23.Bxe4 Nxe4 24.Qd3
Isn’t this the same as 22…Bxd3 23.Qxd3 Bd6 after Black retreats with 24…Nf6? 24…f5
No! Black now threatens …Bxe5 followed by putting pressure on the c4 pawn 25.gxf5 gxf5
The key point. Now Black’s piece placement makes perfect sense: the rook on c7 comes over to g7 and the queen on a8 rakes across the long diagonal causing enormous problems for the White king. That’s why we play 23.Re2: to be first to the g-file with Rg2!
23…a6
Again a very logical move: Black aims to achieve …b5 striking at the c4 pawn but without losing a pawn, or at least allowing White to establish an outpost on c6. The question is whether Black has time for this. Using the computer as a sparring partner, it’s possible to maintain equality for Black, but I definitely felt under pressure with Black when analysing on my own!
24.Bxe4 Nxe4 25.Qd3
We’ll take the most obvious move as the main line. 25.Qc2 is another possibility, avoiding the 25…Nc5 resource Black uses against 25.Qd3.
25.Qe3 was another idea I looked at and produced an instructive line:
25…Nf6 (25…f5 26.gxf5 exf5 27.Qb3 transposes to 24.Qd3) 26.f5 exf5 27.gxf5 Bxe5 28.fxg6 hxg6 29.dxe5 Rxc4
Note the negative effect that White’s g4 thrust has on White’s position in this specific situation. Black’s counterplay against c4 and the capture of this hanging pawn automatically brings a rook to White’s 4th rank. This inevitably leads to counterplay against White’s king due to the combination of White’s missing g-pawn and Black’s lurking queen on a8. In other words, 22.g4 substantially increases the power of Black’s queenside counterplay: the capture of the pawn on c4 is not just a goal in itself but the prelude to a fresh burst of counterplay against the White king. However, without 22.g4, White wouldn’t be creating any of his own threats – it’s a double-edged move!
30.e6 Rg4+ 31.Kf2 Qg2+ 32.Ke1 Rd1+ 33.Kxd1 Qxf1+ 34.Re1 Nd5 35.exf7+ Qxf7 36.Qh3 Nf6 37.Kc1 Qxa2 38.Bxf6 Rc4+ 39.Bc3 Qa3+ 40.Kd2 Qa2+ 41.Kd1 Qb3+ is the main line of a Komodo draw
25…Nc5
25…f5 26.gxf5 exf5 (26…gxf5 27.Rg2+ Rg7 28.Rxg7+ Kxg7 29.d5 looks really dangerous for Black) 27.Qb3 looks very pleasant for White
25…Nf6 26.f5 Bxe5 27.fxg6 The presence of the rook on e2 is very useful here: it covers h2! 27…Nxg4 (27…hxg6 28.Rxe5 Nxg4 29.Rg5) 28.gxf7+ Kg7 29.Rxe5 Nxe5 30.Qg3+
This interesting idea pursues the logical goal of targeting the c4 pawn, at the cost of putting another piece away from the king and on to the kingside.
26.Qh3
26.Qc2 Bxe5 27.fxe5 (27.Rxe5 Nd7 28.Re3 Qc8 29.Rc3 looks awkward for White) 27…Nb7
is Komodo’s suggestion, claiming an advantage for Black. I found this hard to believe at the start but the more you look, the fewer attacking chances you see on the kingside and the weaker the pawn on c4 looks! White pawn on e5 (created by the exchange of the knight) reduces the power of the d4-d5 break by blocking the a1-h8 diagonal while the queen is badly-placed on c2: it should be making eyes at the Black king, not defending the c-pawn! For that reason, 26.Qh3 is much more logical, abandoning the c4 pawn in order to exploit Black’s weakened kingside dark squares
26…Na4 27.Ba1 Bxe5 28.Rxe5 Rxc4 29.f5
This looked exceedingly scary to me when I was analysing, but Komodo manages to hold the balance with judicious use of checks against the king along the h1-a8 diagonal opened by 22.g4.
29…Re8 30.Rfe1
Komodo’s main line. I’d already written off Black’s game after 30.f6 or 30.Qh6 but Komodo put me right:
30.f6 Kh8 31.Qh6 Rg8 32.Rxe6 Rc2 33.d5
and now NOT 33…Qxd5 34.Qg7+
34…Rxg7+ 35.fxg7+ Kg8 36.Re8+ mate.
but apparently 33…Nc3 is sufficient for Black according to Komodo.
30.Qh6 exf5 31.gxf5 (31.d5 Rxg4+ 32.Kf2 Rxe5 33.Bxe5 Qf8 holds easily) Rxe5 32.f6 Qf8.
30…Qc6 31.d5 Qc5+ 32.Kh1 Rc1 33.dxe6 Rxe1+ 34.Rxe1 Qd5+
35.Qg2 Qxg2+ 36.Kxg2 fxe6 37.fxg6 hxg6 38.h4
Is approximately equal according to Komodo.
This all felt very fraught for Black. While analysing some more, I came across the interesting idea of
23…Bxd3 24.Qxd3 b5 25.cxb5 Qd5
The inclusion of …Bd6 takes the sting out of Nc6 somewhat while White’s queenside is vulnerable to attack.
26.a4 Bxe5 27.Rxe5 Qa2
with counterplay in a sharp position was one line I was looking at.
Conclusions
Black’s placement of his major pieces on the queenside was not illogical but certainly risky. The resulting White threat of f4-f5 pushed him to open the centre with 19…dxc4
somewhat earlier than he might have wished. 22…Bxd3
was the moment that things started to slide and 23…Nd7
– though a logical positional idea – was a tactical error after which White was winning. 23…b5
was the last chance to keep Black in the game.
22…Bd6
was a definite improvement, restraining White’s play by maintaining the central piece tension. The position is finely balanced though always a little easier for White to play in my opinion. After 23.Re2, Black should take energetic action with 23…Bxd3 24.Qxd3 b5.
Despite the fact that Komodo helped me hold the balance after the slower 23…a6, it felt a little too fraught for a practical game.
Great practical game. Bogo played like Lasker. NB: Spelling: Amazon: Bogoljubow: The Fate of a Chess Player, Sadler: Bogolyubow: The Fate of a Chess Player, Lundin,Erik – Bogoljubow,Efim (another variant). There might be many ways to spell the name correctly but only one correct book title. At first, I thought the game was missing at chessgames.com but the Chessgame-Year 1931 is incorrect and Erik is replaced by H (http://www.chessgames.com/perl/chessgame?gid=1030908)
Hi Carsten, good spot, I’ve corrected the book title. Tough to get his name right! It was indeed a very good practical game. Efim had some good struggles with the Swedish players during his trip there in 1930! Best Wishes, Matthew
Just a small clarification: As Bogoljubow was born in pre-revolution Russian but later (1927) got german citizenship this is a typical confusion. The cyrillic “Ефим Дмитриевич Боголюбов” in german transcription “Jefim Dmitrijewitsch Bogoljubow”, but scientific transliteration is “Efim Dmitrievič Bogoljubov”. As you can see the transcription is more like how to speak out the name “Jefim” = “Yefim” (see also the middle name where “e” is transcripted as “je”). The cyrillic “ю” is transliterated in DIN 1460 (german Deutsches Institut für Normung) and GOST (=Gosstandart Rossii) standards as “ju” while BSI (the British Standards Institution) would be “yu” and ALA (American Library Association) would be “i^u”. BTW “в” is always transliterated as “v”, only in german transcription it is “w”.
Hi Ulrich, wow thanks for that! Hopefully, I’ll get his name right from now on! Best Wishes, Matthew