
While idly flicking through recent games of Vishy Anand, my eye was drawn to the position on move 24 in his game against Robert Ruck.

It reminded me strongly of a very impressive game that Gawain Jones had played against Boris Gelfand at the 2013 London Classic:
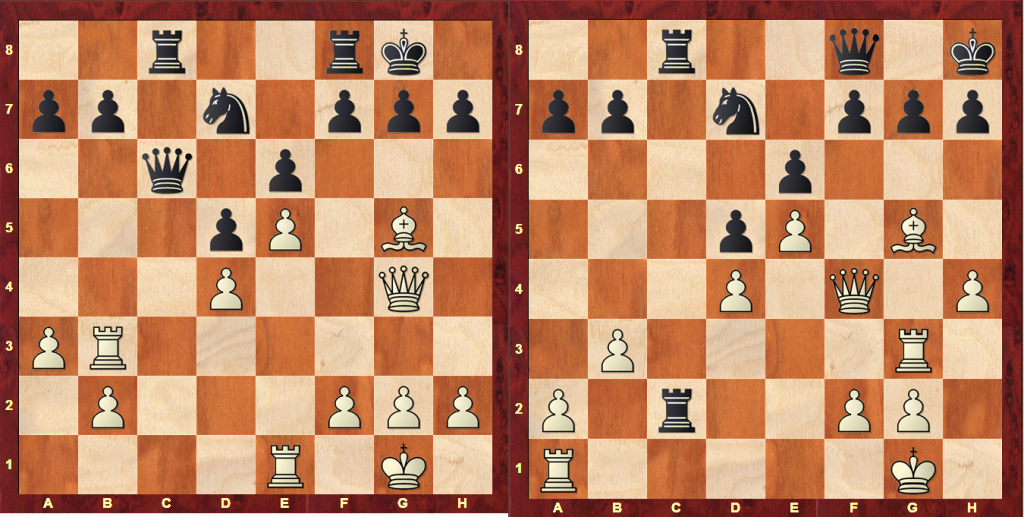
1.e4 c5 2.Nf3 d6 3.Bb5+ Bd7 4.Bxd7+ Qxd7 5.0–0 Nc6 6.c3 Nf6 7.Re1 e6 8.d4 cxd4 9.cxd4 d5 10.e5 Ne4 11.Nbd2 Nxd2 12.Bxd2 Be7
13.Rc1 0–0 14.Rc3 Rac8 15.a3 Nb8 16.Rd3 Qb5 17.Rb3 Qc6 18.Ng5 Bxg5 19.Bxg5 Nd7 20.Qg4
20…f5 21.Qh4 Rfe8 22.Bf6
22…Nf8 23.Bxg7 Kxg7 24.Qf6+ Kg8 25.h4
25…Rc7 26.Rg3+ Ng6 27.h5 Rf8 28.Qg5 Rg7 29.Rc1 Qb6 30.hxg6 Rxg6 31.Qh4 Rxg3 32.Qxg3+ Kh8 33.Qh4 Qd8 34.Qxd8 Rxd8 35.Rc7 Rg8 36.Rxb7 Rg4 37.Rxa7 Rxd4 38.b4 Rd1+ 39.Kh2 d4 40.b5 d3 41.Rd7 d2 42.a4 Kg8 43.a5 Rb1 44.b6 d1Q 45.Rxd1 Rxd1 46.b7 1–0
The game made an impression on me because I had considered the opening position after move 12 to be completely harmless. And yet just 10 moves later, Boris Gelfand’s kingside was being ripped apart! If I’d still been a professional, I would have analysed the game to understand it better. As it is, I simply filed the game away in my mind with the following characteristics:
- French central pawn structure (White pawns on d4 and e5 vs Black pawns on d5 and e6) As you can see, this structure can arise from many different openings!
- White’s light-squared bishop has been exchanged (which should mean severely reduced attacking chances on the kingside)
- White plays Ng5 eliciting …Bxg5 from Black.
- The resulting position with a dark-squared bishop vs a knight on d7 and a White queen and rook active on the kingside 3rd and 4th ranks is very dangerous for Black!
You can imagine how interested I was when I saw Vishy’s game, especially because my first impression was that Black had kept the balance all the way. Same structure, same piece configuration, different outcome – what were the key differences?
1.e4 c6 2.d4 d5 3.e5 Bf5 4.Nf3 e6 5.Be2 Nd7 6.0–0 Ne7 7.c3 Ng6 8.Re1 Be7 9.Bd3 Bxd3 10.Qxd3 Nh4 11.Nxh4 Bxh4 12.Nd2 Qb6 13.Qh3 Be7 14.Qg3 0–0 15.Nf3 Kh8 16.h4 c5 17.Rd1 Rac8 18.b3 cxd4 19.cxd4 Rc2 20.Ng5 Bxg5 21.Bxg5 Rfc8 22.Rd3 Qb4 23.Qf4 Qf8
The last 2 moves – White attacks a kingside target (f7) with his queen, Black defends it with his own queen – are the start of a recurring theme. In contrast to Jones-Gelfand, Ruck has had the chance to bring his queen back to bolster his kingside defences. However, the Black queen’s limited mobility – compared to White’s queen – affects the value that Black can extract from his control of the c-file. Take these variations:
24.Rg3 R8c3
is a natural defensive move, swapping off one of White’s most important attacking units on the kingside. However after
25.Rxc3 Rxc3 26.Rc1
Black cannot maintain his control of the c-file with 26…Qc8 as the f7 pawn hangs. So Black has to concede control of the c-file with
26…Rxc1+ 27.Qxc1
which gives White a little edge in the endgame
Or if Black tries to make use of his control of the c-file to double on the 7th rank:
24…Rb2 25.Rc1 Rbc2
25…Rxc1+ 26.Qxc1 Rxa2 27.Rc3 Nb6 28.Rc7 followed by Be7–d6 is winning for White
26.Rxc2 Rxc2
This has not been a clever exchange for Black: he has loosened his grip on the c-file to exchange White’s poorest piece: the inactive rook on a1. White now has time to intensify his kingside pressure with some typical manoeuvres:
27.Qg4 h6 28.Be7 Qg8 29.Qf4
threatening Bf6
29…Kh7 30.h5
Bf6 is coming next move anyway
30…Qe8 31.Bf6 gxf6 32.exf6 Nxf6 33.Qxf6 with a big advantage for White
As we have seen however, Black’s control of the c-file does give him the “panic button” option of …R8c3 to exchange off the rook on g3 and dim the power of White’s kingside attack. Most importantly however, Black’s control of the c-file acts as a wall, preventing White from attacking Black’s position via a second front. White will have to do his stuff entirely on the kingside, White will never take control of the c-file if Black just stays where he is. And remember, the rook on c2 does attack various points in White’s position – a2 and f2, close to the White king. At the moment, the rook is too far ahead of the rest of Black’s forces to be able to combine against a target, but give Black some freedom and a Black queen in particular might be able to jump out and assist the rook. For the moment however, White is the one in play. How can he create some threats on the kingside?
24.Rg3
In the game, Black played the very interesting 24…h6, upping the pace of the game by forcing White to take immediate action. I wondered however how White was planning to proceed if Black had simply waited, sitting contentedly on his control of the c-file. I came up with the following (the symbol …- simply means that I’m “passing” as Black!:
24…– 25.h5
Note that Komodo sees h6 as a big threat and h6 …g6 as a significant shift in White’s favour. I’m not 100% sure: I don’t see how White breaks through in this situation: I much prefer to angle for Bf6 with a pawn on h5.
25…—
25…h6 as Ruck played is no longer playable with the pawn on h5 26.Bf6 Ruck’s resource 26…Nxf6 27.exf6 g6 is no longer available with the pawn on h5
26.Qg4
Now things start to get worrying for Black.
26…– 27.Be7
27…Qg8 28.Qf4
28.Qh4 is actually Komodo’s favourite with similar ideas, but also the additional possibility of invading on e7: 28…R8c3 29.Rxc3 Rxc3 30.Bb4 Rc2 31.Qe7
28…Qe8 29.Qg5
29.Rxg7 doesn’t work here yet 29…Qxe7 30.Rxf7 (30.Qh6 Rc1+ 31.Rxc1 Rxc1+ 32.Kh2 Qh4#) 30…Rf8 31.Rxe7 Rxf4 32.Rxd7 Rfxf2 is just a draw
29…g6
29…Qg8 30.h6 g6 31.Bf6+
is the cute refutation
30.Rh3 is very dangerous.
In other words, danger is lurking if Black trusts too much in the solidity of his kingside structure. From this point of view, 24…h6 is extremely well-timed. It offends the basic principle that you should not move pawns in front of your king, and it is counter-intuitive to force White to play his big attacking move Bf6! However, by forcing it before White has fully brought all his troops into position, Black gains the opportunity for a strong new defensive structure.
24…h6
25.Bf6
Forced. 25.Rh3 Kg8 26.Qh2 maintains the bishop on g5, but loses something else! 26…hxg5 27.hxg5 Rc1+
25…Nxf6 26.exf6 g6
This defensive structure is a definite improvement for Black over the previous situation. Before he needed queen and king to defend f7 and g7 and a knight on d7 to cover f6. Now Black’s pawn structure is taking the strain: the pawn on g6, defended by the pawn on f7 blocks a White major piece on the g-file while White’s own pawn on f6 covers Black’s f7 pawn (a theme we will see in a number of subsequent variations). Black’s queen on f8 is still restricted by the White queen, but only to the defence of the pawn on h6. This pawn can also be covered by the king from h7 so this pressure is fairly weak. That means that the Black queen is now much more likely to spring out and harry White’s position, particularly from b4.
In the game, Anand played 27.h5 which while whizzing through the moves, felt a little hasty. After 27…g5, Black’s queen is freed at once from the defence of the h6 pawn. It seems much more natural to extract …Kh7 first from Black and only then to play h5. Especially as White has a very obvious move at his disposal: 27.Re1, activating White’s worst piece.
27.Re1
This seemed like a natural improvement on 27.h5, bringing White’s only inactive piece into play and introducing the motif of Rxe6.
a. 27…Rxa2
Another example of the immutable truth in this game: don’t loosen your grip on the c-file!
28.Rxe6
The one weak point to Black’s new defensive structure: the f7 pawn can be overloaded in its defence of the e6 and g6 pawns
28…fxe6
28…Ra1+ 29.Kh2 Rcc1 30.Rxg6
30…fxg6 31.Re8
is the beautiful justification of 27.Re1
28…g5 29.hxg5 fxe6 30.g6
29.Rxg6 Kh7 30.Rg7+
30.h5 was another thought of mine, but Komodo less impressed 30…Rcc2 31.Rg7+ Qxg7 32.fxg7 Rxf2 33.g8Q+ Kxg8 34.Qb8+ leads to a draw by repetition
30…Qxg7 31.fxg7 Kxg7 32.Qd6 Kf6 33.g4 is a clear advantage for White according to Komodo;
b. 27…R8c3
A typical idea from Black, looking to exchange off one of White’s dangerous attacking pieces on the kingside.
28.Rxc3 Rxc3 29.Rc1
This idea again: the Black queen is tied down to the defence of the h6 pawn and thus cannot assist in the fight for the c-file
29…Rxc1+ 30.Qxc1
White’s queen keeps the Black queen passive by tying it to the defence of the h6 pawn. Once the rooks are exchanged, the difference in activity becomes very clear.
c. 27…h5 28.Re5 felt very risky!
d. 27…Kh7
The most straightforward, defending h6 and thus freeing the Black queen for queenside counterplay
28.h5
28.Qe3
preparing h5 followed by f4
28…Qd6
28…h5 is Komodo’s first reaction. I’m not sure though the kingside looks safer when White can’t play Re5!
28…R8c3 29.Qxc3 Rxc3 30.Rxc3 Qb4 looked decent to me. Komodo prefers Black slightly
29.h5 g5
looked the most natural to me, to hold back f2–f4
30.f4 R8c3
28…g5 29.Qe5 Qb4 30.f4
Crisis in the position! In fact, Black has excellent defensive chances! One of the main reasons for this are White’s pawns on f6 and h5. In particular the pawn on h5 takes away White’s best avenue for attacking the h6 pawn! White needs these pawn moves to crack open the Black position, but after that they just get in the way!
I. 30…Qd2
Here we see the value of the rook on c2: Black’s pieces have caught up with it and can combine with it against White points on the second rank
31.fxg5 hxg5 32.Qxg5
32.Rxg5 Qf2+ 33.Kh2 Qh4+ is at least a draw
32…Qxg5 33.Rxg5 feels a bit better for White;
II. 30…Rc1 31.Rxc1 Rxc1+ 32.Kh2 Qe1
32…Re1 33.Qc7
33.Qxe1 Rxe1 34.fxg5 hxg5 35.Rxg5 again looks a bit better for White;
III. 30…Qxe1+ 31.Qxe1 Rc1 32.Kf2
32.Qxc1 Rxc1+ 33.Kf2 Rh1 missed this! Komodo says slight edge for Black! 34.fxg5 Rxh5 35.gxh6 Rf5+ is the nasty point when f6 and h6 fall
32…Rxe1 33.Kxe1 Rc1+ 34.Kd2
34.Ke2 Rc2+ 35.Kf3 Rc3+ 36.Kg4 Rc2 37.fxg5 I wasn’t sure about this. Komodo says 0.00 37…Rf2 The key idea, delaying …hxg5. I hadn’t spotted this one: It’s just very hard to do anything constructive as any rook move is met by …Rxg2+
34…Rf1 which looks fairly even;
IV. 30…gxf4 31.Rg7+ Kh8
is also equal according to Komodo. I didn’t dare believe!
32.Re3
32.Rf1 Qd2 with …Rg8 to follow if White doesn’t act
32…fxe3 33.Qf4 Qe1+ 34.Kh2 Rxg2+ 35.Rxg2 Qb1 36.Qg3 (36.Qxe3 Qc1) 36…Qh7 37.Qxe3 Rc2 holds
Not easy though!
V. 30…Rg8
was my favourite idea. It’s not bad
31.f5
31.fxg5 hxg5 is a clear advantage for Black according to Komodo. Again take a look at those f6 and h5 pawns: no way through for White!
31…exf5 32.Qxf5+ Kh8 33.Rd1
33.Qxc2 Qxe1+ 34.Kh2 Qe6
33.Rge3 Qd2 34.Qxd5 Qf2+ 35.Kh2 Qh4+ 36.Kg1 Qf2+ is a draw by repetition
33…Rd2
33…Qd6 was my idea and is also not bad
34.Rxd2 Qxd2 35.Qxd5 Re8 is Komodo’s path to the draw
After examining 27…Kh7, it probably occurs to you that the king would be much better placed on h8 rather than h7 after the standard attacking sequence h5 …g5, f4 …gxf4. With the king on h8, Rg7 does not arrive with check which gives Black an extra tempo for counterplay.
e. 27…R8c6
prevents Rxe6, and introduces the idea of …Qd6 once the pressure against h6 is neutralised. It also tempts White to play h5, without Black having first played …Kh7. Komodo’s #1 choice 27…a6 has the same purpose.
28.h5
28.b4 was one of my ideas idea, aiming to follow up with a3 and stop the queen from accessing the queenside dark-squares (a3 & b4) from which she helps to launch counterplay
28.a3 has a similar idea to 28.b4
28…g5 29.Qe5 Qb4
is the idea. Black wants to play this position a tempo down (with the king on h8 instead of h7) in comparison to 27…Kh7. This means that White’s Rg7 does not come with check which should favour Black
30.f4 gxf4 31.Rg7
is still equal according to Komodo, but Black is then drawing extremely comfortably
31…Qd2 32.Rf1 Qe3+ 33.Qxe3 fxe3 34.Rxf7 Rc1 35.Re7 e2 36.Re8+ Kh7 37.Re7+
and a draw by perpetual
In any case, 27.Re1 looks like a very reasonable attempt for White. The game continuation was less fortunate, though it was only after switching on the engine that the truth became clear!;
27.h5 g5 28.Qe5 Qa3
Komodo is already claiming a big advantage for Black! Of course, in comparison to 27.Re1 Kh7, the king is ideal on h8 and Black’s c-file counterplay is coming much quicker (with check, due to the position of the rook on a1)
29.f4
3 consecutive mistakes according to Komodo!
29…Rc1+
29…Qb2
was in fact winning for Black according to Komodo! Doesn’t look remotely like it, but in fact, Black’s king is much safer than White’s: the f6 and h5 pawns shield Black’s king but have opened up White’s king!
30.Re1 Rc1 31.Rxc1 Rxc1+ 32.Kh2 Qb1 33.Rf3 Rh1+ 34.Kg3 Rxh5
taking pawns, defending the Black king and threatening ideas like …gxf4+. What a move!
35.Qb8+ Kh7 36.Qf8 Qe1+ 37.Rf2 gxf4+ 38.Kf3 Qe3+ 39.Kg4 Qg3+ 40.Kxh5 Qg5#
In the game, Black steered the game to a draw
30.Rxc1 Qxc1+ 31.Kh2 Qxf4 32.Qxf4 gxf4 33.Rg7 Rc2 34.Kh3 Rxa2 35.Rxf7 Kg8 36.Rxb7 a5 37.Rg7+ Kf8 38.Rg6 Kf7 39.Rxh6 Rd2 40.Kg4 Rxg2+ 41.Kxf4 Rf2+ 42.Ke5 Re2+ 43.Kd6 Re4
½–½
Just thinking back to what happened, you may feel that 24.h5 was an improvement on 24.Rg3. This seems very natural when you see in the game that 24.Rg3 was well met by 24…h6. However, 24…h6 can still be played with an additional point:
24…h6 25.Bh4 Re2
The White bishop is poorly-placed on h4, exerting no influence on the c1 square and the fight for the c-file. This gives Black some extra freedom for manoeuvre
26.Qf3
26.Rc1 Re4
26…Rcc2 27.Rc3 Red2 28.Rxc2 Rxc2 29.Bg3 Kg8
looks pretty balanced. At some stage, Black may get brave enough to transfer his knight to c6 to put pressure on d4
To get back to my original question, what was the difference between Jones-Gelfand and Anand-Ruck?
Most importantly, Ruck enjoyed a much better defensive distribution of his pieces with his queen helping to hold the kingside while his rooks patrolled the open c-file. Gelfand’s setup with queen and rook on the c-file and rook on f8 was much less effective. Secondly, Jones had the use of the h-file to attack the h7 pawn (21.Qh4 threatened Rh3); Anand had already played h4 on move 16 which meant he could only target the f- and g-pawns with his pieces. Thirdly, Anand’s queenside was vulnerable to invasion on the dark squares by Black’s queen. If he had arranged his pawns on b2 and a3 instead of a2 and b3 then Black would have had much more difficulty activating his queen.
great analysis
Hi Lech, thanks! Glad you enjoyed it!