
My last round game at Haarlem against the Dutch GM Erik van den Doel was far and away my best effort of the tournament. It was played on board 1 when Erik, IM Quinten Ducarmon and I were tied in 1st place with 4,5/5.
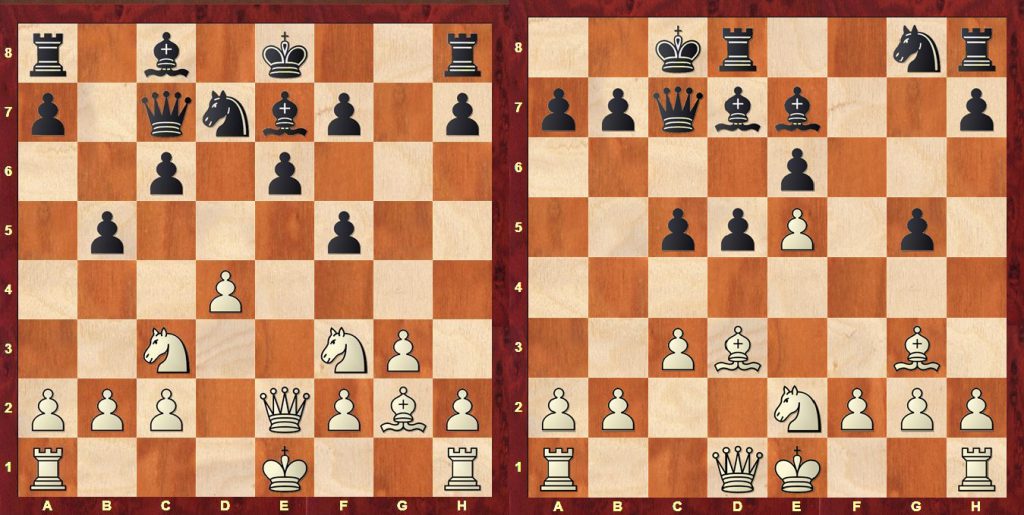
Van den Doel,Erik – Sadler,Matthew D
Haarlem Nova College 03.07.2016
1.e4 e6 2.d4 d5 3.Nd2 Be7 4.e5 c5 5.c3 Nc6 6.Bd3 Bd7 7.Ne2 f6 8.Nf3 fxe5 9.Nxe5 Nxe5 10.dxe5 Qc7 11.Bf4 g5
A novelty, thought up at the board. I had come across the position after 11.Bf4 once before in my preparation and I was aware that 11…0–0–0 12.Qd2 Nh6 13.Bxh6 gxh6 14.f4 had been played in a US game in 2014. At the time I didn’t have the opportunity to analyse further so I made a mental note to stop and think if the position came up in practice. Although Black had done fairly well in the previous game, I felt it was a shame to sacrifice Black’s dynamic potential on the kingside by accepting fairly useless doubled h-pawns. The idea of castling queenside followed by …h5 to prepare …Nh6 had vaguely entered my thoughts then, but in the heat of battle a much more aggressive idea loomed out at me!
12.Bg3 0–0–0
Who has the space advantage? White has the only pawn (the pawn on e5) that has crossed into the opponent’s territory and this pawn exerts some cramping influence on Black’s development by taking away the f6 square from the Black knight. However, looking at the position, you don’t feel that White is cramping Black – quite the contrary. This is because Black is exerting an astonishing amount of control on the 4th rank. After his next move …h5, Black will be attacking every square on the 4th rank: a4 is attacked by the bishop on d7 and b4–h4 will be attacked by the pawns on c5, d5, g5 and h5. For this reason, White’s e-pawn gives the impression of being a lone soldier flung forward rather than a part of a cramping strategy from White. I have the same feeling – though less extreme – about White’s position in the Advance Caro-Kann after 1.e4 c6 2.e4 d5 3.e5 c5 4.dxc5. All that empty uncovered space on the 4th rank and those 2 faraway White pawns on c5 and e5!
Looking at the White minor pieces, it’s clear that White has a problem with his bishop on g3 and his knight on e2. On the h2–b8 diagonal, the bishop can perform no other function apart from holding on to the pawn on e5. To make matters worse, the bishop is in the way of Black’s desired kingside counterplay with …g5 and …h5–h4. …g5 has already gifted Black one tempo and …h4 will give Black another. The knight on e2 is completely restricted by the pawns on c5 and g5. Part of the attraction of playing 11…g5 was the parallel with the 18th game of the 1929 Bogolyubow-Alekhine World Championship Match which I had played through recently.
In that game, Alekhine put a whole skeleton of pawns on light squares (b5, c6, e6 and f5) which took away a lot of squares from the knight on c3! I particularly liked the “prongs” on b5 and f5. So here I reproduced that effect even more effectively by restricting a knight on e2 with “prongs” on c5 and g5. The knight would be much better placed on f3, defending e5 and supporting h4 as a response to Black’s …h5.
As already stated, Black has a simple and rapid plan of attack at his disposal: …h5…Nh6 and then either
- a continuation of the kingside advance with …h4 and …g4 (supported by the knight on h6) or
- The simple attack on the e5 pawn with …Nf7 (or …Ng4 if White hasn’t played h3)
13.b4
This is a natural move for a player of attacking bent. Faced with an imminent Black kingside attack, White attempts through sacrificial means to alter the balance of the position. The aim of 13.b4 is to
- Expose the Black king by opening the b-file with bxc5
- Challenge Black’s extreme influence over the 4th rank by exchanging the pawn on c5 for White’s useless (in the sense of activity) b2 pawn.
- Secure the strong d4 outpost for the White knight on e2 by removing White’s c-pawn and thus correct one of the biggest problems in his position.
It was an impulsive decision from White: White played it after just a few minutes’ thought having already spent a fair amount of time on the opening. The general idea is typical and logical but White barely has the time for this show of strength. Black’s play with …h5 (gaining a tempo on the way by threatening …h4 trapping the bishop) and …Nh6 (with the threat of …Nf7 winning the e5 pawn) is coming very fast. Moreover, after a sequence like 13…h5 14.h3 Nh6 15.bc Bc5, White must realise that taking advantage of the newly-won d4 square with 16.Nd4 drops a pawn to 16…Bd4 17.cd Qc3+ and forces the White king to abandon castling.
The effective result of 13.b4 therefore is that White has wrecked the safest area of the board for his king: the queenside. From this moment on, White has great difficulty finding a safe haven for his king and – by extension of this problem – coordinating and activating his rooks. Wherever he puts his king now, there will be an element of risk. Komodo wants to use the control White will gain over d4 as part of his defensive plan, castling kingside and tucking the king away on h1 when the pawns come down to h4 and g4. If White can hold a knight on d4 blockading the Black pawn on d5, then the opening of the g-file and the a8–h1 diagonal after …gh, gh will not spell disaster (yet) for White. I was convinced that I had a clear advantage after 13.b4. Whatever the objective truth, White’s decisions in the coming moves are much more difficult to evaluate than Black’s.
While my opponent was thinking, I looked at a number of lines.
a) 13.Qd2 h5 14.h4 gxh4 15.Bf4
This was the line that interested me most during the game. At the cost of a pawn, White extends the influence of the e5 pawn (which prevents the Black knight from developing to f6) by also preventing the knight from exiting via h6. This slows down Black’s initiative considerably. From f4, the bishop is also closer to the more attractive diagonal g1–a7 from a post on e3.
15…Rf8
This was the plan of development for Black I’d settled on: …Rf8 followed by …Bd8 & …Ne7–c6. I looked at other ideas like …Kb8 and …Rc8 followed by …Bd8 and …Ne7 but I preferred to have the idea of …Rxf4 in the position while I regrouped my pieces.
a1) 16.b4 is an interesting idea here, since Black is looking to play …Bd8. White will look to reactivate his bishop on the g1–a7 diagonal with Be3 if possible. 16…Rxf4 17.Qxf4 Nh6 looks very interesting: just as in the game, b4 loosens White’s queenside dark-squares enormously which makes a position without White’s dark-squared bishop doubly attractive.
a2) 16.Ng1 Aiming to redeploy White’s pieces to their best posts. 16…Rxf4 (16…Bd8 17.Nf3 Ne7 18.Nxh4 achieves a measure of stability for White though Komodo still prefers Black slightly here.) 17.Qxf4 Nf6 is definitely worthy of attention, exploiting the moment to bring the knight to its best square, aiming for the strong outpost on g4 (17…Nh6 18.f3 Be8 is also interesting) 18.f3 (18.Nf3 Ng4) 18…d4 is a dangerous initiative for Black (18…Bc6 followed by …Nd7 is also worthy of consideration)
a3) 16.0–0–0 Bd8 17.Kb1 Ne7 18.Rxh4 Ng6 19.Rhh1 (19.Rh3 Nxf4 20.Nxf4 Bg5 works here as the rook on h3 hangs 21.Nxd5 exd5 22.Qxg5 Bxh3) 19…Nxe5 20.Rhe1 (20.Qe3 Ng4) 20…Be7 White cannot increase the pressure on e5 in time.
b) 13.Qd2 h5 14.h3 Nh6 15.0–0–0 is White’s most natural way of playing, tucking the king to safety away from Black’s pawn advance on the kingside. The key question is whether he can still hold the pawn on e5 when Black completes his encirclement of the pawn with …Nf7.
b1) 15..h4 Feels like a useful move to throw in if you’re chasing after the e5 pawn. After 16.Bh2, f2 is no longer defended and g2 is also vulnerable to …Rg8 if White ever captures the g5 pawn. The only drawback is that the dark-squared bishop is defended on h2 whereas on g3 it may be undefended.
16.Bh2 Nf7 17.f4 (17.Kb1 Nxe5 18.Qe3 Bd6 19.Qxg5 Rdg8 wins for Black; 17.Qe3 d4 just as in the game 18.Qe4 c4 also wins for Black) 17…gxf4 (17…Rhg8 with the idea of …g4. Komodo less impressed. Thinks White can meet …g4 with hg followed by g3) 18.Nxf4 (18.Bxf4 Nxe5; 18.Qxf4 Bg5)
a1) 18…Bg5 19.Kb1 Nxe5 (19…Qxe5 20.Qf2)
a11) 20.Ng6 Bxd2 21.Bxe5 Qxe5 (21…Qb6 22.Ne7#) 22.Nxe5 Be3 23.Nf7 Rhg8 24.Nxd8 Kxd8 25.Rhe1 Rg3 is an edge for Black;
a12) 20.Qe1 Nf3 21.Nxd5 (21.gxf3 Bxf4; 21.Nxe6 Nxe1 22.Bxc7 Nxd3 23.Bxd8 Bxd8 24.Nxd8 Rxd8 25.Rxd3 Bf5 26.Rhd1 c4) 21…Nxe1 22.Nxc7 (22.Bxc7 Nxd3 23.Bxd8 Rxd8) 22…Nxd3 23.Rxd3 e5 24.Rd5 I wasn’t 100% sure about this one 24…Bf4 25.Bxf4 exf4 26.Rxc5 b6 27.Rc4 Bf5+ 28.Kc1 Bd3;
a13) 20.Qe2 Nxd3
a131) 21.Nxd5 Qc6 22.Rxd3 exd5 23.Qe5 Be8 24.Qf5+ was a crazy line I got into: I couldn’t see a win…and that’s right! 24…Rd7 25.Qe5;
a132) 21.Nxe6 Qb6 22.Nxd8 Nf4 Komodo is a little better for Black (22…Bf5 23.Rxd3 c4 24.Ka1 cxd3 (24…Bxd3 25.Qg4+) 25.Qe5)
a133) 21.Nxd3 e5 22.Nxe5 made me very uneasy and it’s right. Komodo sees a clear advantage for White (22.Bxe5 Rde8 The reason 20.Qe1 was interesting) 22…Bf5+ 23.Ka1 Rhe8 24.Qh5 was my line)
a2) 18…Nxe5 19.Ng6 Bd6 20.Nxh8 (20.Bxe5 Bxe5 21.Nxh8 Bf4) 20…Nxd3+ 21.Qxd3 Bxh2 22.Ng6 Bg3 23.Rhf1 I wasn’t sure how fantastic this is for Black. Komodo hovers between equal and a slight edge for Black. It’s definitely playable of course, but it’s a lot of effort and investment in a position where I felt I had a clear edge!
b) 15…Nf7 16.f4 Rhg8 is Komodo’s calm suggestion after that craziness and was one of the lines I was looking at during the game too.
Back to the game!
13…h5 14.h3 Nh6 15.Qd2
White puts his plan of gaining control of d4 on hold in order to fight Black’s play on the kingside. The text allows Qe3 to defend e5 and also aims to prevent Black’s plan of …h4 and …g4 by tactical means using the queen and bishop battery on the c1–h6 diagonal as we saw before. However, 13.b4 is not a helpful move in either of these goals and things really start to slide for White now.
It was best to bite the bullet and carry through White’s idea consistently for better or for worse. Actually, with Komodo’s help, it doesn’t end up as bad as it looks! 15.bxc5 h4 16.Bh2 g4
a) 17.c6 Bxc6 (17…Qxc6 18.0–0 gxh3 19.Nd4 hxg2 20.Nxc6 gxf1Q+ 21.Kxf1 Bxc6 was a line that attracted me: the Black h-pawn is awkward to stop!) 18.Nd4 was a disruptive attempt I was considering during the game 18…g3 19.fxg3 hxg3 20.Bxg3 Rhg8 21.Nxe6 Qa5 looked virtually winning to me.
Komodo takes a long time to draw the same conclusion. I particularly like the fact that c3 is a key weakness after the weakening b4!
b) 17.Nd4 g3 was the line I was looking at 18.fxg3 hxg3 19.Bxg3 Rhg8 looks scary.
c) 17.0–0 gxh3 (17…Bxc5 18.Nd4 Rdg8 19.Kh1 Kb8 was Komodo’s calm recommendation but it only looks like a small plus for Black.) 18.gxh3
c1) 18…d4 was the idea I wanted to play 19.cxd4 (19.Nxd4 Bc6 20.f3 (20.Nxc6 Qxc6 21.f3 Qxc5+ 22.Kh1 Qe3) 20…Bxc5 21.Be4 Komodo claims equality here which seems unfair but isn’t easy to disprove!) 19…Bc6 20.f3 Nf7
I was very enthusiastic about this idea, but Komodo isn’t having any of it! (20…Rhg8+ 21.Kh1 Bxc5 22.Be4 is simply better for White according to Komodo (22.dxc5 Qg7 23.Nf4 Nf5 is the (murky) idea) ) 21.Bc4 Ng5 22.Qb3 It feels very risky for White but Komodo defends with ease! 22…Rhf8 23.Bxe6+ Nxe6 (23…Kb8 24.Bg4) 24.Qxe6+ Kb8 25.Qb3 Qc8 26.e6+ Ka8 27.Rae1.
c2) 18…Nf7 19.Nd4 (19.f4 Rhg8+ 20.Kh1 d4 21.Nxd4 Bc6+ 22.Nxc6 Qxc6+ 23.Rf3 and Komodo finishes off nicely with 23…Nxe5 24.fxe5 Rgf8 25.Kg2 Rxf3 26.Qxf3 Rg8+ 27.Kf2 Bxc5+ 28.Ke2 Rg2+) 19…Ng5
is a less violent and better implementation of this regrouping. Black has a very pleasant game
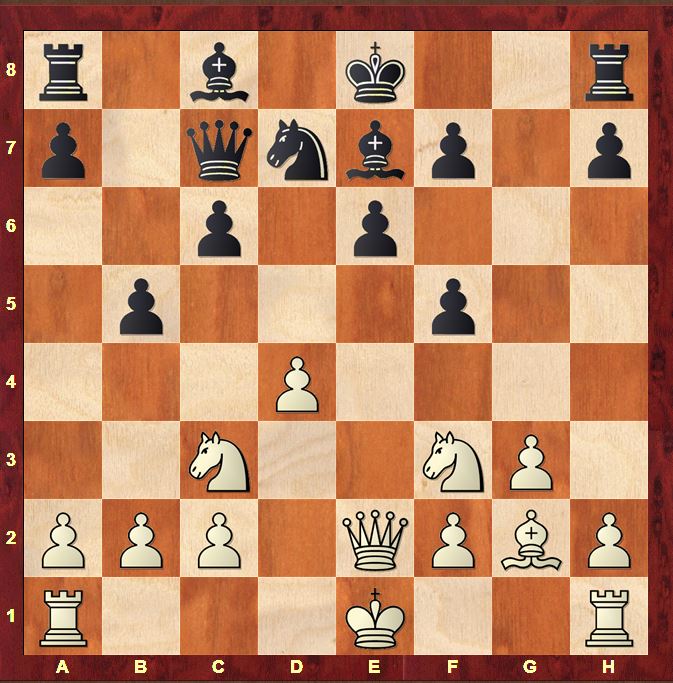
15…h4 16.Bh2 g4 17.Bf4
Hoping for 17…Nf7 18.Qe3
17…gxh3
A neat intermezzo that makes a big difference to the evaluation of the position
18.gxh3
18.Bxh6 hxg2 19.Rh3 (19.Rh2 g1Q+
20.Nxg1 Qxe5+ is the gorgeous point!; 19.Rg1 h3) 19…Rxh6 20.Qxh6 Qxe5 wins thematically due to the weakness of the king and the c3 pawn (caused by 13.b4) 21.Re3 (21.0–0–0 Bg5+; 21.Qg6 Bg5) 21…g1Q+ 22.Nxg1 Qxc3+
18.Rxh3 Ng4 The point of inserting 17…gxh3. g4 is an even stronger square than f7 as it prevents Qe3 defending the e5 pawn. To prevent this, White must accept the shattering of his kingside structure with 18.gxh3
18…Nf7 19.Qe3 Bc6
Thanks to the inclusion of the exchange of g-pawns, this threatens the devastating …d4. …Bc6 activates the rook on d8 with gain of tempo and that is enough to make the position tactically winning for Black.
20.Rg1 d4 21.cxd4 cxd4 22.Nxd4 Bxb4+ 23.Ke2 Bc5
It’s that simple: White can’t help losing material. It’s also handy for the material balance that Black could pick up the b4 pawn (again that weakness after 13.b4!) for free on the way!
24.Nxe6 Bxe3 25.Nxc7 Bxf4 26.Ne6 Bxe5
An inaccuracy, though not a serious one.
26…Rxd3 27.Kxd3 Nxe5+ 28.Kc3 Bh2 The idea I’d missed 29.Rg7 Nf3 is awful for White
27.Nxd8 Kxd8 28.Rad1 Ke7 29.Bc4 Nd6 30.Bd5 Bd7
This was the distribution of pieces I’d envisaged when playing 26…Bxe5. I will tie down a White piece to the defence of h3 and in the meantime transfer my rook to the queenside to latch on to the a-pawn. White attempts to parry the latter threat by exchanging rooks but the tactics are against him.
31.Rg8 Rxg8 32.Bxg8 Bxh3 33.Rh1 Bg4+ 34.f3 Nf5
Protects h4, and threatens both …Ng3+ (winning the rook) and …Nd4+ winning the f-pawn.
35.Rg1 Nd4+ 36.Ke3 Bxf3 37.Rf1 Bg2 38.Rf7+ Kd6 39.Rh7 h3 40.Kf2 Nf5 41.Bc4 Bg3+ 42.Kg1 Nh4 43.Be2 h2#
A beautiful mate with which to win the tournament!
0–1
The position reminds me of a variation of the French Advance line after 1. e4 e6 2. d4 d5 3. e5 c5 4. c3 Nc6 5. Nf3 f6 6. Bd3 fxe5 7. dxe5 Qc7 8. Bf4 Bd7 9. O-O O-O-O. I always thought that the direct attack of Black’s center with c3–c4 is promising; if Black advances his d-pawn White has a possible nice square on e4, while taking on c4 puts pressure on e6. On the other side a future capture on d5 could make White’s bishop on h2–b8 were strong. I was always fascinated by the following little masterpiece: Romanishin—Ivanchuk, URS-ch FL54, Irkutsk 1986 1. e4 e6 2. d4 d5 3. e5 c5 4. c3 Nc6 5. Nf3 Bd7 6. Be2 f6 7. O-O fxe5 8. Nxe5 Nxe5 9. dxe5 Qc7 10. c4 Qxe5 11. Bh5+ g6 12. Bf3 O-O-O 13. Re1 Qd6 14. Nc3 dxc4 15. Qe2 Nf6 16. Qxc4 Be7 17. Bf4 Qd4 18. Nb5 Bxb5 19. Bxb7+ 1-0. Of course as always chess is concrete and patterns could not applied blindly. Nevertheless in your game the move 13. c4 immediately popped up in my mind! But it is very bad in view of the surprising 13. … dxc4 14. Bxc4 b5! with an almost decisive advantage for Black. Best regards and thank you for your very superb blog!
Ulrich
Hi Ulrich, thanks for your comment and the interesting variation! The similarities with the Advance French are quite striking indeed. Funny how just a few small changes – the White knight on e2 instead of White castling – turn it into a completely different story! Glad you’re enjoying the blog! Best Wishes, Matthew