
In the last part of our examination of the theory of King, Rook and Pawn against King and Rook, we look at endings involving a rook’s pawn (a/h). We shall examine 3 basic scenarios for rook’s pawns
- The White king supports the pawn with the aim of shepherding it to a queen.
- The White rook stands in front of its pawn and the White king runs over to try and assist it.
- The weaker king is cut off on a rank from the h-pawn
Let’s take a look at both scenarios in turn:
- The White king supports the pawn with the aim of shepherding it to a queen.
K,R and Rook’s Pawn – King supporting
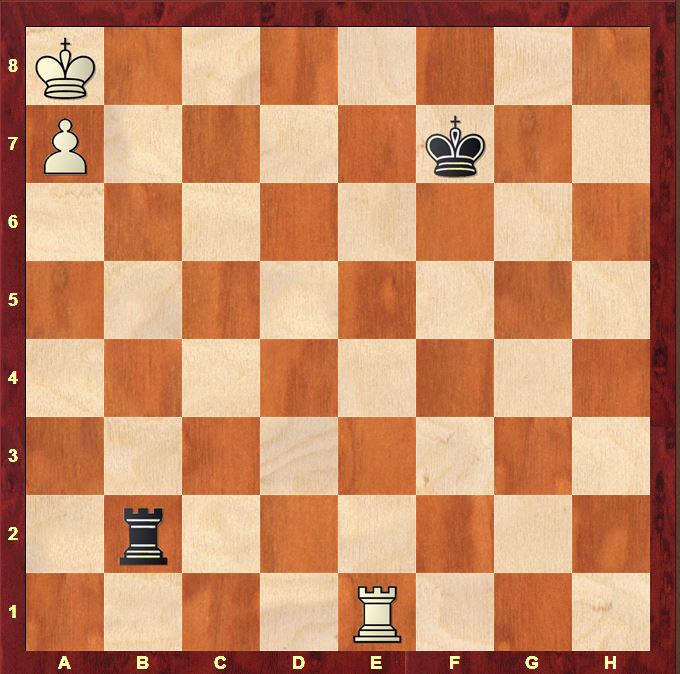
This is the only position of this type worth remembering in practical play. White needs to remember that the Black king needs to be cut off on the f-file in order for White to win.
1.Rc1 Ke7 2.Rc8 Kd6
The best defence, preventing the White king from escaping down the board
2…Kd7 3.Rb8 Ra2 4.Kb7 Rb2+ 5.Ka6 Ra2+ 6.Kb6 Rb2+ 7.Kc5 and the a-pawn queens
3.Rb8 Ra2 4.Kb7 Rb2+ 5.Kc8 Rc2+ 6.Kd8 Rh2 7.Rb6+
7.a8Q Rh8#
7…Kc5 8.Rc6+
The key idea
8…Kb5
8…Kxc6 9.a8Q+
9.Rc8 Rh8+ 10.Kc7 Rh7+ 11.Kb8 wins
The fourteenth rule is: with White’s king supporting a rook’s pawn, the Black king must be cut off by 5 files (Black king on the f-file) to ensure the win.
- The White rook stands in front of its pawn and the White king runs over to try and assist it.
K, R and Rook’s Pawn – Pawn on the 7th
This is the typical scenario that everyone knows about: White ‘s king cannot relieve the rook of its duty of supporting the a7 pawn as it will be checked away whenever it tries.
1.Kb6 Rb1+ 2.Kc6 Rc1+ 3.Kb7 Rb1+ with a draw
The fifteenth rule is: When White has advanced his rook’s pawn to a7 supported by a rook on a8, Black should place his rook behind the pawn and check the White king away when it threatens to relieve the rook of its protective duties.
The question arises naturally however: what if White doesn’t play his pawn to a7, leaves it on a6 and tries to bring his king to a7 as in the first example? In this case, Black should make use of the Vancura defence:
Vancura defence
This is Black’s basic defensive structure. Black claims that the long side of a rook’s pawn is long enough for space both for his king and for a sufficient checking distance for his rook. The king stays on g7 and the rook checks the White king from the f-file when it gets too close to the a-pawn
1.Kc5
1.a7 Ra6 draws as in the previous example
1…Rf5+ 2.Kb6
2.Kd4 Rf6
2…Rf6+ 3.Kb7 Rf7+ 4.Kc6 Rf6+ 5.Kd5 Rb6
The sixteenth rule is: Black defends against a White pawn on a6 supported by a rook on a8 by attacking the pawn laterally from the f-file. Black’s king is best kept on the g-file (g7 and g6).
3. The weaker king is cut off on a rank from the h-pawn
A completely different scenario to the other 2 so I won’t make a rule for this one. However, it’s well worth being aware of!
This position is taken from a variation in Muller and Konoval’s “Understanding Rook Endgames”. At first sight, this doesn’t seem too bad for White: in terms of files, his king is pretty close to the h-pawn. However, White’s king needs to be on the second rank (for example around e2) to be able to restrict the Black king and rook and thus hinder the advance of the h-pawn. As we shall see, Black’s freedom to use the f1,f2,f3 squares for his rook make the advance of the h-pawn very easy here:
1. Kf5 Kg3 2. Ra6 Rf4+ 3. Ke5 h3 4.Ra2 Rf1 5. Ra3+ Rf3 6. Ra8 h2 7. Rh8 Kg2 8. Ke4 Rh3 9. Rg8+ Rg3
wins
Just to round off, the 16 rules in one table:
| Material | Rule# | Rule |
| White has a knight’s pawn (b- or g-pawn) on the 5th rank supported by his king | 1 | Black MUST get his king in front of the pawn |
| White has a bishop’s pawn (c- or f-pawn) on the 5th rank supported by his king,
|
2 | Black’s king must always be able to escape to the short side so that Black’s rook can check laterally from the long side. |
| White has a central pawn (d- or e-pawn) on the 5th rank supported by his king
|
3 | Black’s king can be either on the short side or long side to hold a draw. Defence with the king on the long side requires greater precision. |
| All positions | 4 | You should always place the king on the short side if given the choice. |
| White has a knight’s pawn on the 6th rank supported by his king on the 6th rank. | 5 | As long as he can get his king in front of the pawn, Black can hold the draw with passive defence |
| White has a bishop’s pawn or central pawn on the 6th rank supported by his king on the 6th rank. Black’s king is in front of the pawn.
|
6 | Never allow this unless you are able to drive the king away immediately with rear checks. The defensive technique to achieve this is Philidor’s defence |
| White’s has a central pawn on the 6th rank supported by a king on the 7th rank | 7 | Play the king to the short side and the rook to the long side with maximum checking distance, while standing guard over the back rank. |
| All positions | 8 | You should always maintain maximum checking distance between the Black rook and the White king |
| White has a bishop’s pawn on the 4th rank supported by his king and Black’s king is cut off by 1 file on the long side of the pawn.
|
9 | Place the rook in front of the pawn and the king on the 5th or 6th rank, ready to interfere with the White rook. |
| All positions | 10 | Do not let your king get cut off along a rank when defending against a passed pawn. |
| All positions | 11 | A “Horizontal Cut” is more powerful than a “Half Cut” |
| White has a bishop’s or knight’s pawn on the 4th rank supported by his king and Black’s king is “Half Cut” | 12 | Actively forestall White’s king from moving up and supporting the advance of its pawn with his rook. |
| White has a bishop’s pawn on the 4th rank and the Black king is cut off by 2 files | 13 | White wins |
| White’s king supports the rook’s pawn.
|
14 | The Black king must be cut off by 5 files (Black king on the f-file) to ensure the win |
| White has advanced his rook’s pawn to a7 supported by a rook on a8. | 15 | Black should place his rook behind the pawn and check the White king away when it threatens to relieve the rook of its protective duties. |
| A White pawn on a6 supported by a rook on a8 | 16 | The Black rook should attack the pawn laterally from the f-file. Black’s king is best kept on the g-file (g7 and g6). |
These 16 rules are a good basis for evaluating and assessing more complex endings involving transpositions into K,R & P vs K& R endings. We will look at a few such examples in a future article.
Excellent once again-many thanks.