
This interesting game doesn’t even make it into Tibor Karolyi’s 3-volume biography of Mikhail Tal, or even in Mikhail Tal’s own collection of Best Games! I found it in “The Complete Manual of Positional Chess, Opening and Middlegame” by Sakaev and Landa, in a chapter entitled “Do not leave the king in the centre”. Good advice in general, and especially against Tal! Later I also found the game annotated in the book “Study Chess with Tal” by Mikhail Tal and Alexander Koblencs although the notes there are fairly superficial.
A playable version of this game is available at http://cloudserver.chessbase.com/MTIyMTYx/replay.html
I have also created 2 videos about this game at https://www.youtube.com/watch?v=NA_-lyS_t_4 and https://www.youtube.com/watch?v=ZpN-B8Td87c
Tal,Mihail – Fuster,Geza
Interzonal–04 Portoroz 1958
1.e4 c6 2.d4 d5 3.Nc3 dxe4 4.Nxe4 Nd7 5.Nf3 Ngf6 6.Nxf6+ Nxf6 7.Bc4 Bf5 8.Qe2 e6 9.Bg5 Be7 10.0–0–0 h6 11.Bh4 Ne4 12.g4 Bh7 13.Bg3 Nxg3 14.fxg3
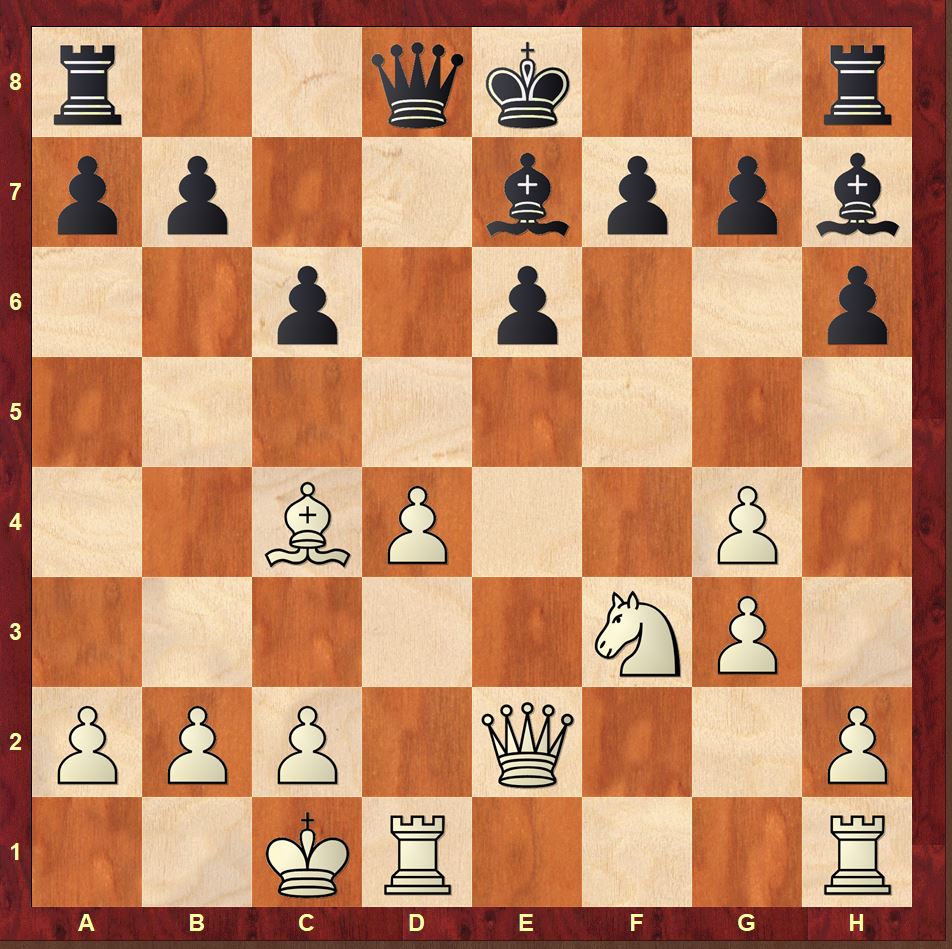
Black has long-term problems on the kingside: White’s pieces are able to take up attacking positions against e6 (Bc4+Qe2) and f7 (Ne5 and Rhf1) while he has already started a possible pawn storm with g4, h4 and g5. Castling kingside is thus not attractive for Black at the moment. In comparison, White’s king seems very safe on the queenside. In terms of plans for Black, we should sense 2 general directions to start with:
- Prepare queenside castling
- Knock away White’s attacking pieces or / and weaken White’s own king’s position.
This course may open up additional possibilities to castle kingside later, or new avenues of counterplay.
I’d like to start with the second plan first, as it’s the first thing an active, impatient player like me thinks of! I also always prefer the opponent to have weaknesses in his king’s position, particularly if I’m a little worried about my own king! To start with, White’s current attacking structure depends heavily on the presence of the light-squared bishop on the a2–g8 diagonal. Black can attempt to drive away this piece from its strong post; if White wishes to maintain his attacking structure, then Black’s queenside counterplay accelerates significantly.
14…b5
a) 15.Bxe6 Always needs to be looked at when you look at a Tal game. 15…fxe6 16.Qxe6 Qd5 is not dangerous for Black.;
b) 15.Bb3
The most natural move for White maintaining White’s current attacking structure.
15…a5
This is surprisingly awkward. If White wishes to delay an immediate strike then he must weaken his queenside to preserve his light-squared bishop; otherwise, he needs a tactical solution.
b1) 16.a3 a4 17.Ba2 b4 is suddenly dangerous for White, not for Black!;
b2) 16.c3 b4 17.c4 Bg5+ 18.Nxg5 Qxg5+ 19.Rd2 a4 is vey pleasant for Black: what remains of White’s attacking ambitions?;
b3) 16.d5 exd5 17.Ne5 (17.Rhe1 Ra7) 17…Rc8 My move, and the best one. 18.Nxc6 Rxc6 19.Qxb5 Qb6 20.Ba4 Bg5+ 21.Kb1 Bxc2+ is the nasty trick I’d spotted;
b4) 16.Ne5 Bg5+ (16…a4 17.Nxf7 just seems to save White 17…Bg5+ (17…axb3 18.Nxd8 Bg5+ 19.Rd2 bxa2 (19…Rxa2 20.Qxe6+ Kxd8 21.Qd6+ Kc8 22.Qxc6+ is a draw by repetition) 20.Qxe6+ Kxd8 21.Qd6+ Kc8 22.Qxc6+ Kb8 23.Qxb5+ Kc7 24.Qc5+ is a draw by repetition) 18.Nxg5 Qxg5+ 19.Kb1 axb3 20.Qxe6+ Kd8 21.Qd6+ Kc8 22.Qxc6+ Kb8 23.Qb6+ is a draw by repetition) 17.Kb1 a4 is the best move order, with a clear advantage for Black.;
c) 15.Bd3 A clever idea and the key test of Black’s plan. What has Black lost by playing 14…b5? A safe haven on the queenside: the consequence of playing 14…b5 is that Black can now only castle kingside. 15.Bd3 avoids creating any weaknesses on White’s for Black to aim for at, and forces Black to put his king on the kingside the cost of reducing White’s own attacking potential. I’ve spent some time thinking about the position after
15…Bxd3 16.Rxd3 Qd5 17.Kb1 0–0 18.h4
In general, I think that I prefer White’s position as g5 followed by Rf1 and Ne5 is coming fast while I can’t really see Black creating any counterplay against White’s king in the near future. It seems therefore that 14…b5 is not the best move in this position, but the idea of forcing the opponent to take action before he is ready is one well worth remembering.;
14…Qc7 15.Ne5 Bd6
[15…Bf6 is suggested by Sakaev / Landa as more natural, attacking the knight in the same way while also blocking the f-file.]
16.h4
[I think that Tal was perhaps intending h4 against 15…Bf6 and simply decided to play it anyway when Black played 15…Bd6! We’re first going to see what happened (violence warning: it’s pretty horrific!) and then look to see how Black could have defended better.]
16…f6
[Suicide! How can you do this against Tal?]
17.Bxe6 fxe5 18.dxe5 Be7
[I guess that Fuster thought that the closed e-file might protect his king from danger? However, Tal still has 2 files (d-file and f-file) and a host of diagonals! No hope!]
19.Rhf1 Rf8 20.Rxf8+
[An instructive point: when prosecuting an attack, always check to see whether simple captures work: if you can continue your attack by capturing a piece (and forcing the opponent to capture back which then gives the move to you again) then this is always the quickest way.]
20…Bxf8 21.Qf3 Qe7
[21…Rd8 22.Rxd8+ See my last comment! 22…Qxd8 (22…Kxd8 23.Qxf8#) 23.Qf7#]
22.Qb3 Rb8 23.Bd7+ Qxd7 24.Rxd7 Kxd7 25.Qf7+ Be7 26.e6+ Kd8 [26…Kd6 27.Qf4+] 27.Qxg7
1–0
Let’s take a look now at Black’s better defensive options at the 16th move, and also see whether 16.h4 really was White’s best move.
16.h4
[What does h4 do? It supports g5 you would have thought. The strange thing though is that you don’t actually need h4 to achieve g5: in fact it almost works better without! Take a look at the obvious 16.Rhf1 and assume Black defends f8 with 16…Rf8.]
[16.Rhf1 Rf8 17.g5 hxg5 18.Qh5 Threatening the bishop on h7 and Bxe6 exploiting the pin along the h5–e8 diagonal. 18…Bxe5 (18…Bf5 19.Rxf5 exf5 20.Nxf7) 19.dxe5 Bg6 20.Qxg5 Qe7 21.Qe3 is very unpleasant for Black. However, the main point is that Black’s best defence isn’t to leave the knight and try to escape to the queenside somehow: Black has to bite the bullet and get rid of the knight on e5]
16…Bxe5 17.dxe5 Rd8 18.Rxd8+ Qxd8 19.Rd1 Qa5
[You start to see the point of 16.h4 in comparison to 16.Rhf1. Rather than playing Rhf1 and then later Rd1, White has gained the extra h4 move which feels useful. My initial feeling was that White would be pressing in this position, but my engines think that Black can hold the balance by targeting both White’s structural weaknesses and the bishop on c4. For example, it is not easy for White to establish full control over the d-file while the queen on e2 is tied to the defence of the isolated e-pawn, while Black’s pressure against the pawn on a2 (together with the idea of …b5) is a constant irritation for White.]
20.Qe3
[20.Rd6 0–0 21.a3 (21.Kb1 Qc5) 21…b5 22.Bd3 Bxd3 23.Rxd3 b4 opens up an additional file after which Black will always find one channel of defence.]
20…0–0 21.Kb1
[21.a3 b5 (21…Rd8 22.Rd6) 22.b4 (22.Be2 b4) 22…Qa4 23.Qb3 Qxb3 24.Bxb3 a5 25.Rd6 Be4 is fine for Black: everything holds!]
21…Rd8 22.Rd6
[This impressive-looking idea achieves little against an ingenious defence:]
22…Rxd6
[22…b5 23.Bd3 (23.Bb3 c5; 23.Bf1 Rxd6 24.exd6 Qb4 25.d7 Qd6) 23…Bxd3 24.cxd3 Rxd6 25.exd6 Qb4 26.d7 Qd6 draws 27.Qxa7 Qxd3+ 28.Kc1 Qf1+]
23.exd6 Qb4 24.d7 Qd6
[and the d-pawn falls.]
So was there a better move than 16.h4?
15.Ne5 Bd6
[Thinking about this last line, it occurred to me that White needs to be able to establish a rook on d6, but that White and keeps on failing tactically because he is too slow defending his queenside against the pressure from Black’s queen on a5. So perhaps, rather than the move 16.h4 which hasn’t turned out particularly useful in any line so far, we should think about protecting the queenside with 16.a3.]
16.a3
[16…Rf8 is still met by 17.g5;
16…Bxe5 17.dxe5 Rd8 18.Rxd8+ Qxd8 19.Rd1 Qa5 now carries no threat whatsoever against the queenside, which means that White can set up a much better structure: 20.Qe3 0–0 21.Be2
looking for Bf3 and Qd4 for compete control 21…a6 22.Bf3 Rd8 23.Rd6 with a great position for White! Wonderful! The great, lamented coach Mark Dvoretsky would be proud of me for finding such a prophylactic move as 16.a3! The only thing I’m not sure about is whether it is actually the best move. Of course 16.a3 offers Black a target on the queenside to attack which means that Black might choose to switch back to the plan we saw earlier: 16…b5!]
16…b5 17.Bd3
I suppose even 17.Ba2 is possible here, though I am not happy about the bishop’s (lack of) activity after 17…Bxe5 18.dxe5. What is it doing now on a2?
17…Bxd3 18.Rxd3 0–0
[The position is extremely double-edged. I’d rather be White but Black possibly has enough play to keep afloat:]
19.g5 hxg5 20.h4 g4 21.Nxg4 b4
[I’m more nervous about h4–h5-h6 than I am about Black’s play on the queenside so I would not want to have Black in a practical game, but an engine might have a chance!]
You forget the move the rook in the analysis diagram after 14…b5 15 Bd3 Bxd3 16.Rxd3 Qd5 17.Kb1 0–0 18.h4.
Hi Ulrich, thanks! Corrected! Best Wishes, Matthew