
One of the nicest themes we discuss in “Chess for Life” comes up in the chapter on Sergei Tiviakov. In this chapter we discuss one of Sergei’s most significant contributions to chess theory: the 3…Qd6 Scandinavian (1.e4 d5 2.ed Qd5 3.Nc3 Qd6). While writing the book, I played the opening a few times to get some personal insights about the opening. In one game, my opponent launched a pawn storm on the kingside starting with g4. I survived, but I was shaken and I wondered how Sergei dealt with such aggressive play.
As we explain in the book, Sergei’s standard reaction to space-gaining tactics from the opponent was to exchange off pieces immediately. You can view this approach in 2 ways. The traditional way is to view it negatively as a purely defensive mechanism, clearing some space in a cramped position by getting rid of some pieces. However, you can also view it in a more positive, attacking light: the side with more space finds it harder to cover all his territory with fewer pieces on the board! Gaps will inevitably arise which can be exploited by your pieces! This concept is called “compactness” by the Russian master Shashin in his weird and wonderful book “BEST PLAY: A New Method for Discovering the Strongest Move”
When we mentioned this idea to John Nunn, he pointed us at once to the game Adams-Caruana Dresden Olympiad 2008 as an illustration of this theme and we quote it in the book. With this theme fresh in my mind, I was delighted to get the chance to do something similar in my game against Glenn Flear in the recent 4NCL.
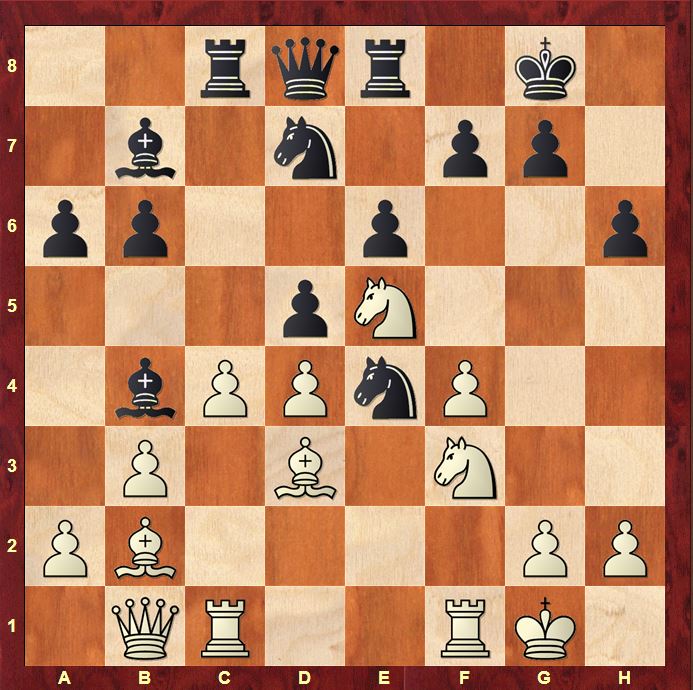
White has a space advantage and a strong central presence with his knight on e5 supported by pawns (on d4 and f4) and minor pieces (the B on b2 and the other knight on f3). White’s position felt very airy to me however. That’s due to the rather illogical position of White’s queen. From e2, the queen would cover the gaps in White’s position; with the queen on b1, Black gains a number of tempting entry points on e3 and d2. The Tiviakov chapter was fresh in my mind so you can imagine I jumped at the chance to initiate some exchanges after Glenn’s next move. The trick was to make sure I remained with pieces that could exploit the resulting additional spaces in White’s position. I decided that – just as in the Adams-Caruana game we quote in the book – my queen would be ideal for the job, in combination with my 2 bishops.
17.cxd5 Nxe5
I spent some time on 17…Nxe5 evaluating the pawn structure that arose in the game. It took me a while, but I decided eventually that I really liked Black’s attacking chances!
18.Rxc8 Nxf3+ 19.gxf3
19.Rxf3 Bxc8 20.Bxe4 exd5 21.Bh7+ Kh8 wins a piece due to the double threat of …Re1+ and …g6 so White is forced to loosen his pawn structure further.
19…Bxc8
Making sure my bishop gets rerouted to some the kingside where Black has 2 points of entry into the White position: h3 and g4
20.fxe4 exd5 21.e5
When evaluating the position ahead, I decided that this sequence had further stretched White’s position. White’s pawns have been drawn forwards leaving gaps behind the pawns which my resulting pieces should be able to exploit. White definitely misses his knights to cover squares like d2 and h4!
21…Bh3
Accurate I thought, but actually missing the chance to set a nice trap! It is very thematic however: the light-squared bishop makes use of the first entry point into White’s position behind the advanced White pawn mass.
21…Qh4 22.f5 blocking the path of the light-squared bishop to the kingside worried me. However, there’s a fantastic response which I only spotted later in another line. 22…Qg4+ 23.Kh1 Rxe5
Stockfish!! 24.dxe5 Bb7 25.Bd4 Qxd4 26.Be2 Qxe5 27.Bf3 Bd6 28.Qc2 White is still surviving but Black is clearly better
22.Rf3
22.Rf2 is the best defence and we will see why later. White seems to be approximately OK though I think Black’s position is easier to play due to White’s airy king.
22…Qh4
23.Bxa6
Completely missing Black’s idea
23.Rf2 White’s best defence, but Black has a very beautiful way to achieve the desired result 23…g5 24.fxg5 (24.f5 g4 is very dangerous for White; 24.a3 gxf4 25.axb4 Kh8 26.Bh7 The only move to stop …Rg8+ 26…f5
27.exf6 Qg4+ 28.Kh1 Re2 wins!) 24…Bd2 Still invading as 25.Rxd2 Qxg5+ wins!
23…Bd2
That’s it! All those wide open spaces within White’s position. Suddenly White is completely lost! 22.Rf2 or 23.Rf2 would have at least stopped this invasion for the time being.
24.Kh1 Bg4 25.Qf1
25.Rf1 Qh3 26.Qd3 Be3 27.Qc2 Bf5 28.Bd3 Be4+
25…Bxf3+ 26.Qxf3 Bxf4 27.Qe2
27.h3 Ra8
27…Ra8
White will regret taking that pawn on a6! Black uses the a-file to invade White’s position on the queenside
28.Bb7 Rxa2 29.Bxd5 Bxh2
The cleanest win: 30.e6 (30.Bxf7+ Kf8) 30…Be5+ 31.Kg1 Rxb2 is terminal
0–1
Postscript
After the article was published, a reader pointed me to the game Gelfand-Campora from Boris Gelfand’s wonderful book “Positional Decision Making in Chess” published by Quality Chess. In that game, Gelfand shows great awareness of our theme and takes a fantastic decision: having more space, he makes the conscious choice to exchange the Black pieces that might be able to exploit the holes in his position (queens and rooks). He consciously aims to leave Black with only the useless ones (the knights) that can’t exploit any of the open channels!
Gelfand,Boris – Campora,Daniel Hugo
EU-Cup Izmir 2004
I’ll quote part of Gelfand’s comment here:
“The next stage is to exchange the rooks and queens. Having done this, Black will have no counterplay whatsoever allowing me to play on both flanks, which is necessary to exploit the advantage
After the exchanges, White will be able to open the game without fearing that something dangerous will slip through the cracks”
23.Rc1 Qd7 24.Rfc2 Rac7 25.Nd3 Kf8 26.Rxc7 Rxc7 27.Rxc7 Qxc7 28.Qc1 Qxc1 29.Nxc1
No danger now! Gelfand went on to win a lovely endgame. What a player!
29…Nfd7 30.Kf2 Nc5 31.Ke3 Ke7 32.b4 Ncd7 33.Bh3 Nf6 34.Nd3 Ne8 35.f4 f6 36.Bc8 Nc7 37.Kf3 Kd8 38.Bf5 Nd7 39.h4 Nf8 40.h5 Ne8 41.Nf2 Nc7 42.Nd1 Ne8 43.Ne3 Nc7 44.Bh3 Ne8 45.Bf5 Nc7 46.Bg6 Nxg6 47.hxg6 Ne8 48.Nf5 Kd7 49.Kg4 Kd8 50.Kh5 Kd7 51.Nxg7 Nxg7+ 52.Kxh6 f5 53.Kxg7 fxe4 54.Kf7 e3 55.g7 e2 56.g8Q e1Q 57.Qe8+
1–0
Great article. I am reminded of a game in Gelfand’s recent book, where he exchanges major pieces, when he has a space advantage to stop his opponent roaming in his space.
Hi Hugh, thanks for that! I guess you mean the game Gelfand-Campora from Gelfand’s “Positional Decision Making in Chess”? That’s a great point – I’ll update the article with it! Best Wishes, Matthew