
In 1928, Bogolyubow played 2 matches against Euwe in Holland for the title “Champion of FIDE” (see http://www.chesshistory.com/winter/extra/fide.html for Edward Winter’s excellent Chess Notes entry on the story behind this title) Bogolyubow won both 10 game matches 5,5-4,5 after very tough fights. In the first match, Bogolyubow only managed to nose ahead after winning the 7th and 8th games in succession. In the second match, Euwe failed to convert an advantage of an extra piece and kingside attack in the middlegame of the 8th game which would have levelled the match.
Just as a little digression, Euwe had an extraordinary record of losing close matches to strong opponents! He lost 5,5-4,5 to Alekhine in 1926, lost 5,5-4,5 twice to Bogolyubow in 1928 (!), lost 6-4 to Capablanca in 1930 and 6-4 to Spielmann in 1935. It’s quite amazing he managed to defeat Alekhine 15,5-14,5 in 1935!
Anyway, I’ve had a lot of fun analysing the crazy 4th game of the 1st match with Bogolyubov and I’d like to share that with you!
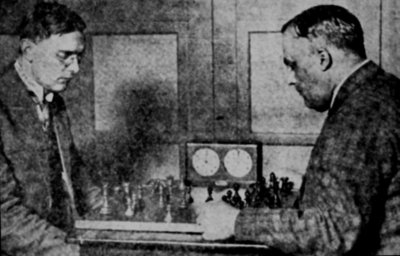
Euwe,Max – Bogoljubow,Efim
1st Match Amsterdam 1928, 4th game
1.d4 Nf6 2.c4 d5 3.cxd5 Qxd5 4.Nc3 Qa5 5.Nf3 Nc6
When I started playing again after a long time away from the game, I dabbled in a lot of unusual openings of which this was one. It’s not difficult to refute so I was saving it for a rapid or blitz game and a gambling mood! It was a very bold choice from Bogolyubow, considering that he had just fallen behind in the match after blundering the exchange with White early on in the game.
6.e3
6.Bd2 was what I really didn’t like! 6…e5 7.e4 exd4 8.Nd5 wins. It shouldn’t be too difficult to spot either.
6…e5 7.d5 Nb4 8.Bb5+ c6 9.Qa4
Euwe has reacted poorly to Black’s unusual opening and after this further mistake, he’s clearly worse.
9…Qxa4 10.Bxa4 b5 11.Bb3 Nd3+ 12.Ke2 e4 13.Ng5 b4 14.Ncxe4
14.Ba4 bxc3 15.Bxc6+ Bd7 16.Bxa8 h6 Komodo (16…cxb2 17.Bxb2 Nxb2 18.Bc6 Komodo sees this as equal which seems a bit optimistic for White) 17.bxc3 hxg5 is good for Black according to Komodo
14…Ba6 15.Kf3 cxd5
15…Nxd5 was a clear advantage for Black according to Soloviov which Komodo confirms. The text worked out very well in the game after
16.Ba4+ Ke7 17.Nd2 h6 18.Nh3 g5 19.g4 h5 20.Nxg5 hxg4+ 21.Kg2 Bh6 22.f4 gxf3+ 23.Ndxf3 Bxg5 24.Nxg5 Ne4 25.Nxe4 dxe4 26.Rf1 Rag8+ 27.Kh1 Rh3
28.Bd2 Rgh8 29.Rad1 Rxh2+ 30.Kg1 R2h7 31.Rf2 Rh1+ 32.Kg2 R1h2+ 33.Kg1 Rxf2 34.Bxb4+ Nxb4 35.Rd7+ Kf6 36.Kxf2 Nd3+ 37.Kg1 Rg8+ 38.Kh2 Bc8 39.Rxa7 Ne5 40.Bd1 Nf3+ 41.Bxf3 exf3 42.Ra4 Rg2+ 43.Kh1 Rxb2 44.Rf4+ Ke7 45.Kg1 Rg2+
0–1
However, Soloviov in his book “Bogolyubow: The Fate of a Chess Player” points out a miracle defence in this position and this was the focus of my analysis:
16.Nxf6+ gxf6 17.Nxf7
The start of an amazing defensive plan for White. I’ve been trying to understand why it works.
- The main reason is definitely that White’s kamikaze actions inhibit Black’s development: the knight on f7 prevents Black from castling queenside, and also neutralises the nasty …Ne5+.
- Another factor is that White’s moves come with tempo against heavy Black pieces which keeps Black responding to threats for a couple of moves rather than developing his own.
- A funny point is that White’s 3 moves 16.Nxf6+, 17.Nxf7 and 18.Bxd5 wreck Black’s pawn structure and create lots of holes within it. That makes the White king very hard to catch as it advances up the board as you shall see!
- Also important is the number of pawns that White is picking up. In many lines, he can give up a piece to pacify Black’s attack and emerge with advantage with rook and many pawns against 2 pieces.
What amazes me in the ensuing variations is how many pieces Black needs to cover all the central squares and deliver mate!
17…Rg8 18.Bxd5 Rc8 19.Nd6+
A further stroke of luck: White’s knight on f7 was lost in the long run, but White can trade it in with gain of material. White has to wait with bated breath though to see whether Black’s resulting pieces are well-placed enough to deliver mate!
19…Bxd6 20.Bxg8 Rc2 21.Rd1
Soloviov’s move, threatening to cut off the Black rook’s influence on the second rank with Bd2 while putting pressure on Black’s advanced knight. Soloviov analyses 1 move, I focused on another and Stockfish suggested yet another one while I was checking my analysis:
A) 21...f5
Threatening …Rxf2#
22.Bd2
22.Rd2 Ne1#
is the first of many surprising and beautiful mates!
22…Ne5+ 23.Kf4 Nf7+ 24.Kxf5
24.Kf3 Ng5#
24…Rc5+ 25.Ke4
25.Kf6 A step too far! Now Black has the choice:
My 25…Be7+ 26.Kg7 Rg5+ 27.Kxh7 Bd3+ 28.e4 Bxe4# is good enough but Komodo’s 25…Kf8 26.Bxb4 Be7+ 27.Ke6 Bc8+ 28.Rd7 Ng5#
is another picture! Thank you Komodo!
25…Re5+ 26.Kf3 Rf5+
26…Ng5+ 27.Kg4 Bc8+ 28.Kg3
Amazingly Black has no convincing discovered check!
28.Kh5 Ne4+ 29.Kh6 Bf8+ 30.Kxh7 Rh5+ 31.Kg6 Rh6#
28…Rxe3+ 29.Kh4
29…Re4+ 30.f4 wins (30.Kxg5 Be7+ 31.Kh6 Rh4+ 32.Kg7 Rg4+ 33.Kh6 Rh4+ is a draw)
27.Ke4 Re5+
With a draw by repetition is Soloviov’s line and it seems absolutely correct.
B) 21...Rxf2+
was the main focus of my attention
22.Ke4
22.Kg4 Rxg2+
and now we have many choices. I’ll start with the main line I focused on as it is also the most natural way of continuing the attack:
B1) 22…Nc5+
Drawing the king closer to the heart of Black’s position. White has 2 possibilities:
B11) 23.Kd4 Rc2
This is the ideal disposition of Black’s forces. The rook on c2 covers a lot of important squares. The threat is …Be5+, Kd5 …Bb7#
24.e4 Ne6+
25.Kd5
25.Ke3 Bf4+ 26.Kf3 Be2+; 25.Bxe6 Bc5+ 26.Kd5 Bb7#
25…Be5
My win. 25…Ke7 26.Bxe6 Be5 is a few moves quicker as Komodo points out
26.Kxe6 Bc8+ 27.Kd5 Bb7+ 28.Ke6 Rc6+ 29.Kf5 Bc8+
30.Rd7 Bxd7+ 31.Be6 Bxe6#
B12) 23.Kd5
This move puts pressure on Black by gaining a tempo against the loose bishop on d6. That gives Whte time to fight Black’s desired setup with …Rc2
23…Ke7
23…Kd7 covers c6, but leaves the king open to a check on the h3–c8 diagonal 24.Bxh7 (24.Bd2 Rf5+ 25.Kd4 Kc6 26.e4 Nb3+ 27.axb3 Bc5#) 24…Rxg2 25.Bf5+ wins a tempo 25…Kc7 26.e4 Rxh2 27.Bd2 White has built a solid cage around his king to hide it from rook checks
Now time for some more spectacular stuff!
B121) 24.Kc6
Trying to escape further and gain more time with the attack against d6. There is a problem however
24…Nd3 25.Rxd3
25.Bd2 Rf5 26.Rac1 Ra5
Stunning!
27.Be1 Ne5#
25…Rc2+
wins
B122) 24.Bd2 Rf5+ 25.Kd4
25.Kc6 Ne6 26.Rac1 (26.Bxe6 Rc5#) 26…Nd8#
25…Ne6+
25…Nd3 was my solution but White has chances to limit his disadvantage 26.Bc4 (26.Rac1 Be5+ 27.Ke4 (27.Kd5 Bxb2+) 27…Nf2+ 28.Kd5 (28.Kxf5 Bd3+) 28…Bd6+ 29.Kd4 Rg5 wins) 26…Bxc4 27.Kxc4 Nxb2+ 28.Kb3 Nxd1 29.Rxd1 a5 is better for Black but not yet winning
26.Bxe6
26.Ke4 Ng5+ 27.Kxf5 (27.Kd4 Bc5#) 27…Bc8+
26…Kxe6 27.Rac1
I thought White was surviving here, but I’d missed the forced mate…
27.Ke4 Be2 28.Be1 Re5+ 29.Kf4 Rd5+ 30.Ke4 f5#)
27…Rd5+ 28.Ke4 Bd3+ 29.Kf3 Rf5+ 30.Kg4 Be2+ 31.Kh4 Rh5#
B123) 24.e4 Rc2
Winning I thought. 24…Nd3 25.Rd2 Rf1 26.Bxh7 Rxc1 27.Rxc1 Nxc1 is a slight edge for Black according to Komodo though I’m a bit dubious to be honest
25.Rd2 Rc4 26.Rd4
is a draw according to Komodo;
B124) 24.Bxh7
A defence that I consistently missed! It covers the key squares c2 and f5 which Black’s rook uses continually to tighten the noose around the Black king. It also grabs another pawn which adds to White’s bargaining chips!
24…Rxg2
24…f5 25.Bd2 Blocking …Rc2 (25.Kc6 Ne4 with …Rc2+ to follow 25…Ne4 26.Be1 Nf6+ (26…Rc2 27.Bh4+ The downside to …f5) 27.Kd4 Rc2 28.Rac1 Bc5+ 29.Ke5 Rxc1 30.Rxc1 Bd6+ 31.Kd4 Nxh7 32.Bg3 is Komodo’s line with a slight edge for White
25.Bf5
25.Kc6 Nb7
threatening …Rg5 (me) or …Ke6 (Komodo!)
26.Bf5 (26.Bd2 Rg5 threatens …Na5, …Nd8 and …Rc5+ mate) 26…Rf2 27.Bh7 Rxh2 28.Bf5 Rf2 is Komodo’s draw by repetition!
25…Rxh2 26.e4 Bb7+ 27.Kc4 Ba6+
27…Rc2+ 28.Kxb4 Nxe4+ 29.Rxd6 Kxd6 30.Bf4+ and White is over the worst
28.Kxb4 Bd3 29.Kc3 Be5+ 30.Kb4 Bd6
is Komodo’s draw by repetition.
22…Nc5+ is thus very dangerous for White, but not decisive. I took a look at a couple of other ideas:
B2) 22…f5+
This is not an ideal move from Black’s point of view as it loosens Black’s control of the e5 square which gives him yet another square for his pieces to control.
23.Kd5 Ke7
Again threatening …Rc2
24.Rd2
Komodo’s standard way of stopping it. I found it very hard to evaluate what was happening after 24…Rf1 so this time I let my engines take the strain! (24.e4 Rxg2 25.Bxh7 Bb7+ 26.Kc4 Bxe4 27.Rxd3 Rc2+ 28.Kd4 Ke6 29.Bg8+ Kf6 30.Bg5+ Kxg5 31.Rh3 Bc5+ with a slight edge to Black was Komodo’s main line; 24.Bd2 Rxg2 25.Bxh7 Nxb2 simply picking up material 26.Bxf5 Nxd1 27.Rxd1 Bb7+ 28.Kd4 Bf3 29.Be4 Rg4)
24…Rf1 25.Bxh7 Nxc1 26.Rc2 Bb7+
26…Rd1+ 27.Kc6 Nd3 28.Rxd1 b3
An amazing Komodo find! 29.Rxd3
29.axb3 Nb4#
29…bxc2 30.Rc3 Bd3 31.g4 Bb4 32.Rxc2 Bxc2 33.Bxf5 should end up a draw.
27.Kc4 Ba6+ 28.Kd5
is a Stockfish draw.
B3) 22…Bc7
is an interesting idea, anticipating Kd5 by getting the bishop out of the way already.
23.Bxh7
23.Bd2 Rxg2 followed by …Nf2+ just picks up material
23.Rxd3 f5+ 24.Kd4 Bb6+ 25.Ke5 Bxd3 looks awkward for White although Komodo reckons he can escape! In a practical game though, I think White survival is impossible.
23.Rd2 Rf1 24.Rc2 is another typical Komodo attempt to escape followed by b3 and Bb2. The position is just a mess, but I don’t think that White is worse.
23…f5+ 24.Kd5 Rc2 25.Rxd3 Bxd3 26.g4 Be4+ 27.Kd4 Bb6+ 28.Ke5 Rc5+ 29.Ke6 Rc6+ 30.Ke5 Bc7+ 31.Kd4 Bb6+ 32.Ke5
is a draw by repetition according to Komodo.
The last variation to look out is Stockfish’s suggestion when I put my analysis to him to check and it may be the most sensible of all:
C) 21…Bb7+
The idea: recapture the material and remain with a slight edge due to the active Black rook on the 7th.
22.e4 Rxf2+ 23.Ke3 Ba6 24.Rxd3
24.e5 Bc5+ 25.Ke4 Re2+ 26.Kf3 Nxe5+ 27.Kg3 Bf2+ 28.Kf4 h5 and White’s king is still in trouble
24…Bc5+ 25.Rd4 Re2+ 26.Kf3 Bxd4 27.Bf4 Rxb2 28.Rc1 h5
is Stockfish’s favourite idea with an edge for Black. Black’s bishop come in to c3 and e2 to keep White’s rook passive and then Black activates his queenside majority with ..a5–a4. White still has some work to do to hold the draw.
29.h4 Be2+ 30.Kg3 Bc3 31.a3 a5.
Amazing stuff!
Postscript 16th September 2016
While reading through a copy of the great Swedish player Gideon Stahlberg’s “Chess and
Chess Masters” (written in 1937) I saw that he had also done some interesting analysis of this game.
Stahlberg also points out White’s better defence 16.Nxf6+ (instead of 16.Ba4+) but he analyses a different idea for White on the 21st move:
Here he suggests the line 21.Bxh7 f5 22.Bxf5 Rxf2+ 23.Ke4 Nc5+ 24.Kd5 Rxf5+ 25.Kxd6 Ne4+
26.Kc7 Rf7+ 27.Kc6 Rd7!
A gorgeous move, threatening …Kd8 and …Rd6+ mate!
28.Bd2 Rxd2
when Stahlberg considers White has drawing chances due to the reduced material. Excellent analysis upon which the computer cannot improve!