
In an earlier post, I examined Alekhine’s predilection for centre-clearing gambits by analysing 2 of his games against Reshevsky and Rabinovich. I also mentioned Alekhine’s game against Winter at Hastings 1936/7 which featured a speculative Gambit against the solid Caro-Kann: 1.e4 c6 2.d4 d5 3.Nc3 de 4.Ne4 Nf6 5.Bd3. I hadn’t realised it at the time, but the opening stage was a wonderful exposition of Alekhine’s unique skill in maximising the benefits resulting from the gambit of a central pawn.
Alekhine,Alexander – Winter,William
Hastings 1936/7
1.e4 c6 2.d4 d5 3.Nc3 dxe4 4.Nxe4 Nf6 5.Bd3
I have a deep-seated reverence for central pawns so I’m filled both with horror and admiration for Alekhine’s courage in playing this in an important tournament game.
5…Qxd4 6.Nf3 Qd8 7.Qe2 Nxe4 8.Bxe4 Nd7 9.0–0
I wasn’t expecting that at all! Intuitively, I would expect White to compensate for his missing central pawn with maximum aggression. From that point of view, castling queenside – which brings a rook into play on the open d-file at once – seems indicated. However, Alekhine obviously believed in this setup as he also played it subsequently in a simultaneous in Prague 1938:
1.e4 c6 2.d4 d5 3.Nc3 dxe4 4.Nxe4 Bf5 5.Bd3 Qxd4 6.Nf3 Qd8 7.Qe2 e6 8.0–0 Bxe4 9.Bxe4 Qc7
This should be a better version of the Alekhine-Winter game as Black has held on to his defensive knight on the kingside and managed to exchange off his otherwise useless light-squared bishop
10.Bg5 Nd7 11.Rad1 Ngf6 12.Nd4 Be7 13.Bf3 Ne5 14.Bf4 Nxf3+ 15.Qxf3 Qb6 16.Be5 0–0 17.Rd3 Qa5
In the subsequent play, Black neutralised White’s initiative and won a good game: Alekhine – Bacinsky, Prague simultaneous 1938
9…Nc5
It’s tempting for Black to net the 2 bishops, but Black’s position gets a little loose after this move. After 9…Nc5, Black loses control over the centre (e5 square) and also loses the ability to cover the kingside with his knight. These factors give White a surprising number of ways to interfere with the completion of Black’s kingside development.
10.Rd1
10.Bf4 is also worthy of attention, preventing the Black queen from establishing itself on c7. The queen will have to leave the open d-file at some stage, and the further it is from the kingside, the better it is for White. 10.Bf4 also gives White the possibility of placing his rooks on d1 and e1, which is obviously more desirable than d1 and a1 as in the game!
10…Qc7
This was the starting point for my analysis. Just in general, it’s perplexing to see how little value the strongest engines attach to central pawns. Stockfish hovers between 0.00 and -0.10 in all sorts of positions…but also shows no shame in suddenly jumping to -0.50 when his counterplay starts to run out! It makes analysing such positions with engines extremely confusing. My recommendation is to only bring in the engines when you uncover a concrete tactical variation that needs to be checked. For the rest, rely on your own feelings about the position.
I got interested in 3 moves in this position:
1. 11.Bg5
This prevents
a) 11…e6 due to 12.Rd8+ and also discourages
b) 11…g6 due to 12.Bf6 Rg8 (12…exf6 13.Bxc6#) 13.Be5.
Black has been prevented from castling kingside which means Black will struggle to get his king out of the centre.
11.Bg5 forces Black therefore to look for other methods of development.
c) 11…Be6 prepares …g6 by blocking the e-file. However, now we see an advantage to not committing the Nf3 too early to e5 or g5:
12.Nd4 g6 13.Bf3 (13.b4 Nxe4 14.Nxe6 fxe6 15.Qxe4 Bg7 16.Rab1 Qe5 is just equal) 13…Bg7 14.b4 Rd8 15.Be3 is pleasant for White
11.Bg5 also has a couple of drawbacks. The first drawback is that Black can gain a tempo on the bishop with …f6 and set up a strong central presence with …e5 on the next move. However, it’s not as simple as it looks!
d) After 11…f6, aiming to follow up with …e5, Black is in for a shock:
12.Ne5 (12.Bxf6 “winning”, was my first idea.
However, it doesn’t! 12…Qf4 Stockfish! (12…exf6 13.Bg6#; 12…gxf6 13.Ng5 Bd7 14.Qh5+ Kd8 15.Nf7+ Kc8 16.Qxc5 wins; 12…Nxe4 13.Be5) 13.Bxc6+ bxc6 14.Bd4 Ba6 15.Qe1 Stockfish sees a tiny edge for White in this position, but I don’t understand that at all…) 12…Nxe4 13.Qh5+ g6 14.Nxg6
when Stockfish is required to find a half-decent defence:
14…Bg4 15.Qxg4 hxg6 16.Bf4 e5 17.Qxg6+ Qf7 18.Qxe4 Rh4 19.g3 with a clear extra pawn for White.
e) 11…Nxe4 12.Qxe4 f6 13.Bf4 e5
was an engine suggestion that elicited a “Really??” from me! 14.Nxe5 fxe5 15.Bxe5 Qe7 16.Rd3 Bd7 (16…Qe6 17.Re1 Be7 18.Bd6 Qxe4 19.Rxe4) 17.Rxd7
17…Kxd7 18.Qd3+ Ke8 19.Re1 Rd8 20.Qb3 is strong when Bc3 picks up Black’s queen. White’s slight material advantage and Black’s awkward king should give White the better of the position.
In my view,
f) 11…Bg4 is the safest way for Black to play, exploiting the fact that White’s knight is still on f3 to develop the light-squared bishop and cover the d8 square with the rook on d8. Black is then ready to develop his dark-squared bishop with …e6. White’s initiative is not yet finished however. For example:
12.Qc4 Nxe4 13.Qxe4 Bxf3 (13…Qc8 looks like the best idea when 14.h3 Bf5 15.Qe2 f6 16.Bf4 Kf7 is still unclear. You feel that Black is starting to unravel, but he’s not out of the woods yet!) 14.Qxf3 e6 15.Bf4 Qa5 16.Qg3 Qf5 17.Rd2 Qg6 18.Qb3.
In conclusion, 11.Bg5 is a reasonable idea for White. The only drawback is that it gives Black the option of a natural reply with 11…Bg4. The other 2 moves we will examine make Black work much harder for his position!
2. 11.Ng5 is another interesting idea I found, trying to exploit the absence of a Black knight on f6 by probing the kingside light-squares. It also prevents natural Black development with …Bg4 so Black is forced to think concretely.
a) 11…e6 is natural, but gives White good chances after 12.Bxh7 Be7 13.Qh5 g6 14.Qf3;
b) 11…g6 12.Qc4 Ne6 13.Bf4
was the first line I thought of and the initial reason I was attracted to 11.Ng5
13…Qb6 (13…Qxf4 14.Bxc6+) 14.a4 Nxg5 15.a5 Qb5 16.Qxb5
16.Qd4 Ne6 17.Qxh8 Nxf4 18.Rd8+ Kxd8 19.Qxf8+ Kd7 20.Rd1+ Nd5 I couldn’t break this when analysing by myself, and it seems to be true: Stockfish gives Black a clear advantage.;
16.Bc7 e5 is Stockfish’s line and unfortunately just seems to win
16…cxb5 17.Bxg5 a6
Black is surviving, but it won’t be easy for him to get his queenside free. I would rather be White!
However, 12…e5 is just good for Black: his next move is …Ne6 or …Be6 and 13.Nxf7 is met by 13…Be6
White has a stronger continuation however:
12.Qf3 f6 13.Bf4 Qb6
This was as far as I got, but now Stockfish has the stunning
14.b4 Nxe4 15.Nxe4 Bg7 16.Qb3 keeping Black’s king in the centre with a continuing initiative!
c) 11…Nxe4 12.Qxe4 e5 13.Nxh7 Be7 14.Ng5 Bxg5 15.Bxg5 Be6 is Stockfish’s favourite line and seems to equalise. Black will follow up with …f6 and …0–0 or …Kf7.
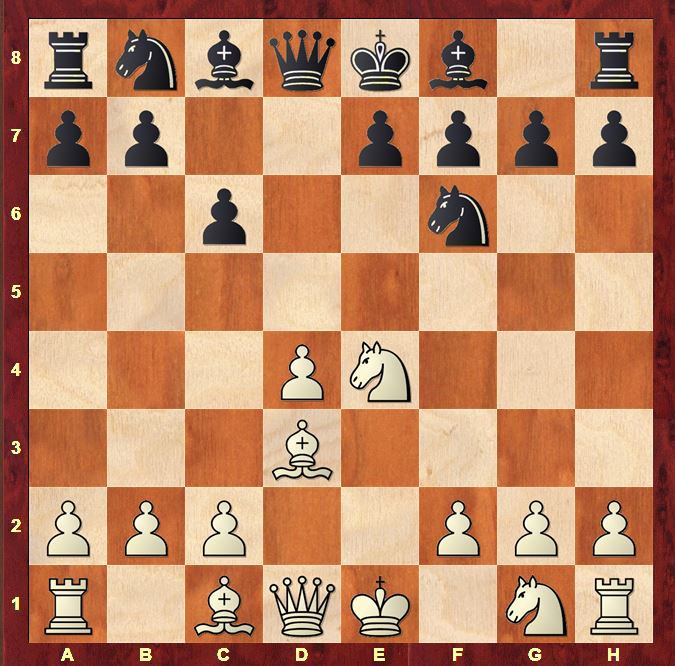
3. 11.Ne5 A dynamic idea that Alekhine played in the game, aiming to develop the c1 bishop to f4 behind the knight on e5. Alekhine wants to make Black regret putting his queen on c7!
11…Nxe4 12.Qxe4 Be6
12…f6 13.Ng6
13.Bf4 Qc8
A good plan from Winter. Black is preparing to develop either with …g6 and …Bg7 or via …f6 and …Kf7. White now has an important decision to make:
1. 14.Rd2
is an idea of mine, directed primarily against Black’s development with …g6 and …Bg7
a) 14…g6 15.Re1 Bg7 16.Nd7
was the point and one I was very proud of, paralysing Black by stopping him from castling! (16.Nxf7 Kxf7 17.Rde2 Bd5 18.Qxe7+ Kg8 is nothing for White)
16…Bxb2
Grabbing another pawn seems best.
i) 17.Be5
My idea, but Stockfish thinks he can improve it.
17…Bxe5 18.Qxe5 Rg8 19.Rd3 b6 (19…c5 20.Nxc5 Qc6 (20…b6 21.Nxe6 fxe6 (21…Qxe6 22.Qb5+) 22.Qb5+ Kf7 23.Rf3+ The point of 19.Rd3!) 21.Nxe6 Qxe6 22.Qb5+ Qc6 23.Qg5) 20.Qe4 Qb7 threatening …0–0–0 is how Stockfish wants to try and escape!
ii) 17.Rd3 Bg7 (17…b6 abandons support for …Qc6: this makes a big difference 18.Qb4 Bg7 19.Bg5 c5 20.Qa4) 18.Be5 Bxe5 19.Qxe5
White has gained a valuable tempo in comparison to 17.Be5!
19…Rg8 20.Nc5 b6 21.Nxe6 Qxe6 22.Qc3 Qc8 23.Qf6 Qc7 24.Rde3 0–0–0 25.Rxe7 and White’s initiative continues
I was pretty pleased with that, but Stockfish came back with a much better defensive concept, dispensing with the idea of …g6 and heading straight for a defensive formation based around …f6 and …e5.
b) 14…f6 15.Nc4 Kf7 16.Re1 Bd5
is what Stockfish wants. The idea is extremely original
i) 17.Qe2 Kg8 18.Ne3 Bf7 followed by …e5!
The Black king is tucked away in safety which means Black no longer has to fear any sacrifices on e5 after …e5!
ii) 17.Rxd5 cxd5 18.Nd6+ exd6 19.Qxd5+ Kg6 20.Qd3+ Qf5 21.Qg3+ Kf7 22.Qb3+ d5 23.Qxb7+ Kg6 24.Qxa8 Qxf4 25.Qe8+ Kh6 26.Re3 g6 27.Rh3+ Kg5 28.Rg3+ Kh6 allows White to make a draw by miracle!
2. 14.Nc4
Was Alekhine’s stroke of inspiration. Black now has a number of defences:
a) 14…Bxc4 15.Qxc4 e6 is very similar to lines we saw earlier. White maintains play due to his lead in development: 16.Qc3 f6 17.Re1 Be7 18.Re4 0–0 19.Qb3 Kh8 20.Rxe6 Qd7 21.Rae1 Rfd8 22.h4 is an edge for White
b) 14…g6
Recommended as best by Kotov
15.Qd4 My favourite idea, and surprisingly dangerous
15.Be5 f6 16.Bc3 is Kotov’s recommendation with “a dangerous initiative for White” (16.Bc7 A moment of inspiration… soon dashed 16…Bxc4 17.Rd8+ Qxd8 18.Bxd8 Bd5 19.Qb4 Rxd8 20.Qxb7 Kf7 is better for Black) 16…Bg7 17.Re1 Kf7
Not sure I see that initiative! White is just a pawn down and Black is ready to consolidate with …Re8 and …Bd5
15…Rg8 (15…f6 16.Nd6+ exd6 17.Qxf6 Rg8 18.Re1 wins!) 16.Qe4
So strange! White can just spend 2 tempi like this and still retain dangerous chances!
i) 16…b5 17.Ne5 Bd5 18.Rxd5 cxd5 19.Qxd5 wins;
ii) 16. ..f6 17.Bc7
Compare this to 15.Be5 f6 16.Bc7! This line works now as the rook on g8 hangs after 17…Bxc4 18.Qxc4! Sometimes, it’s good to waste a tempo!
17…Kf7 18.Rd8 Qxd8 19.Bxd8 Rxd8
Black’s material situation is not too bad, but his development is too backward to deal with the ensuing threats against his queenside
20.Re1 (20.Na5 Rd7 21.Re1 Bd5 22.Qe3 b6 23.c4 was my line) 20…Bd5 21.Qf4 is Stockfish’s very unpleasant recommendation
c) 16…g5 17.Be5 h5 is the computer approach followed by …h4–h3. Needs more work to be sure!
d) 16…Bg7
i) 17.Rd3 I thought this might be even more accurate than 17.Rd2, but I’d missed the next move! 17…f5
ii) 17.a4 to prevent …b5 was an idea I was looking at before I found an interesting answer to 17.Rd2 b5. It’s still really worth looking at as it contains a venomous trap to Black’s most natural continuation.
iia) 17…b5 18.axb5 cxb5 19.Nb6;
iib) 17…f6 18.Rd6 was my lovely idea… and it works!
18…Bd5 (18…Bf5 19.Qe3 Kf8 20.Re1 Qe8 and now Stockfish likes 21.Rd2 e5 22.Nd6 Qe7 23.Qf3 Rd8 24.Nxf5 gxf5 25.Rxd8+ Qxd8 26.Be3 Black’s position is a bit of a mess!) 19.Rxd5 cxd5 20.Qxd5 Kf8 21.Nd6
21…e6 22.Qb3 Qd7 23.Nxb7 The threat of Nc5 is surprisingly awkward for Black 23…Rc8 24.Qb4+ Ke8 25.Nd6+
iic) 17…Bxc4 18.Qxc4 Bxb2 19.Rab1 Bf6 20.a5 White is 2 pawns down, but Black is under great pressure. I would expect to have reasonable practical chances at the very least.;
iii) 17.Rd2
The main line of my analysis
iiia) 17…f6 18.Re1
iiib) 17…Bxc4 18.Qxc4 Bxb2 (18…Qe6 19.Qb4 b6 Since Re1 is not possible, I wondered whether this might be OK for Black. However, White doesn’t need to rush: Black’s king is going nowhere in a hurry! 20.Rd3 with Re1 to follow) 19.Re1 Bf6 20.Rd6 e6 21.Rdxe6+ fxe6 22.Rxe6+ Be7 23.Rxe7+ Kxe7 24.Bg5+ Kd6 25.Bf4+ Ke7 26.Bg5+ is a Stockfish draw
iiic) 17…b5
18.Nd6+ exd6 19.Rxd6
When I first thought of this, I was expecting to find a refutation fairly quickly: I never did!
iiici) 19…Bxb2 20.Rad1 Kf8 21.Rxc6 Qb4+ is coming!;
iiicii) 19…Qb7 20.Rxe6+ fxe6 21.Qxe6+ Kf8 22.Bd6+;
iiiciii) 19…Kf8 20.Rxc6 Qd8 (20…Qe8 21.Bd6+; 20…Qb7 21.Rxe6 Qxe4 22.Bd6#) 21.Rd6 (21.Bd6+ Ke8 22.Rc7 is Stockfish’s way) 21…Qe8 (21…Qc8 22.Qb4 was my win) 22.Rxe6 fxe6 23.Bd6+ Kf7
24.Qb7+ Kf6 25.Qf3+
…when it’s up to White to select the mate of his choice!
iiiciv) 19…Bf6 20.Rxc6 Qd8 21.Rd6 Strangely enough, there’s nothing better than a repetition! (21.Rxe6+ fxe6 22.Qxe6+ Kf8 23.Bh6+ Bg7) 21…Qc8
So how good is 14.Nc4? Well the computer suggests the plan of …f6, …Kf7, …Kg8, …Bf7 and …e5 and again, it’s not easy to stop!
14…f6 15.a4 Kf7 16.Qe2 h5 (16…Bd5 17.Ne3 Be6 18.Nc4) 17.h4 (17.Rd2 g5 18.Be3 Bd5 followed by …e5 now that White no longer has Ne3) 17…Kg8 followed again by …Bf7 and …e5 18.Rd2 Bf7 19.Rad1 e5 20.Bg3 Bd5 21.Ne3 Be6 The game isn’t finished after a move like 22.f4 but Black has achieved a lot. Difficult playing these positions against the computer!
You can see though how many chances we’ve been able to discover for White in such gambits. For an unprepared Black player, defending these types of positions against Alekhine in a practical game is a tough task!
In the game, Alekhine’s opponent went kamikaze and gave away his position with some wild pawn moves:
14…g5 15.Bxg5 Rg8 16.Bf4 Bxc4 17.Qxc4 Qg4 18.g3 e5 19.Re1 0–0–0 20.Rxe5 Rg6 21.Qxf7 Bd6 22.Qf5+ Qxf5 23.Rxf5 Bxf4 24.Rxf4 Rd2 25.Rc1 Re6 26.Rf8+ Kd7 27.Rf7+ Ke8 28.Rxb7 Ree2 29.Rf1 Rxc2 30.Rxa7 Rxb2 31.Rxh7
1–0