
In the next few months, I am going to spend some time looking at the games of one of the strongest British players of the 1920s and 1930s, 2-times British Champion Sir George Thomas. It is strange that the British players of this period have attracted so little attention, when so many other long-forgotten players have been the subject of extensive biographies. Although the British players of that period were not first-rank masters, they were ever-present actors during a thrilling period in the world of chess and were strong enough to cause occasional upsets against the very best. We have already seen Yates’ 2 fine victories against Alekhine (https://matthewsadler.me.uk/attack/yates-and-alekhine/) and Atkins’ defeat of Rubinstein (https://matthewsadler.me.uk/attack/h-e-atkins-9-times-british-champion-part-ii/) in earlier blog articles and we will start this series by examining Sir George Thomas’ defeat of Capablanca at Hastings 1934-35.
The 1920s and 1930s were a golden period for English chess tournaments. Think of such classic tournaments as London 1922 and 1927, Nottingham 1936 and of course the annual Hastings tournaments held over the New Year. The Hastings tournament of 1934-35 was exceptionally strong with Capablanca, Euwe, Botvinnik, Flohr and Lillenthal (an ex-world champion, 2 future world champions and 2 potential world championship challengers!) making up the foreign contingent and Sir George Thomas, Michell, Vera Menchik, Norman and Sir Stuart Milner Barry as the home players.
This turned out to be the finest result of Sir George Thomas’ career – indeed a result of which any chess player would be proud – as he shared 1st place with 6,5/9 with Euwe and Flohr, defeating Capablanca and Botvinnik along the way. Only a terrible last-round loss to his compatriot Michell cost him outright first place. As the Manchester Guardian put it “Sir George has shown that in chess, also the well-tempered native blade is capable of piercing the stoutest foreign armour”
We will start off by examining his good win against Capablanca. This was the reaction in the press to this unexpected win (Yorkshire Post, 29th December 1934)
“The game […] proceeded along orthodox lines to the 24th move, when Capablanca, in a practically equal position, gave his opponent the opportunity for a neat combination which, after an exchange of pieces, left the British master with a rook and 2 minor pieces against 2 rooks with equal pawns. Thne ending was difficult, but Sir George Thomas, evading all drawing traps, made sure of the full point after some five hours of play”
As we shall see, that’s not quite right! I have also created a short video about this game on my YouTube channel: https://youtu.be/qPMuvHk-sNc
Also go to http://cloudserver.chessbase.com/MTIyMTYx/replay.html for a playable version of this game.
Capablanca,Jose Raul – Thomas,George Alan
Hastings Christmas Congress 1934/35
1.d4 Nf6 2.c4 e6 3.Nc3 d5 4.Bg5 Nbd7 5.e3 c6 6.a3 Be7 7.Qc2 0–0 8.Nf3 Re8 9.Rd1 Nf8
A strange-looking move, though fairly logical in its own way. White and Black are locked in the “battle for a tempo” so typical of this line. White wants Black to capture on c4 before he moves his light-squared bishop, and Black wants to wait with …dxc4 until White has moved his light-squared bishop! In the meantime, both sides try and find something useful to do! White has played a3, Qc2 and Rd1 whereas Black has played …Re8 and …Nf8. 9…Nf8 is a somewhat passive move: on d7, the Black knight supported both the …c5 and …e5 freeing breaks whereas after 9…Nf8, neither of these breaks is possible, so it isn’t particularly clear whether this extra move has helped Black. For that reason, Capablanca decides that he can now afford to lose the “battle for the tempo” and develop his light-squared bishop.
10.Bd3 dxc4 11.Bxc4 Nd5 12.Bxe7
12.Bf4
was interesting in this position, using the plan that Alekhine played against Rubinstein in 1923:
1…d5 2.c4 e6 3.Nf3 Nf6 4.Nc3 Be7 5.Bg5 Nbd7 6.e3 0–0 7.Rc1 c6 8.Qc2 a6 9.a4 Re8 10.Bd3 dxc4 11.Bxc4 Nd5 12.Bf4 Nxf4 13.exf4 c5 14.dxc5 Qc7 15.0–0 Qxf4 16.Ne4 Nxc5 17.Nxc5 Bxc5 18.Bd3 b6 19.Bxh7+ Kh8 20.Be4 Ra7 21.b4 Bf8 22.Qc6 Rd7 23.g3 Qb8 24.Ng5 Red8 25.Bg6 Qe5 26.Nxf7+ Rxf7 27.Bxf7 Qf5 28.Rfd1 Rxd1+ 29.Rxd1 Qxf7 30.Qxc8 Kh7 31.Qxa6 Qf3 32.Qd3+ 1–0 Alekhine,A-Rubinstein,A Karlsbad 1923
It was also played in a more recent game between Gelfand and Serper in Uzhgorod 1987. 12…Nxf4 13.exf4 Qc7 14.g3 c5 15.0–0 a6 16.Ba2 b5 17.d5 c4 18.b3 Bb7 19.bxc4 bxc4 20.Ne5 Bxa3 21.dxe6 Rxe6 22.Nd5 gave White some initiative due to Black’s weak light squares (c4 will fall and f7 is very sensitive!) White won in 72 moves.
12…Qxe7 13.0–0 b6 14.Ne2
A clever move, avoiding the exchange of knights in response to the gain of central space with e3–e4. Black thus does not get an opportunity to relieve his cramped position with exchanges.
14…Bb7 15.e4 Nf6 16.Ng3
Capablanca takes the opportunity to find an alternative post for the knight rather than return it to c3. The knight on g3 has 2 purposes:
- By aiming at the f5 square, it dissuades Black from organising the …e6–e5 break.
- It prepares to meet the …c5 break with d4–d5. After …exd5, exd5 White will again be able to use the f5 outpost for his knight.
16…Red8 17.Rfe1 Rac8
18.Qb3
Something you really wouldn’t expect from Capablanca: a 2–move manoeuvre that destroys the coordination in his position! White was in control of the position after Black’s 17th move. Both of Black’s active freeing breaks are impossible:
- Black has no support for …e5
- …c5 is met tactically for now by d5 when …ed, ed followed by Nf5 would be very dangerous for Black.
Black’s most likely freeing move is the …c5 break. Black’s most obvious plan to achieve this is to move the queen from the e-file and then play …c5. If White still wants to meet …c5 with d5 (which seems logical) then he will need to increase his cover of the d5 square. From that point of view, Capablanca’s 18th move is extremely logical, moving the queen to the a2–g8 diagonal and thus supporting the advance of the d-pawn after …c5. d5. However, the move is a little rushed: Black was not yet threatening …c5, so the obvious 18.b4, clamping down on …c5 was just asking to be played. This move has several points:
- Black’s freeing break …c5 will now come at the cost of a pawn weakness – an isolated pawn on c5 – after bc …bc, d5.
- White’s possibility of e5 followed by Ne4 now not only secures the d6 outpost for the White knight, but also combines the knight on e4 with pawns on b4 and d4 to hold back the …c5 break by force.
After 18.b4, 18…Qc7 can be met by 19.Qb3 or 19.Qa2 when 19…c5 20.bc bc 21.d5 looks very strong for White. Capablanca’s move has a similar purpose, but severely underestimates Black’s resources
18…Qc7
Preparing …c5
19.Qa2
This is a really poor move. I’m not sure why Capablanca played it. My guess is that Capablanca was irritated with himself for not having played 18.b4 on the last move (which is a natural Capablanca move if ever there was one!) and decided to repair that omission as soon as possible by dropping the queen back to a2 to allow the b-pawn to move. Just for a moment however, the White position is lacking harmony and strength. That comes from the fact that the White queen’s room for manoeuvre is so limited: she only has 3 legal moves now! If such a powerful piece is so poorly-placed, there is a likelihood that tactics will not turn out in White’s favour.
It was time to understand that White’s 18th move was a slight error and switch plan with 19.e5 Ne8 20.Ne4 or first 19.a4 a6 20.e5 Ne8 21.Ne4, in both cases with a slight White advantage. The text is much worse than a waiting move such as 19.h3!
19…c5
Absolutely essential…and surprisingly strong!
20.d5 b5
I think that Capablanca may have missed that this move was possible – and strong – immediately without the preliminary …exd5. It would also have been Black’s idea after the quiet waiting move 19.h3 c5 20.d5 b5 as 21.Qxb5 exd5 22.exd5 Bxd5 23.Bxd5 Nxd5 24.Nf5 Ne6 would be fairly even as the Black weakness on c5 is compensated by White’s backward pawn on b2. After the move 19.Qa2 however, 20…b5 turns the position in Black’s favour!
In comparison, 20…exd5 21.exd5 b5 22.d6 is very strong. It’s also a useful point that the queen on a2 does not get hit by …bxc4! (22.Nf5 is even stronger according to my engine, demonstrating the power of the knight on g3! 22…bxc4 23.Ne7+ Kh8 24.Ng5 g6 25.d6 Qd7 26.Qxc4 and Black’s position collapses)
21.Bxb5
a) 21.d6
was the best chance, although the position has already turned Black’s way who has managed to activate his queenside majority significantly with gain of tempo
21…Qb6
(21…Rxd6 22.Rxd6 Qxd6 23.Bxb5 is fairly even. White’s pawn on e4 is a little uncomfortable to defend, and Black has some nice dark-squares around it for his minor pieces (e5 and f4) but White’s position is solid, and he can dream of first neutralising the bishop on b7 by reinforcing his centre with f2–f3 and then later exploiting the pawn weakness on c5.)
22.Bf1 c4
(22…Ng6 preparing …Ng4, but a slightly slow move 23.a4 This is surprisingly annoying for Black 23…bxa4 (23…a6 24.a5 Qc6 25.e5 Nd7 26.b3 is very pleasant for White who will point the queen to the kingside and start to push with h4–h5) 24.Qxa4 should again be just about fine for White)
23.a4
(23.e5 Ng4 24.Rd2 Nd7 25.h3 Bxf3 26.hxg4 Bxg4)
23…a6 24.b4
(24.a5 Qc5 is the key difference with 22…Ng6: the queen has an exellent spot on c5 when chased)
24…Ng6 25.a5 Qa7
is pleasant for Black, as White always has to worry about the d6 pawn.
b) Another try 21.dxe6 Rxd1 22.exf7+ Kh8 23.Rxd1 bxc4 24.Qxc4 Ng4
is just better for Black.
21…exd5 22.e5
22.exd5 Bxd5 23.Bc4 Bxf3 24.gxf3
The bishop on c4 combines with the queen on a2 against f7 and even more importantly prevents the knight on f8 from reaching d4 via e6. Black’s key task is to find a good stable square for the knight on f8.
a) 24…Rxd1 25.Rxd1 Rb8 was one idea, to prevent the White queen from activating itself via b3 (25…Qb7 26.Nf5 Qxf3 27.Ne7+ Kh8 28.Rd3 Qg4+ 29.Rg3) 26.b3 Ng6 (26…N6d7 is a very interesting idea from my engine, aiming to put the knights on e5 and g6, or to exchange the f6 knight for the bishop on c4 with …Nb6xc4, leaving the knight of f8 with a path to White’s weakened kingside via e6/g6–f4/h4) 27.Qd2 Nh4 28.Be2 I wasn’t sure how great this would be for Black. My engine sees a slight advantage. 28…h6 29.b4 cxb4 30.axb4 Qb7 31.Qf4 Ng6 32.Qd4 Qxb4 33.Qxa7 should be holdable;
b) 24…Qb7 Hoping that the ending after Qb3 is good for Black and ths dissuading the White queen from activating itself. However, this does not appear to be true, and my engine also points out other possibilities. 25.Nf5 (25.Qb3 Qxb3 26.Bxb3 Rxd1 27.Rxd1 Rb8 28.Rd3 Ng6 29.Rc3) 25…Qxf3 26.Ne7+ Kh8 27.Be2;
c) 24…Ng6
25.Qb3
I wasn’t sure how wonderful this position would be for Black: White’s kingside structure is damaged, but Black has an isolated pawn on c5 too and White’s light-squared bishop exerts annoying pressure on Black’s position (the f7 pawn). It must be said however, that the threat of capturing on f7 is not so great in general: Black’s king moves to h8 and the game goes on. From that point of view, Black can definitely consider sacrificing the f7 pawn for counterplay elsewhere on the board. White’s major pieces are well-placed (just like Black’s). However, Black has a strong way to latch onto White’s kingside weaknesses:
25…Nh4
This places the knight on the edge of the board, but it attacks White’s kingside weaknesses and the knight is also extremely hard to shift. In some senses, the knight reaches a stable outpost on h4, from which it also attacks clear White weaknesses: White’s damaged structure (doubled f-pawns) which leave the White king vulnerable behind them. Note that the knight on h4 takes away the g2 square from the White king and thus pins it to the back rank.
26.Rxd8+ Rxd8 27.Rd1 Rxd1+
(27…Rd4 Black transforms his isolated c-pawn into an isolated d-pawn. The danger in this is that the pawn is more vulnerable on d4 than on c5 and that in this pawn structure, White gains a queenside pawn majority which means he can create a passed pawn there. However, the d-pawn is both a potential danger, and a shield allowing Black to transfer his queen via d7–h3 to attack White’s kingside weaknesses. This idea sharpens the position considerably. 28.Rxd4 cxd4 29.Ne2 g6)
28.Qxd1 g6
A solid idea, keeping the advantages that Black has achieved and preparing to centralise the queen once Black’s king’s position has been made safer.
29.Qb3 Kg7 30.Qc3 Qe5
The tactical reason why White cannot stop the Black queen from centralising!
22…Ne4 23.Nxe4
An enormous tactical mistake. I imagine that Capablanca completely misevaluated the position after 23…dxe4 24.Ng5, otherwise I can’t imagine why he would ever make this capture. Black stands very well anyway, but there was no reason for White to lose immediately!
23…dxe4
24.Nd2
24.Rxd8 Qxd8 traps the knight on f3! (24…Rxd8 also wins, exploiting the key tactical problem in the position: the loose bishop on b5! 25.Ng5 h6 26.Nh3 Qa5 hitting e1 and b5 and winning a piece) ;
24.Ng5 Rxd1
(24…c4 25.Bxc4
(25.Rxd8 Qxd8 26.Nxf7 Qa5 (26…Kxf7 27.Bxc4+ Kg6 is also good for Black, but the text is clearer) 27.Bxc4 Qxe1+ 28.Bf1 Threatening Nh6+ 28…h6 is the key way to defend! (28…g6 29.Nd6+ Kh8 30.Qf7 would ensure a draw by perpetual) )
25…Rxd1 26.Bxf7+ Kh8 27.Rxd1 Qc1
(27…Qxe5 28.Be6 Qxg5 29.Bxc8 Bxc8 30.Qf7 wins)
28.Qb3 Qxg5 29.Qxb7 is better for White)
25.Rxd1 c4
is the way to do it: Black threatens …Qxe5 (forking both the bishop on b5 and knight on g5) while …e3 is another very unpleasant idea. It’s amazing how quickly White’s position has gone downhill. His pieces don’t make such a poor impression: the rook is centrally-placed on an open file, and the influence of the queen on a2, bishop on b5 and knight on g5 converges on the a2–g8 diagonal, so there is a sense in which White’s pieces are reasonably coordinated. However, none of White’s pieces is stable, to quote a Marin concept: all of the White pieces are undefended, instead of being anchored on protected outposts, the White back rank is weak (which means White’s king is weak), and – most crucially from a tactical point of view – the White queen is so poorly-placed after 25…c4 that she cannot perform her normal role of papering over the cracks with her power! With just 4 legal moves at her disposition (of which 2 give away material immediately) the queen temporarily contributes nothing to the game, being able neither to coordinate a counterattack nor to defend White’s loose pieces.
26.h4 h6 27.Nh3 e3 28.fxe3 Qxe5 29.Bxc4 Bxg2
pointed out by my engine, wins easily
30.Bxf7+ Kh8 31.Kxg2 Qe4+ …Rc2 is now available to strengthen Black’s attack 32.Kg3 Qxe3+ 33.Kg4 Qe2+
24…Rxd2
24…Qa5 would be even more decisive, though there is nothing wrong with the text either
25.Bc4 (25.Nc4 Rxd1 26.Rxd1 Qxb5 27.Nd6 Qd7)
25…Rxd2 26.Bxf7+ Kh8
and now the weakness of White’s back rank interferes with any of White’s attempts to create rapid counterplay
27.e6
(27.b4 Rxd1 28.Rxd1 cxb4 29.e6 Bd5)
27…Bd5 picks up the e6 pawn with a clear extra piece (27…e3 as pointed out to me by my engine, is even stronger)
25.Rxd2 Qa5
And Thomas picked up 2 pieces for the rook with a winning position!
26.b4 Qxb5 27.bxc5 Qxc5 28.Qb2 Ba8 29.Rdd1 Qe7 30.Qd4 h6 31.Qd6 Qxd6
31…Qg5 was best, keeping the queens on to create danger on the kingside (…e3 is threatened to start with)
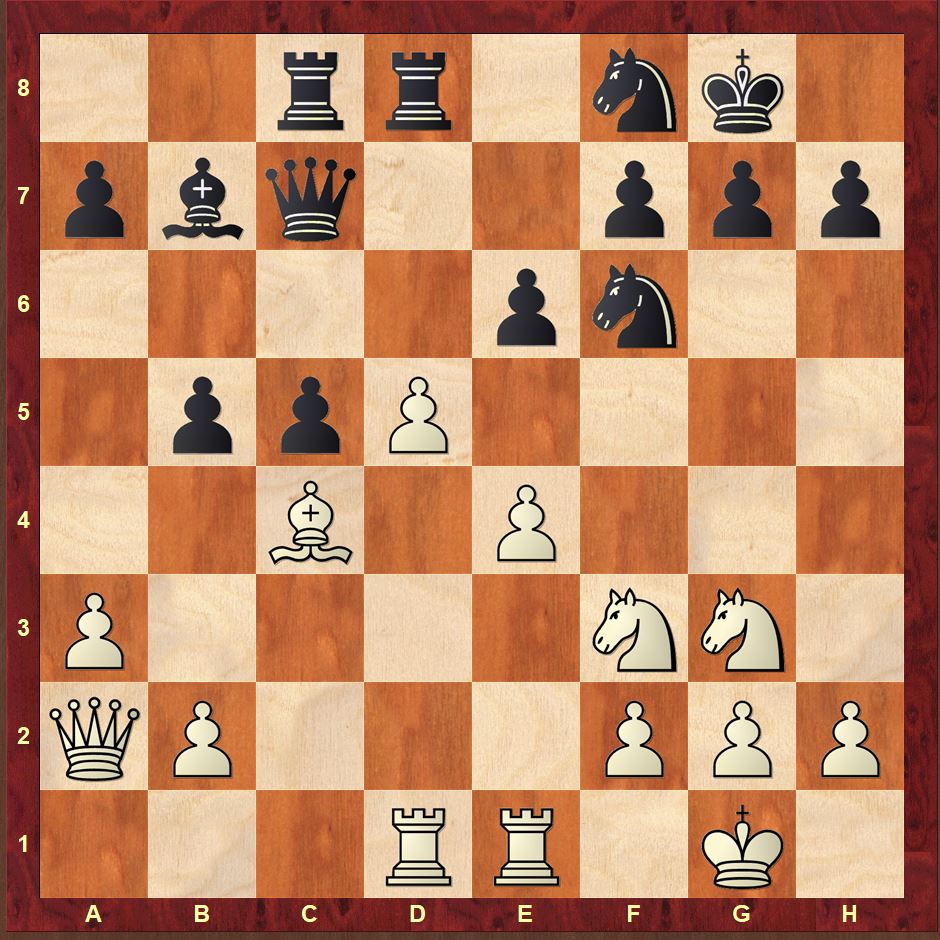
32.Rxd6 Ng6 33.e6 fxe6 34.Rxe6 Kf7 35.Ra6 Rc7 36.Rb1 Ne7 37.h4 Nc8 38.Rb5 Bb7 39.Rf5+ Kg8 40.Re6 Ne7 41.Rf4 Bd5 42.Rd6 Rc8 43.Ra6
Thomas’ conversion has been somewhat nervy, but this move unexpectedly gives Black a fantastic tactical opportunity which Thomas exploits fully!
43.Rd7 Ng6 is the unexpected trap! 44.Rg4 Be6
43…Rc1+ 44.Kh2 Nc6
The rook on a6 is now very short of squares! 45.Ra4 a5 doesn’t improve matters either!
45.h5 Rc2 46.Rf5 Be6 47.Rf4 Rc4
Shutting the trap! …Bc8 will win the rook on a6! A very unexpected motif!
48.g4 Bc8 49.Rxc6 Rxc6 50.Rxe4 Kf7 51.Ra4 Ra6 52.Rf4+ Ke7 53.Re4+ Kf6
0–1
Postscript
A few days ago, my friend Steve Giddins leant me a copy of William Winter’s (another strong English player of that period) memoirs published in CHESS magazine in the 1960s. His comments on his first impressions of Capablanca in 1919 are very amusing: “I have never been partial to glossy immaculate young men, and in common with other English players, I resented his behaviour at the board. He never sat down, but when it was his turn to move, strolled up to the table, surveyed the position for a few seconds, made his move, and walked away as if he were giving a simultaneous exhibition. Probably he was justified in holding the opposition in contempt but he need not have shown it so blatantly.” Reading this, and having just witnessed Capablanca’s uncharacteristically poor series of moves between moves 18 and 23, it made me wonder whether Capablanca had perhaps failed to buckle down at the crucial moment against a player he would expect to beat convincingly. However, that was 1919, and our game was played in 1934, and to be fair to Winter, he does carry on by saying that “later on he got rid of all his mannerisms, and I came to appreciate his sterling character.”
I can sense a certain Swiss-resident, soi-disant “chess historian” sharpening his pointy stick, at your reference to “London 1923”! That is a typo for “1922”, of course.
Thanks Steve! Indeed, a bad error! Corrected now! Best Wishes, Matthew
I hope to learn a good deal from your discussion of Thomas’s victory. Is there a way to download it (and your other blog material) in pgn format? A typographical issue: when you write “The text is much worse than a waiting move such as 19.h3!”, I’m pretty sure that the exclamation point is part of the sentence and not attached to the move. However, there may be other cases when it’s not so clear. I don’t know a way to avoid the potential ambiguity.
Hi Charles, thanks for your comments. You should be able to download a pgn at http://cloudserver.chessbase.com/MTIyMTYx/replay.html which still worked for non-Chessbase users last time I checked. Yes indeed, the exclamation mark was enthusiasm, not approbation for the move! Best Wishes, Matthew
Thank you. The link allowed me to download “replay.pgn”, which works perfectly with the chessx on my linux system.