
In our “Chess for Life” chapter on Tony Miles, we looked at an original opening plan of Tony’s in which he released the central tension very early with …c5-c4 in one of his patented offbeat openings. Although we discussed this decision at reasonable length in the book, we couldn’t include all the material we’d gathered on the subject without going completely off-topic! This article provides further detail on the illustrative games Rubinstein-Flamberg and Hort-Karpov mentioned in that chapter.
Many years ago, when I was about 9 or 10, I came across this game in one of the many chess books I devoured at the time:
Rubinstein,Akiba – Flamberg,Alexander
Lodz 1906
1.d4 d5 2.c4 e6 3.Nc3 Nf6 4.Bg5 Be7 5.Nf3 Nbd7 6.e3 0–0 7.Rc1 b6 8.cxd5 exd5 9.Ne5 Bb7 10.Bd3 c5 11.f4 Re8 12.0–0 c4 13.Bb1 a6 14.Rf3 b5 15.Rh3
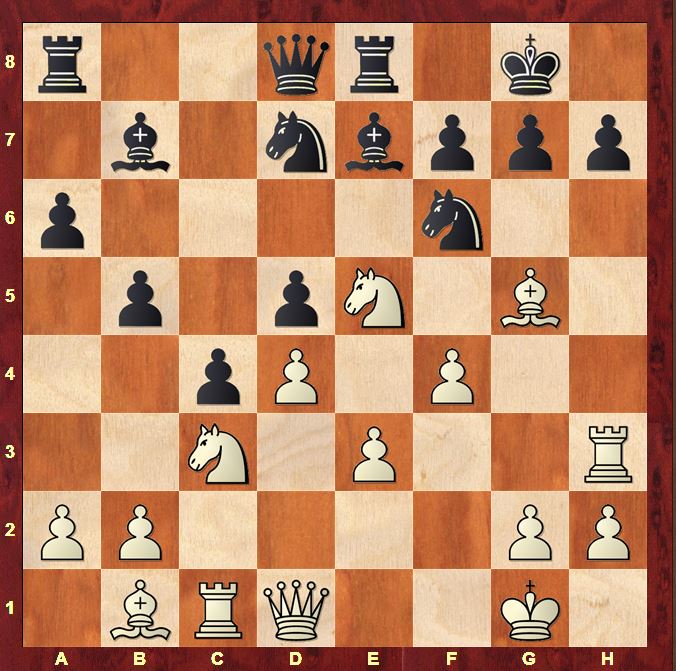
15…Nf8 16.Bxf6 Bxf6 17.Bxh7+ Nxh7 18.Qh5 Qc7 19.Qxh7+ Kf8 20.e4
20…dxe4 21.Nxe4 Bxe5 22.fxe5 Qc6 23.Re1 Qd5 24.Qh8+ Ke7 25.Qh4+ Kd7 26.Qf2 Kc7 27.Rf3 Re7 28.Nc3 Qe6 29.Rf4 Rd8 30.Rf1 Rdd7 31.Qg3 Qb6 32.Ne2 Qc6 33.Rxf7 Kb6 34.Rxe7 Rxe7 35.Nf4 Qe4 36.Qg6+ Qxg6 37.Nxg6 Rd7 38.Rd1 b4 39.e6 Rd6 40.e7 Bc6 41.Ne5
1–0
How could such a game fail to make an impression on you? A lasting impression was also made on me by the notes to the game which condemned 12…c4 as the losing move. Black’s idea had been obvious: to gain space on the queenside where he enjoyed a pawn majority. However, releasing the tension in the centre had given White a free hand on the kingside which had led inevitably to disaster. I vowed then that I would never make that dreadful beginner’s mistake myself!
A few years ago, I was reading Kasparov’s “My Great Predecessors – Part I” and came across the classic game Pillsbury-Tarrasch Hastings 1895
Pillsbury,Harry Nelson – Tarrasch,Siegbert
Hastings 1895
1.d4 d5 2.c4 e6 3.Nc3 Nf6 4.Bg5 Be7 5.Nf3 Nbd7 6.Rc1 0–0 7.e3 b6 8.cxd5 exd5 9.Bd3 Bb7 10.0–0 c5 11.Re1 c4
12.Bb1 a6 13.Ne5 b5 14.f4 Re8 15.Qf3 Nf8
16.Ne2 Ne4 17.Bxe7 Rxe7 18.Bxe4 dxe4 19.Qg3 f6 20.Ng4 Kh8 21.f5 Qd7 22.Rf1 Rd8 23.Rf4 Qd6 24.Qh4 Rde8 25.Nc3 Bd5 26.Nf2 Qc6 27.Rf1 b4 28.Ne2 Qa4
29.Ng4 Nd7 30.R4f2 Kg8 31.Nc1 c3 32.b3 Qc6 33.h3 a5 34.Nh2 a4 35.g4 axb3 36.axb3 Ra8 37.g5 Ra3 38.Ng4 Bxb3 39.Rg2 Kh8 40.gxf6 gxf6 41.Nxb3 Rxb3 42.Nh6 Rg7 43.Rxg7 Kxg7 44.Qg3+
44…Kxh6 45.Kh1 Qd5 46.Rg1 Qxf5 47.Qh4+ Qh5 48.Qf4+ Qg5 49.Rxg5 fxg5 50.Qd6+ Kh5 51.Qxd7 c2 52.Qxh7#
1–0
I was expecting a comment from Kasparov after Black’s 11th move, condemning Black’s strategy. Instead, he said this: “11…Ne4 is not bad, but Tarrasch is playing for a win”. And indeed he demonstrated that the game had remained double-edged – if anything a little in Black’s favour – until the 40th move. That was a big shock. The dogma that I’d believed in since my childhood had been called into question. I was in crisis!
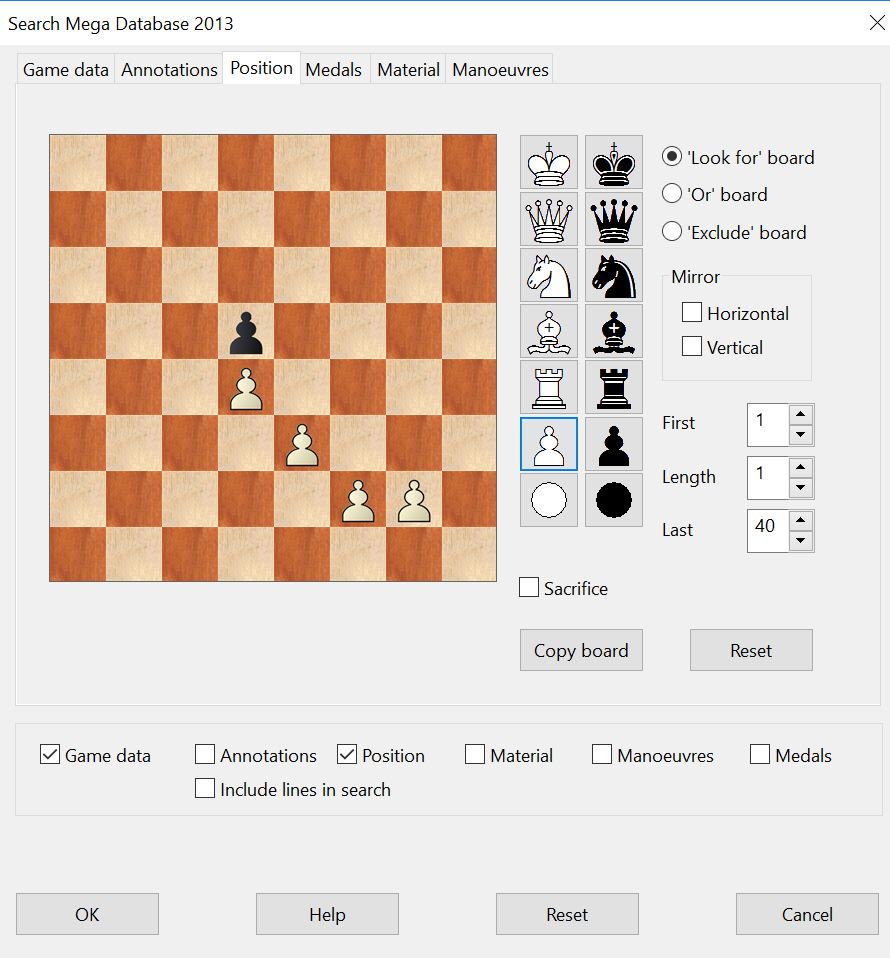
In order to investigate further, I put together a database of games in which …c5-c4 had occurred. I’m putting in the screenshots from Chessbase to show how I narrowed down my search to relevant games as I am often asked how to perform such searches:
1. Arising from 1.d4 d5 (ECO D00-D69)

This narrows down the number of games to search. I didn’t set any ELO limits (to only get games between strong players) as this would also rule out Classic games (when players didn’t have ELO ratings)
2. From a position with these characteristics:
I wanted to avoid getting too many main-line Tarrasch games with a fianchettoed White light-squared bishop which leads to totally different plans.
3. Queens and 2 rooks had to be on the board.

I didn’t want to get positions in which …c5-c4 had been played in the ending. The key problem was supposed to be getting mated in the middlegame!
4. …c5-c4 from Black

To reduce the chance of main-line Tarrasch openings getting through, I also stipulated that …c5-c4 should only occur between moves 10 and 40.
This resulted in 15786 games. I then had a look through the games and picked out 2 types of games:
- Classic games played by interesting players like Capablanca, Alekhine, Tarrasch and Lasker (about 32 games)
- Modern games where the players had an average ELO higher than 2500 (781 games)
I also added a few games with this theme that I knew about but which didn’t necessarily fit into these criteria. After spending some time looking through this material, I came to some conclusions which I’ll present in the next few paragraphs. My starting point for the topic was this key question: when is …c5-c4 good?
I was prepared to admit that I’d been wrong to think that …c5-c4 was always bad, but that didn’t mean I knew when it was good. A couple of Classic games gave me some ideas:
Kmoch,Hans – Alekhine,Alexander
Semmering 1926
1.d4 f5 2.Qd3 d5 3.Bf4 e6 4.Nf3 Nf6 5.e3 Bd6 6.Be2 0–0 7.Ne5 c5 8.c3 Nc6 9.Nd2 Qc7 10.Ndf3 Nd7 11.Nxd7 Bxd7 12.Bxd6 Qxd6 13.0–0
The position looks even, and White intends to play c3–c4, either immediately or after a preliminary dc.
13…c4
With gain of tempo, Black increases his share of queenside space and prevents White’s freeing break c3–c4.
14.Qd2 b5
Reinforcing the c4 pawn and preparing to launch an attack with …b5–b4.Note that White has play neither in the centre (e3–e4 is held back by Black’s d5 and f5 pawns while the e5 square is unavailable for White’s knight) nor on the kingside. With his next moves, Kmoch tries to change the situation. However, Alekhine smothers this attempt expertly.
15.Ne1 g5 16.f4
Hoping for Nf3–e5
16…g4
A wonderful idea, taking f3 away from the White knight and effectively closing White’s avenues of counterplay on the king’s wing.
17.b3 Rfb8 18.Nc2 a5 19.bxc4 bxc4 20.Rfb1 Na7 21.Qe1 Ba4 22.Bd1 Qe7 23.Qd2 Nb5 24.Rb2 Rb7 25.Rab1 Rab8 26.Be2 h5 27.g3 h4
28.e4 Nd6 29.Rxb7 Rxb7 30.Rxb7 Qxb7 31.Qc1 Nxe4 32.Ne3 hxg3 33.hxg3 Nxg3 34.Kf2 Ne4+
0–1
Kupchik,Abraham – Capablanca,Jose Raul
Lake Hopatcong 1926
1.d4 Nf6 2.Nf3 e6 3.e3 b6 4.Bd3 Bb7 5.0–0 Ne4 6.Nbd2 f5 7.c3 Be7 8.Qc2 d5 9.Ne5 0–0 10.f3 Nxd2 11.Bxd2 Nd7 12.Nxd7 Qxd7 13.Rae1 c5 14.Qd1 Rf6 15.Qe2 Raf8 16.Bb5 Qc7 17.f4
17…c4
A similar situation to the previous game: White has no central play and lacks a knight to establish on the central outpost on e5. In the next few moves, Capablanca takes rigorous and original measures to snuff out any hint of a kingside attack and then proceeds to elevate his position on the queenside.
18.Kh1 Bd6 19.Rf3 h5 20.Ref1 Rh6
In this way, the break g4 will be very hard to achieve!
21.Be1 g6 22.Bh4 Kf7 23.Qe1 a6 24.Ba4 b5 25.Bd1 Bc6 26.Rh3 a5
With the defensive measures in place on the kingside, Black is ready to push through on the queenside.
27.Bg5 Rhh8 28.Qh4 b4 29.Qe1 Rb8 30.Rhf3 a4 31.R3f2 a3 32.b3 cxb3 33.Bxb3 Bb5 34.Rg1 Qxc3 35.Qxc3 bxc3 36.Rc2 Rhc8 37.Bh4 Bd3 38.Rcc1 Rxb3 39.axb3 a2
0–1
In both games, Black’s expansion on the queenside with …c5-c4 is a prelude to a successful invasion on that flank. What lessons can we learn from this? 2 characteristics of the position stood out for me:
- White’s opportunities for kingside and central counterplay were limited. This came about through 2 factors:
- Black’s iron grip on the centre (not something we can always guarantee)
- The exchange of 2 sets of minor pieces which limits the power of White’s attack
- The c4 pawn was well-defended which meant that Black’s queenside space advantage could not be challenged once established.
Let’s now try and relate these points to the games Rubinstein-Flamberg and Pillsbury-Tarrasch.
Black got a satisfactory position in Pillsbury-Tarrasch
because he was able to play 16…Ne4. This move achieved 2 objectives:
- Draining White’s attack of power by exchanging 2 sets of minor pieces
- Blocking the b1-h7 diagonal and thus shutting off a major line of attack against the Black king. You saw how dangerous this was in Rubinstein-Flamberg!
How did Tarrasch make this possible? By having defended the pawn on c4 with …b5. Black cannot play …Ne4 without losing a pawn until he has defended the c4 pawn.
If we take a look at Rubinstein-Flamberg again…
…we see that Black was ready to play 15…Ne4 once he’d played 14…b5 protecting his c4 pawn, but that was simply too late! 15…Ne4 allows 16.Qh5 winning on the spot while 15…Nxe5 16.dxe5 Ne4 17.Qh5 also wins.
At this stage, it may dawn on you that the disposition of White’s pieces in Rubinstein-Flamberg after his 15th move is the perfect attacking setup for White:
- The Bb1 attacks h7
- The Knight is entrenched on e5
- The Rook on h3 combines against h7
- The queen on d1 is ready to spring out to h5 attacking f7 and h7.
If you compare this game to Pillsbury-Tarrasch, you’ll see that Flamberg defended according to Tarrasch’s classic recipe… only Rubinstein’s rook was on h3 and Pillsbury’s was on e1. A huge difference! If White can get in all Rubinstein’s moves and Black can’t realise …Ne4, then the plan of …c5-c4 is indeed bad!
Understanding that …b5 defending the pawn on c4 is a necessary prelude to Black’s key defensive idea of exchanging minor pieces with …Ne4 will help you to appreciate White’s play in the famous game Hort-Karpov Amsterdam 1981:
Hort,Vlastimil – Karpov,Anatoly
Amsterdam 1981
1.d4 Nf6 2.Nf3 e6 3.c4 d5 4.Nc3 Be7 5.Bg5 h6 6.Bh4 0–0 7.e3 b6 8.Rc1 Bb7 9.cxd5 exd5 10.Be2 Nbd7 11.0–0 c5 12.Qc2 a6 13.Rfd1 c4
Karpov had already played a similar game in this fashion against Gligoric, drawing easily (in fact he was a little better when the draw was agreed). It seems a logical moment for …c4 as White is presumably looking to open the d-file with dxc5 after playing 13.Rfd1. The disposition of White’s forces (bishop on e2, queen on c2 and king’s rook on d1) is not ideal for launching a kingside attack, but they are well-placed to support the occupation of e5 with the knight. This frees White’s bishop on e2 to move to f3 and put pressure on the d5 pawn. In the game against Gligoric, Karpov had followed up …c4 by first strengthening his support of d5 with …b5 and …Nb6 before following up with …Ne4. Hort understands this perfectly and puts an enormous spoke in Black’s wheels.
14.a4
Stopping …b5 and thus preventing …Ne4. White has an additional idea of b3, challenging the pawn on c4. Karpov’s attempt to shore up his c4 pawn with …b5 leads to total catastrophe.
14…Bc6 15.Ne5 Qc7 16.Nxc6 Qxc6 17.Bf3 Bb4
17…Rae8 18.b3 b5 19.axb5 axb5 20.bxc4 bxc4 21.Rb1 is very unpleasant for Black due to the weakness of d5. However, the text is a tactical blunder.
18.Nxd5 Nxd5 19.Qf5 Qxa4 20.Bxd5 Rac8 21.b3 cxb3 22.Rxc8 Rxc8 23.Qxf7+ Kh8 24.Bxb3 Qb5 25.Be6 Rf8 26.Bxd7
1–0
Summary
- In order to neutralise White’s potential central and kingside pressure, Black needs to exchange off a couple of sets of minor pieces after he has committed himself to …c5-c4. The most natural way to do this is via …Ne4.
- In order to play …Ne4 after …c5-c4, the pawn on c4 must be defended. The most natural way to do this is via …b6-b5, which in turn must be supported by …a7-a6.
- White can try to stop …b5 with a2-a4 as in Hort-Karpov. If Black cannot achieve …b5, he is likely to face serious problems in defending his centre and in maintaining his pawn on c4.
- White’s ideal attacking formation against the …c5-c4 plan is
Bb1
Ne5 + Pf4
Bg5
Rh3
Qd1
as in Rubinstein-Flamberg. If White can achieve this, then he will develop dangerous attacking chances.
Putting it all together
So time now for a modern example which demonstrates a successful implementation of the …c5-c4 plan. Black maintains her flexibility, delaying …c5-c4 until she is certain to be able to support it immediately with …b6-b5. White doesn’t get the chance to apply Hort’s remedy with a4. White therefore builds up her forces according to Rubinstein’s recipe but Black is in time to play …Ne4. The game remains balanced for a while until Black gets on top, although there are many twists and turns before the game ends in a draw!
Batsiashvili,Nino – Koneru,Humpy
Teheran FIDE GP (Women) 2016
1.d4 Nf6 2.c4 e6 3.Nc3 d5 4.Bg5 Be7 5.e3 h6 6.Bh4 0–0 7.Nf3 b6 8.Bd3 Bb7 9.0–0 Nbd7 10.Bg3 c5 11.cxd5 exd5 12.Qc2 a6
A flexible move, preventing the annoying Nb5, while supporting …c5–c4 and …b6–b5
13.Rad1 c4
14.Bf5
A typical square for the bishop, exerting pressure on the d7 knight. Since Black has played …h6, the bishop cannot be driven away with …g6. …h6 is a mixed blessing. On the one hand, the kingside light-squares are weakened. On the other hand, White’s dark-squared bishop finds it harder to take part in White’s kingside play.
14…b5 15.a3 Qb6
15…Nb6 16.Ne5 Nc8 followed by …Nd6 is Stockfish’s very sensible suggestion
16.Ne5 Rad8 17.Bh4 Rfe8 18.f4 Nf8 19.Rf3 Ne4
20.Bxe7 Rxe7 21.Nxe4 dxe4 22.Rg3
22.Bxe4 Bxe4 23.Qxe4 f6 24.Qc6 Qa7 25.Ng4 Re6 wins the queen!
22…f6 23.Ng4 Kh8 24.Qe2 Bd5
A situation similar to Pillsbury-Tarrasch! The chances are balanced.
25.Nf2 Qc6 26.Qh5 Bf7 27.Qg4 Be6 28.Bxe6 Nxe6 29.Qh5 Qe8 30.Qh3 Nc7 31.f5 Nd5 32.Rg4 a5 33.Re1 b4 34.axb4 axb4 35.Qh4 c3 36.bxc3 bxc3 37.Rxe4 c2 38.Rxe7 Qxe7 39.Nd3 Qa3 40.Nc1 Qc3 41.Qf2 Nb4 42.Qe2 Ra8 43.Kf1 Ra5 44.g4 Kh7 45.h4 Na2 46.Kg2 Qc6+ 47.Qf3 Qc3 48.Qe2 Qb2 49.Qd2 Qb7+ 50.Kf2 Nb4 51.e4 Ra3 52.Re3 Ra1 53.g5 Qc7 54.g6+ Kg8 55.Kf3 Nc6 56.Rd3 Kf8 57.Kg2 Qe7 58.Re3 Qb4 59.Qxc2 Qxd4 60.Rc3 Rxc1 61.Qxc1 Qxe4+ 62.Kg3 Qe5+ 63.Kg2 Qe4+ 64.Rf3 Ne5 65.Qc8+ Ke7 66.Qe6+ Kf8 67.Qc8+ Ke7 68.Qe6+
½–½
In conclusion, it’s a case of “The Lord giveth, and the Lord taketh away”. In the specific position Rubinstein-Flamberg, 12…c4 was a bad idea. Black reveals his plan for the next few moves much too early and by the time he is ready to play his typical neutralising move (…Ne4) it’s already too late: White has had time to deploy his pieces to perfection and the retribution is swift!
A more flexible and less direct implementation of the plan worked out nicely for Black in the modern game Batsiashvili–Koneru as Black was ready to follow up …c4 (with tempo) immediately with …b5.
You can also conclude that move orders play a crucial role in successfully implementing the plan of …c5-c4. In Karpov’s game against Hort, Karpov assumed carelessly that he would be able to play …b5 at his leisure after playing …c4. Hort’s excellent 14.a4 disabused him of this notion and led to one of the worst defeats of Karpov’s career.
Postscript 22nd May 2016
James Vigus pointed out the following nice game from round 8 of the (still ongoing) European Championships in which Black used the plan of …c5-c4 (together with …f7-f5) to squeeze White’s position and stifle his activity. It worked extremely well!
Hammer – Yilmaz
European Individual Championship
1. c4 e6 2. Nc3 d5 3. d4 Nf6 4. cxd5 exd5 5. Bg5 c6 6. e3 Be7 7. Bd3 Nbd7 8.Qc2 Nh5 9. Bxe7 Qxe7 10. O-O-O Nb6 11. Kb1 g6 12. Nge2 Ng7 13. Ng3 Bd7 14. Rc1 h5 15. h4 O-O-O 16. Na4 Nxa4 17. Qxa4 Kb8 18. Rc3 b6 19. Ra3 Be8 20. Rc1 Ne6 21. Qa6 c5 22. Ne2
22…c4
23. Bc2 f5
24. Nc3 Rh7 25. Nb5 Qb4 26. Ba4 Rb7 27. Rcc3 Bd7 28. g3 Bc6 29. Kc1 Be8 30. Kb1 Ng7 31. Rc1 Ne6 32. Rcc3 Bc6 33. Kc1 g5 34. hxg5 Nxg5 35. Kb1 Ne4
36. Rc1 Nxf2 37. Nc3 Nd3 38. Rc2 Qd6 39. Bxc6 Qxc6 40.Ra4 Rg8 41. Rg2 Qe6 42. a3 Qxe3 0-1
Hi Matthew, thanks for another fascinating article and the insight into your training methods. An Exchange Queen’s Gambit Declined just played in the European Championship caught my eye: Hammer-Yilmaz. Before reading this, I’m sure I’d have rejected Yilmaz’s plan of 21…c5, 22…c4! and 23…f5 as weakening and unhealthy for the light-squared bishop – but it’s remarkable how quickly it induces White’s collapse. Best wishes, James
Hey James, thanks for that! That’s a nice spot – I’ve updated the article with the game you mention! Really interesting when you see a game like this: there’s so much emphasis on the dynamic aspect in modern chess, you can easily forget that grabbing space and just squashing the opponent can also be very effective! Best Wishes, Matthew
Excellent!!!!