
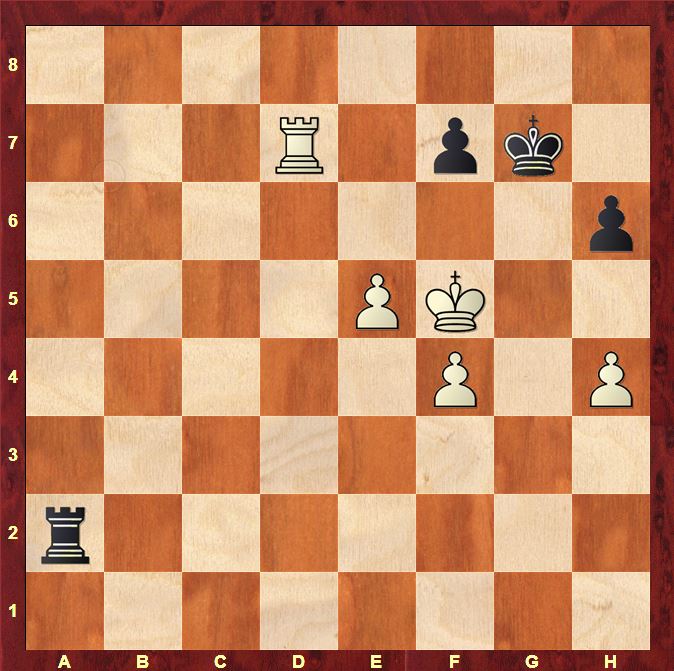
Just a few days ago, I had a Facebook chat with the Dutch IM Stefan Kuipers about the ending Arkell-Emms that is covered in Chess for Life. I noticed the game originally due to the creative way that Keith transposed into a Rook and pawn ending with 4 vs 3 on the same side.
Keith played 68.gxf4!! here. Keith won the rook ending very quickly when Black allowed him to get his pawn to f6:
68.gxf4!! Rc1 69.f5 Rh1 70.Rb7 Kg8 71.Rb8+ Kh7 72.f6
72…Rxh4+ 73.Ke3 Rh1 74.Rf8 h4 75.Rxf7+ Kh8 76.Re7 h3 77.Re8+ Kh7 78.f7 Re1+ 79.Kf4 g5+ 80.Kg3 Rg1+ 81.Kxh3
1–0
In Chess for Life, Natasha and I spent some time analysing the structures that arise after Black replies …gxf5 to f5 and came to the conclusion that they were drawn. I’ll just give the main variation here:
68…Rc3 69.Rb7
Forcing the king to the back rank before breaking with f5
69…Kg8 70.f5 gxf5+ 71.Kf4
71…Kg7 72.Rb6
72.e6 Kf6 73.e7 (73.exf7 Rc4+ 74.Ke3 Kg7 draws) 73…Rc4+ 74.Ke3 Rc8 75.Rd7 Ke6 76.Rd8 Rc3+ 77.Kd4 Kxe7 draws
72…Rc4+ 73.Kg5 Rc3 74.f4 Rg3+ 75.Kxf5 Rg1 76.Rb7 Kf8
If the Black king has to retreat to the back rank, then it’s important to retreat it to f8. This covers the e7 square and so prevents White from invading the Black position with Kf6–e7
77.Kf6 Rg6+ 78.Kf5 Rg1 which should be drawn
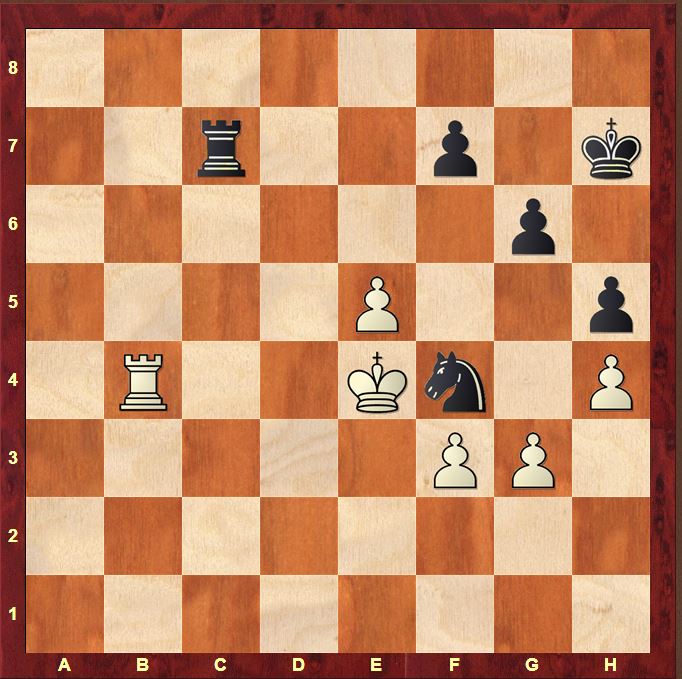
Stefan pointed out that this ending was very similar to the (in)famous game Aronian-Nakamura from the recent Candidates:
Here Nakamura blundered with 74…Kf8. In the post-mortem after the game, Aronian claimed that the ending was winning anyway once White gets in h5. This turned out to be an incorrect evaluation but it certainly wasn’t an easy hold for Black. Stefan’s comments got me interested and I did a little digging. Searching in Chessbase for this exact ending (with White holding the pawn advantage) between players averaging over 2300, after a little cleaning up I came to a total of 14 games. White’s average rating in these games was 2533, Black’s average rating was 2425.
| White wins | White draws | White loses |
| 6 | 8 | 0 |
| 42,9% | 57,1% | 0% |
So White has fairly good chances of winning this ending. There were quite a few entertaining episodes in these games so I thought it would be nice to organise them into a few themes and present a selection!
Stalemates
The White pawn on h5 is nasty for Black as it restricts the mobility of his king severely, but it also offers possibilities of stalemate tricks. Take a look at these 2 games:
Jobava,Baadur – Bayram,Yakup
Ankara 2002
61.Re8
Jobava has chosen an interesting way of playing this ending, placing the rook on e8 to take away f8 from the Black king. That means that f5–f6+ will force the Black king into the corner which is a dangerous place for the king to be.
61…Ra2
A very dangerous move!
61…Rg2+ 62.Kf3 (62.Kh3 Rf2 63.Kg3 Rf1 stops f4–f5 for now by keeping a hold on the f-pawn) 62…Rh2 was the right way as giving up the h-pawn leads nowhere 63.f5 Rxh5 64.Kg4 Rh1 65.f6+ Kh7 66.Rf8 h5+ 67.Kf5 Rf1+ draws 68.Kg5 Rg1+ 69.Kxh5 Rg5+
is the standard stalemate trick!
62.f5 Ra4+ 63.Kf3 Rh4
The attack against the h-pawn is much too late while Black also restricts his rook’s mobility unnecessarily.
63…Ra1 64.f6+ Kh7
is still drawn amazingly according to the tablebases. The position of the rook on a1 is key as 65.e6 can be met by 65…Rf1+ 66.Ke4 Rxf6 while the nicest way to meet 65.Kg2 (for example) is 65…Ra8! 66. Re7 Kg8 followed by …Kf8 which reaches the best defensive structure in this ending (see the last part of this article for more explanation and a link to analysis by Maxime Vachier-Lagrave)
64.f6+ Kh7 65.e6 Rh1
Black is a move behind compared to 63…Ra1. In the game however, Black still managed to hold after
66.Kg2 Re1 67.Rh8+
67.exf7 Rg1+ 68.Kf3 Rf1+ 69.Ke4 Re1+ 70.Kd5 Rd1+ 71.Ke5 Re1+ 72.Kd6 Rd1+ 73.Ke7 Rd7+ 74.Kf8 (74.Ke6 Rd6+) 74…Rxf7+
67…Kxh8 68.exf7 Kh7 69.Kf2
69.f8Q Re2+
69…Re5 70.f8Q Re2+ 71.Kf3 Re3+
Black simply keeps on checking on the e-file!
½–½
So how could White have won?
66.Ke2
was the right way to play. The point is that Black finds it much harder to give desperado rook checks when the White king is free on the queenside. The White queen interferes with any checks on the a3–f8 diagonal. Meanwhile White threatens Re7!
66…Rh2+ (66…Rh3 67.Re7; 66…Ra1 67.Re7) 67.Ke3 Rh3+ 68.Ke4 Rh4+ 69.Ke5 Rxh5+ No stalemate any more! 70.Kd6 Kg6 71.e7 Kxf6 72.Rh8.
A similar stalemate idea arose in the following game:
Ibrayev,Nurlan – Van Kampen,Robin
Pardubice 2008
On the brink of victory, White completely missed Black’s stalemating idea!
84.Ke6+
84.Ke8+ Kh8 85.f7 Rf2 86.Re6 wins (86.f8Q+ Rxf8+ 87.Kxf8 is not recommended!)
84…Kg8 85.Re8+ Kh7
I imagine that White intended 86.f7 here and only noticed now that 86…Rxf7 87.Kxf7 is stalemate! White has now lost his winning advantage.
86.Re7+ Kg8 87.Rg7+ Kf8 88.Rg4 Re1+ 89.Kf5 Kf7 90.Rg7+ Kf8 91.Rb7 Rg1 92.Rh7 Rg2 93.Rxh6 Rf2+ 94.Kg6 Rg2+ 95.Kh7 Kf7 96.Rg6 Rf2 97.h6 Rh2 98.Rg1 Kxf6 99.Rf1+ Ke7 100.Kg7 Rg2+ 101.Kh8 Rh2 102.h7 Rg2 103.Ra1 Kf7 104.Rf1+
½–½
Rook sacrifices!
We have already seen 1 rook sacrifice in Jobava’s game. Here is another which Black willingly accepts to go into a drawn Q vs R+P ending:
Lalic,Bogdan – Panchenko,Alexander
Sochi 1987
Black is playing very sensibly, keeping an eye on the h-pawn and thus restricting White’s movements. Lalic spots a tactical idea!
54.e5 Rxh5 55.e6 Rxd5 56.e7 Rd3+ 57.Kf2 Rd4
Unfortunately for White, this move saves it all
58.e8Q
58.Ke3 f5 59.Kxd4 Kf7 draws
58…Rxf4+ 59.Kg3 Rf5 60.Kg4 Rg5+
with a simple fortress
½–½
Always go into R, f & h pawns vs R!
A common way for White to attempt to make progress is to play e5-e6. In such cases, Black should jettison the h-pawn and play the (theoretically drawn) ending with R, f & h-pawn against R. In both cases where Black attempted to hang on to his h-pawn, he got into serious trouble. Ibrayev – Van Kampen above was one such example. Here is another:
Gurevich,Dmitry – Rechlis,Gad
Beersheba 1987
79.e6 fxe6+ 80.Rxe6 Rh1
80…Kf7 81.Rxh6 Kg7 82.Ra6 Rb1 is a theoretically drawn R, f & h pawn vs R ending (though never an easy one)
81.Re7+ Kf8 82.Kf6 Rxh5
Losing!
82…Ra1 keeping the rook active was a better option.
I was very nervous about Black’s position, but the tablebases confirm it’s still a draw as long as Black is happy to give up his h-pawn! 83.Re6 Rb1 84.Kg6 Rg1+ 85.Kxh6 Kf7 86.Rg6 Ra1 is another drawn R, f & h pawns vs R ending.
83.Ra7 Ke8 84.Ra8+ Kd7 85.f5 Rh1 86.Kg7 Rg1+ 87.Kf7 h5
and now
88.Rh8 Rh1 (88…Rg5 89.Kf6) 89.f6 h4 90.Rh7
Not easy! There are still plenty of pitfalls! 90…h3 91.Kg8+ Ke6 92.f7 Rg1+ 93.Kf8 with Ke8 to follow is just winning for White. The game was much less convincing!
Don’t let the White king into e7!
In an all-Armenian match-up, Lputian won this endgame against Sargissian when Black allowed the White king into e7. Sargissian could have prevented it right until the moment it happened! I do wonder though whether Aronian’s confidence was based on a hazy recollection of this game:
Lputian,Smbat G – Sargissian,Gabriel
Yerevan 1999
76.Kd6 Rf2
76…Kf8 was still possible as the f-pawn hangs after 77.Rb8+ Kg7. Once the king gets to e7, White gets a very unpleasant extra possibility
77.Ke7 Rf1 78.Rb6
A great idea!
78…Ra1
78…Rxf4 79.Rf6 Rh4 80.Rxf7+ Kg8 81.Rf5 is just winning
79.f5 Ra7+ 80.Kd6 Ra1 81.f6+ Kg8 82.Rb8+ Kh7 83.Rb7 Ra6+ 84.Ke7 Re6+ 85.Kxf7 Rxe5 86.Re7 Ra5 87.Ke6+
87.Ke6+ Kh8 88.Re8+ Kh7 89.f7 Ra6+ 90.Kd5 (not 90.Ke7 Ra7+ 91.Kf6 as I had originally posted. Can you see what I had missed and Stefan Kuipers pointed out?) Ra5+ 91.Kc4 wins
1–0
Let the pawn come to f6, but get your king out of the corner!
Maxime Vachier-Lagrave did some good analysis of this ending (see https://www.chess.com/news/aronian-joins-karjakin-as-nakamura-touches-king-4798) and concluded that Black could afford to allow White to advance his pawn to f6. The best and simplest defence for Black is then to play his king to e8 and defend passively with his rook on the back rank (we saw in Jobava – Bayram that the position can also be drawn with the Black king in the corner, but that is much more fraught!) There is one very impressive practical example of this. Black (the substantially lower-rated player) held for 114 moves with a basic structure of Kf8 + Rd8 once White had played f6!
Vukic,Milan – Kobas,Adnan
Zenica 1986
77.f6+ Kf8 78.Ra3 Rd1+ 79.Ke4 Rd8 80.Kf5 Rb8
81.Ra4 Rc8 82.Ra5
An important moment for Black. By covering the 5th rank, White has introduced the threat of e6. For example 82…Rb8 would be met by 83.e6 fe 84.Kg6 winning: White simply follows up with Ra7-h7.
82…Re8
The only move, but sufficient
83.Ra7
83.Rb5 is met by 83…Kg8 (again the only move). Now White has 2 attempts:
a. 84.e6 is met by 84…Rxe6 85.Rb8+ Kh7 86.Rf8 Rxf6+ forcing stalemate
b. 84.Rb6 (looking to force through e6) is met by the only idea 84…Ra8 (84…Rc8 or 84…Rd8 is also possible) when 85.e6 Ra5+ drives the king back before capturing on e6.
83…Rb8 84.Rc7 Ke8 85.Ke4 Rb1 86.Kd5 Rd1+ 87.Kc6 Rc1+ 88.Kb7 Re1 89.Re7+ Kf8
90.Kc8 Rc1+ 91.Kd8 Rd1+ 92.Rd7 Re1 93.Rd5 Re2 94.Kd7 Re1 95.Ra5 Rd1+ 96.Kc6 Rc1+ 97.Rc5 Rd1 98.Rd5 Rc1+ 99.Kd6 Re1 100.Rd2 Ke8 101.Rd3 Ra1 102.Kd5 Ra5+ 103.Ke4 Ra4+ 104.Rd4 Ra1 105.Rb4 Re1+ 106.Kd5 Rd1+ 107.Rd4 Re1 108.Kd6 Ra1 109.Rd5 Re1 110.Rd3 Ra1 111.Kc5 Ra5+ 112.Kd6 Ra1 113.Rb3 Rd1+ 114.Kc6
½–½
Just as a little aside. When analysing this endgame, it occurred to me that Black was only able to defend passively (with both his king and rook on the 8th rank) due to the presence of the pawns on h5 and h6 which block an entry route for White’s pieces via the kingside. Remove these pawns, and the ending would be winning as in the game Hebden-Arkell Milton Keynes 2008:
Here Mark played 67.Rd2 and only reached the winning structure after a few sidesteps. White could put Black into awful trouble immediately with the lovely idea
67.Rb2 Ke8 68.Rb1
A beautiful preparatory move, making sure that if Black looks for counterplay with his rook round the back, then he will have to check from the second rank (with reduced checking distance between his rook and the White king)
68…Kf8 69.Kg5
This is it. The White king is invading on the kingside!
69…Kg8 70.Kh6 Re8 71.Rb7 Kf8 72.e6
The key point!
72…Rxe6 73.Rb8+ Re8 74.Rxe8+ Kxe8 75.Kg7 wins.
Amazing how little differences can mean so much in rook endings!
In conclusion then, it wasn’t exactly easy, but it definitely was possible to hold this in a practical game. Thanks a lot to Stefan for providing the idea for this article!
This is very interesting (and entertaining). Matthew, I know you have the enthusiasm, but where do you find the time?!
The ending is even more tricky than I thought, and I think it just shows how wrong it was to say that Naka touched his king in a “drawn” position, when he hadn’t yet
demonstrated how he would hold.
Hi Jonathan! Thanks for your comment! Yes I agree completely – I think that Naka still had a fair way to go before he reached a draw. He fell more or less at the first hurdle, but there were plenty more to come! Best Wishes Matthew