
In this article, we will examine endings in which White’s pawn has not yet moved past the 4th rank, but Black’s king is cut off from the pawn (and is thus unable to move over and blockade the pawn) on the long side (thus interfering with any attempts from Black to check from the side). It is once more a case of the Lord giveth and the Lord taketh away – White’s pawn is further back but Black has to prevent its further advance primarily with his rook.
We will start once again with the most common theoretical position in this configuration:
K, R & Bishop’s pawn – 4th rank.
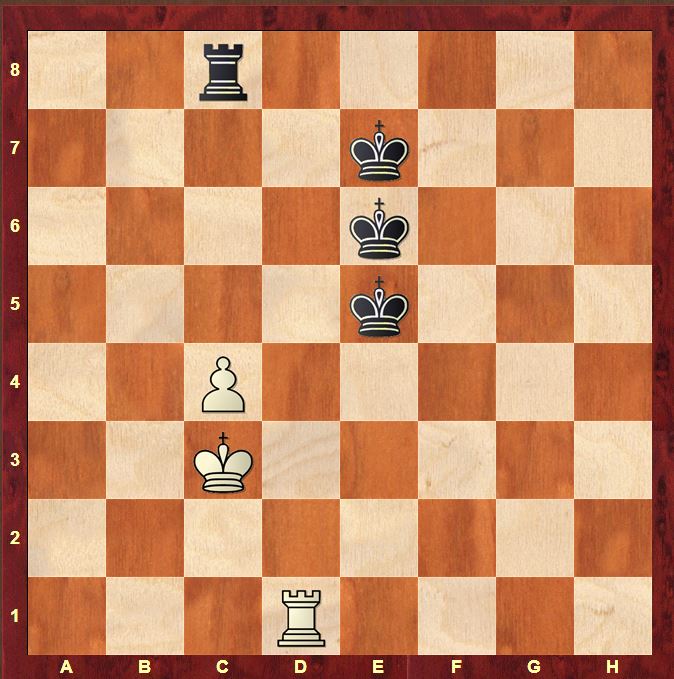
This demonstrates the typical disposition of forces:
- White’s rook prevents the Black king from moving across to block the pawn. The Black king is on the long side of the pawn and stands typically on e7, e6 or e5.
- The White pawn is supported by the White king but is prevented from advancing further by the rook in front of it.
How will White be able to advance his pawn? As soon as the king pops its head out from behind the pawn to support c4–c5 e.g. with 1.Kb4, then the Black rook will check it directly and not allow the king to settle.
Just as in the examples we saw earlier with lateral checks, the White king will have to run towards the rook in order to bridge the rook’s checking distance and smother the checks. He can’t do this by running in front of his pawn: White’s king needs to run towards the rook but away from his pawn so that Black cannot simultaneously check and attack the pawn. There’s only one way to do it, and it requires a bit of room to the left of the pawn. More specifically: it requires the bishop’s pawn at least!
K, R & Bishop’s Pawn – Black King passive
1.Kb4 Rb8+ 2.Ka5
This is what I meant: the king evades the checks without getting in front of his pawn.
2…Rc8
2…Ra8+ 3.Kb6 Rb8+ 4.Kc7 is much more accommodating from Black. White simply pushes his pawn and Black’s king is on the long side against a bishop’s pawn which loses (Rule #2)
3.Kb5 Rb8+ 4.Ka6 Rc8
Again Black’s best defence, attacking the pawn with his rook whenever White’s king strays away from its defence. How should White proceed? For now, his king has done all it can. White now has to use his rook to counter Black’s attack against the c-pawn and allow White’s king to continue its smothering of Black’s rook on the next move.
4…Ra8+ 5.Kb7 Again allows White to smother Black’s checks leaving him free to advance his c-pawn.
5.Rd4 Ke6 6.Kb7
Trying to force the rook away from the c-file so that the c-pawn can advance.
6…Rc5 7.Kb6
Protecting c5 with tempo.
7…Rc8 8.c5 and the pawn will soon queen.
How can Black defend? I suppose the clue lies in Black’s 5th move. Imagine the Black king had already been on e6
K, R & Bishop’s pawn – Black king active
1…Ke5
Putting pressure on the rook at once which doesn’t give White the time for Kb7
2.Rh4
2.Kb7 Kxd4 3.Kxc8 Kxc4; 2.Rd5+ Ke6 3.Kb5 Rb8+
2…Kd6 and the Black king makes its way to the White pawn securing a draw
If the Black king were already on e5, then White would not even be able to play Rd4!
We thus have our ninth rule: when White’s has a bishop’s pawn on the 4th rank supported by his king and Black’s king is cut off by 1 rank on the long side of the pawn, Black should defend by placing his rook in front of the pawn and his king on the 5th or 6th rank, ready to interfere with the White rook.
Other formations are possible which is not too surprising: with the pawn on the 4th rank, Black should have a wider choice of defensive possibilities than when the pawn reaches the 6th rank. However, the formation described above is by far the simplest.
It’s now time to focus on the ways that White can cut off the Black king. For the terminology, I’m indebted to the Spanish GM Jesus de la Villa Garcia and his stunning endgame book “100 Endgames You Must Know”, which in my view is – by a distance – the best practical endgame handbook ever written.
The “Horizontal Cut”
We have already seen the cut along the file which is familiar to all chess players. However, the cut along a rank can also be very powerful. We will first take a look at the cut that De la Villa Garcia has christened the “Horizontal Cut”
Horizontal Cut
When we looked at these positions before, we said that the Black king should be on e6 or e5, but we didn’t mention e4. That might seem a little strange as from e4, the king also stops the White rook from protecting the pawn from d4. However, there is a downside to going all in with the king.
1.Rd5
The “Horizontal Cut”… and this one will definitely hurt in the morning. The painful part for Black is that White no longer needs his king to advance his pawn to c5.
1…Rc7 2.Rh5 Rc8 3.c5
The rook on the 5th rank supports the advance of the c-pawn to the 5th rank and also prevents the Black king from using the d5 square to get closer to the pawn. All White has to do is to repeat this procedure all the way to the queening square.
3…Rc7 4.Kc4 Rc8 5.Rh6 Ke5 6.c6 and White wins
Our tenth rule is: do not let your king get cut off along a rank when defending against a passed pawn.
The “Half Cut”
There is also a grey area which De la Villa Garcia has christened the “Half Cut”:
Half cut – White to play
Here the Black king is still prevented from moving across to the c-pawn by a cut along the rank, but the Black king has a little more freedom than in the previous example. For example, whenever White plays c4–c5, he must take account of Black’s move …Kd5 (which was impossible in the previous example). The White rook also does not support the move c4–c5 so White will again need to use his king for that. The evaluation of the position depends on who is to move. With White to move, White wins:
1.Rb6
Protects the White king from checks and allows Kb4 and c4–c5 in complete safety
1…Rc7 2.Kb4 Kd4 3.Rd6+ Ke5 4.c5 wins
With Black to play, the result is a draw:
Half Cut – Black to move
Here Black has just one move to draw. When you know that White’s plan is to play Rb6 and Kb4, it’s not hard to imagine which move Black should play!
1…Rb8
prevents both Rb6 and Kb4!
2.c5 Kd5
Our eleventh rule is a general rule: a “Horizontal Cut” is more powerful than a “Half Cut”.
Our twelfth rule is: Black defends against a Half Cut by actively forestalling White’s king from moving up and supporting the advance of its pawn with his rook.
The last position we will consider on this theme is one in which the Black king is cut off by 2 ranks:
K,R & Bishop’s Pawn 4th rank – Black king cut off by 2 files
Here Black’s king is well-placed to annoy the White’s rook when it comes to e4. However the increased distance of the Black king from the White pawn gives White an additional easy way of forcing his pawn through.
1.Kb4 Rb8+ 2.Ka5 Rc8 3.Kb5 Rb8+ 4.Ka6 Rc8 5.Rc1 Ke7 6.Kb7 Rc5 7.Kb6 Rh5 8.c5 Kd8 9.Rd1+ Kc8 10.Rg1 wins
Our thirteenth rule is: when White has a bishop’s pawn on the 4th rank and the Black king is cut off by 2 files, White wins.
Just to round off, the 13 rules so far in one table:
| Material | Rule# | Rule |
| White has a knight’s pawn (b- or g-pawn) on the 5th rank supported by his king | 1 | Black MUST get his king in front of the pawn |
| White has a bishop’s pawn (c- or f-pawn) on the 5th rank supported by his king,
|
2 | Black’s king must always be able to escape to the short side so that Black’s rook can check laterally from the long side. |
| White has a central pawn (d- or e-pawn) on the 5th rank supported by his king
|
3 | Black’s king can be either on the short side or long side to hold a draw. Defence with the king on the long side requires greater precision. |
| All positions | 4 | You should always place the king on the short side if given the choice. |
| White has a knight’s pawn on the 6th rank supported by his king on the 6th rank. | 5 | As long as he can get his king in front of the pawn, Black can hold the draw with passive defence |
| White has a bishop’s pawn or central pawn on the 6th rank supported by his king on the 6th rank. Black’s king is in front of the pawn.
|
6 | Never allow this unless you are able to drive the king away immediately with rear checks. The defensive technique to achieve this is Philidor’s defence |
| White’s has a central pawn on the 6th rank supported by a king on the 7th rank | 7 | Play the king to the short side and the rook to the long side with maximum checking distance, while standing guard over the back rank. |
| All positions | 8 | You should always maintain maximum checking distance between the Black rook and the White king |
| White has a bishop’s pawn on the 4th rank supported by his king and Black’s king is cut off by 1 file on the long side of the pawn.
|
9 | Place the rook in front of the pawn and the king on the 5th or 6th rank, ready to interfere with the White rook. |
| All positions | 10 | Do not let your king get cut off along a rank when defending against a passed pawn. |
| All positions | 11 | A “Horizontal Cut” is more powerful than a “Half Cut” |
| White has a bishop’s or knight’s pawn on the 4th rank supported by his king and Black’s king is “Half Cut” | 12 | Actively forestall White’s king from moving up and supporting the advance of its pawn with his rook. |
| White has a bishop’s pawn on the 4th rank and the Black king is cut off by 2 files | 13 | White wins |
So that’s the lot for this article. In the next article, we’ll round off our look at the theory of King, Rook and Pawn against King and Rook by looking at positions with a Rook’s Pawn.
Quite easy when it is explained like this!
Thank once again.