
In this article, I look back to an ending I played in the 4NCL in November 2015. It was a weekend of endgames for me as the queens came off the next day as soon as move 14!
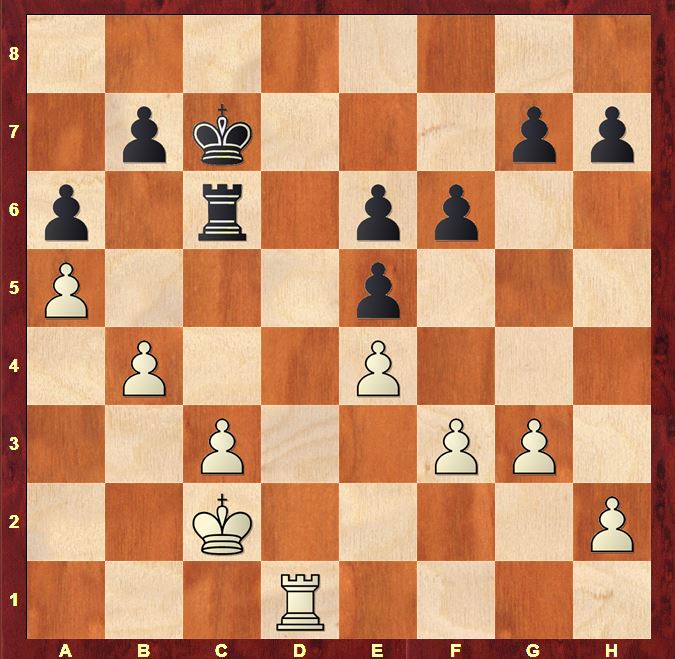
I reached the position in the diagram after 31 rather dour moves. I felt my position should be winning in routine fashion as White is effectively a pawn up: create a passed pawn on the queenside and win! Unfortunately, I didn’t manage to assess all of the possible king and pawn endings accurately which led me to complicate my task considerably. A playable version of this analysis is available at http://cloudserver.chessbase.com/MTIyMTYx/replay.html
Sadler,Matthew D – Roberson,Peter T
4NCL 2015
1.e4 e6 2.d3 c5 3.g3 Nc6 4.Bg2 Nf6 5.Nf3 Be7 6.0–0 0–0 7.Re1 d6 8.c3 Bd7 9.a3 Qc7 10.Nbd2 Ne5 11.Qe2 Rac8 12.Nxe5 dxe5 13.a4 a6 14.a5 Rfd8 15.Nb3 c4 16.dxc4 Qxc4 17.Qxc4 Rxc4 18.Be3 Bb5 19.f3 Rcc8 20.Bf1 Bxf1 21.Kxf1 Kf8 22.Ke2 Ke8 23.Nc1 Nd7 24.Nd3 f6 25.Red1 Nc5 26.Nxc5 Rxd1 27.Kxd1 Bxc5 28.Bxc5 Rxc5 29.Kc2 Kd7 30.Rd1+ Kc7 31.b4 Rc6
I spent a lot of my remaining time trying to understand the position. I got some things right but certainly not everything. White’s basic idea is to push b4–b5 without allowing Black to get his king to c5. It is easy to imagine that we will have a number of face-off situations where White will win if Black gives way. In those situations, Black will need to use a reserve tempo on the kingside to maintain his king’s position. Black has a fair number of these reserve tempos, but White also has his fair share of face-off situations:
1. Kc4 vs Kc6
2. Ka4, Pc5 vs Kc6
3. Kc4, Pc5 vs Kc6
…leading to…
4. b5+ …axb5, Kb4
The order in which these situations are presented is not coincidental: White can use each of them in turn to cream off Black’s reserve tempi. White can also try to turn the kingside pawn structure to his advantage. Just to orientate ourselves in the situation, let’s assume that Black is to move and offers the exchange of rooks with 32…Rd6. How would White win then?
32.– Rd6 33.Rxd6 Kxd6 34.h4 g6 35.g4 h6
was the first defence I thought of, trying to keep the maximum tempi in reserve with a flexible kingside pawn structure. There is a drawback however: In this structure, White also has a reserve tempo on the kingside: h4-h5.
36.Kd3 Kc7
36…Kc6 37.Kc4 h5 38.gxh5 gxh5 39.Kb3 Kc7 40.c4 –> leads to the game
37.Kc4
This manoeuvre is very important to force Black to lose one of his reserve tempi. It makes the win trivial
37…Kc6 38.h5
Fixing the kingside pawn structure and giving Black the move.
38…gxh5 39.gxh5 f5
Black expends one of his reserve tempi.
40.Kb3 Kb5 41.c4+ Kc6 42.Ka3 Kd6 43.Ka4 Kc6 44.c5 f4
Black expends his second reserve tempo… and suddenly, he has none left!
45.Ka3 Kc7 46.Kb3 Kd7 47.Kc4 Kc6
48.b5+ axb5+ 49.Kb4
is the typical variation.
Without quite fathoming out all of this, I made a good start with 32.h4. As we have seen, the further advanced the h-pawn, the fewer reserve tempi options Black has.
32.h4 h5
All of a sudden I got cold feet about the king and pawn endings that could arise!
32…Rd6 33.Rxd6 Kxd6 34.h5 g6 35.hxg6 hxg6 36.g4 was precisely what I was aiming for. The beauty of this line is that after Black plays …f5, then g5 forces Black to use up yet another reserve tempo
32…g6
Trying to restrain the cramping of kingside without committing himself to …h5 is well met by
33.h5 gxh5 34.Rh1
33.Rg1
Not good!
33.Kb3 Rd6 34.Rxd6 Kxd6 35.g4
would have been winning
35…g6
35…g5 36.gxh5 gxh4 37.h6 White is quicker and Black cannot stop the pawn
36.gxh5 gxh5
Placing the pawn on h5 is a better defence for Black than playing …h6 as we saw before. By fixing White’s kingside pawn structure, Black destroys any reserve tempi for White on the kingside while still keeping 2 reserve tempi for himself.
37.c4
37.Kc4 Kc6 and White has to give way without forcing Black to expend any of his kingside tempi.
37…Kc6
I couldn’t work out how to win this during the game (which explains why I avoided the exchange of rooks) but… there is a way
38.Kc3 Kd6 39.Kd3 Kc6 40.Ke3 Kc7 41.f4 exf4+
41…Kd6 42.c5+ Kc6 43.fxe5 fxe5 44.Kd3 Kb5 45.Kc3 Ka4 46.Kc4
42.Kxf4 Kc6
42…Kd6 43.e5+
43.e5 f5 44.Kg5
Amazing but true! The king penetrates to the kingside. That’s the downside to fixing the kingside pawn structure with …h5 instead of waiting with …h6! I just didn’t appreciate the difference during the game.
33.g4 is also winning though it’s a little more complicated 33…hxg4 34.fxg4 Rc4 35.Kd3 Rc6 36.c4 Rd6+ 37.Ke2 Rd4 38.Rxd4 exd4 39.e5
Back to the game, I avoided the exchange of rooks with 33.Rg1 and started to create play on the other wing.
33…Rd6 34.g4 hxg4 35.Rxg4 Rd7
White is still much better in this endgame, but it’s no longer easy!
36.Kb3 Kc6 37.h5 Rf7 38.Rg1 Rd7 39.Rg2 Rf7 40.c4 Rd7 41.Kc3 Rf7 42.Kb3 Rd7 43.Ka4 Rf7 44.Rg6 Kd6 45.Rg1 Kc6 46.Rd1
46.Rg2 Rd7 47.Rg6 Rf7 48.c5
was what I had been planning, but suddenly I got worried by
48…Kc7 49.b5 Rd7
I thought this was a miracle defence…
50.Kb4 Rd4+
50…Rf7 51.h6 gxh6 52.b6+ Kc6 53.Rg8 Kd7 54.Rb8)
51.Kc3 axb5
51…Rd7 52.bxa6 bxa6 53.h6 gxh6 54.Rxf6 Rh7 55.Rxe6 h5 56.Rxa6 Rh8 57.Rg6 h4 58.Rg2 h3 59.Rh2 Kc6 60.Kc4.
52.Rxg7+ Kc6
However
53.h6 Rd1 54.h7 Rh1 55.Re7
still looks very strong.
I also spent a long time looking at
48.h6 gxh6 49.Rxh6 Kd6 50.c5+ Kc6 51.Kb3
51.Rg6 Rf8 52.Rg7 f5 53.Re7 (53.Rg6 fxe4 54.fxe4 Kd7 55.Rg5 Kc6 56.Rxe5 Rf6) 53…fxe4 54.fxe4 Rf6
51…Kd7 52.Kc4 Kc6 53.Rg6 Rf8 54.Rg7 f5 55.Rg6 Kd7
and now
56.c6+
…which I hadn’t seen this
56…Kxc6 (56…bxc6 57.Kc5) 57.Rxe6+ Kc7 58.Kd5
Not sure how winning this is!
Unsure of myself, and influenced by Black’s time shortage, I decided to play around in non-committal fashion for a little while longer with 46.Rd1
46…f5
Black decided by contrast to undertake action. It’s the right choice
47.c5 fxe4 48.fxe4
48…Rf6
48…Rf4 I was rather pessimistic about my winning chances after this move
49.Rd6+ Kc7 50.Rxe6 Rxe4 51.Rg6 Rh4 52.Rxg7+ (52.Rg5 Kc6 53.Rxe5 Rg4) 52…Kc6 53.Rh7 Rh3 seemed drawn to me.
However, after the passive 48…Rh6 I was happy again. My whole position made sense again!
49.Rd6+ Kc7 50.b5 axb5+ 51.Kxb5 Rh6 52.a6 bxa6+ 53.Rxa6 Rxh5 54.Ra7+ Kd8 55.Kc6
An easy position for White to play. He’s so active!
55…Rh4 56.Kd6 Kc8 57.c6 Kb8 58.Rb7+ Ka8 59.Rxg7 Rxe4 60.Rg8+ Ka7 61.c7 Rd4+ 62.Kxe5 Rc4 63.c8Q Rc6 64.Qd7+
1–0