
Part of my routine daily work as a chess professional was to run through a set of about 100 endings and make sure they were committed to memory. These encompassed typical endings in various material configurations, and of course R&B vs R was one of them. I don’t have time to do that sort of work anymore, but I do still try to refresh my recollections of a few key endings before a tournament. While reproducing the winning sequence of R&B vs R the other day, I suddenly caught myself thinking “But do I still understand what I’m doing here?” That was a trigger to spend some time explaining the ending to myself again. After I looked at what I’d written, I thought it might be of interest to others as well and that is the background to the next few articles. The game is available again in playable form at http://cloudserver.chessbase.com/MTIyMTYx/replay.html
For ease of language, White is always the stronger side (with the bishop) and Black is always the weaker side. In this article, I will explain the key Philidor winning position in detail. In a subsequent article, I will examine some of Black’s defensive techniques as well as some of the traps that defenders typically fall into.
I would like to start this examination of R&B vs R by looking at the most impressive piece of pre-computer analysis I’ve ever seen. In 1749, Philidor analysed this position to a win. 268 years later, grandmasters are still struggling to remember how he did it! The winning procedure is complicated so I will break it into smaller parts first before demonstrating the complete solution.
The Black king cannot escape
The first point to understand about this piece configuration is how restricted the Black king is. The Black king can only escape to the 2nd rank via b8–a7 and via f8–g7. In both cases, the Black king must run for 2 moves from d8 before he gets a sniff of freedom. Add a White rook running loose to the mix (which could give mate from a8 if the Black king were to run to b8, and mate from g8 if the Black king ran to f8) and you understand that Black’s chances of defending by running with his king are negligible. How then should Black defend?
Checkmate on the 8th rank
White can only checkmate Black by giving check on the 8th rank. With the Black king in the centre, White can give checkmate from both sides of Black king. Black’s only possible reply in that case is to interpose his rook in between his king and White’s rook.
Black’s best defence is therefore to keep his king in the centre and move his rook to either side of the king where appropriate to block White’s checks from the 8th rank. Black’s rook should also be ready to check the White king on the d-file if White’s bishop moves forward to restrict the Black king still further.
1…Re2 2.Ra1 Rc2 3.Ra8+ Rc8 4.Ra1 Rc2 5.Rg1 Re2 6.Rg8+ Re8 7.Rg7 Re2 8.Be6 Rd2+ 9.Bd5 Re2
Disruption on the 7th rank
What options does White have to disrupt Black’s defensive formation? For the smooth operation of Black’s defensive technique, his king needs to remain central so that his rook can slot in on either side when needed. However, White can disrupt the Black king’s position by giving a check on the 7th rank.
1.Rd7+ Ke8
The best defence
1…Kc8 loses very simply
2.Ra7
Ra8# is threatened and Black can no longer establish a defensive structure with a king on d8 and a rook on c8.
2.Rb7
3.Rb8# is threatened and Black can no longer block with a rook on the c-file. Black’s only option is to run:
2…Kf8 3.Rf7+ Ke8
Not 3…Kg8 4.Rf3+. Here the onus is on White again to make progress. We will see how White manages this in a little while, but remember for now the 2 important points:
1. Black aims to defend by keeping his king central and moving his rook to the appropriate side of his king to block checks on the 8th rank from the White rook
2. White disrupts Black’s defensive structure via operations on the 7th rank. This is a crucial operation: the goal of one of Black’s main defensive techniques in this ending – the “second rank defence” – is to prevent White from establishing control over the 7th (or 2nd) rank.
Restricting the White bishop by checking from the back (3rd rank)
Black’s rook has to be ready to check White’s king on the d-file if White’s bishop moves away from d5. Does it matter though where the Black rook checks from? Is there a difference between the squares e3,e2 and e1?
Intuitively e3 feels riskier for Black than e2 or e1. The closer the rook is to the king, the shorter the checking distance… but in this case, checking distance isn’t a factor. If Black forces the White king to take a step back from d6, then he’s delirious with joy! He doesn’t need another check after that! There are however 2 drawbacks to the e3 square: one obvious, and one very subtle.
The first drawback is that the rook has no access either to the b-file or the f-file as both b3 and f3 are covered by the White bishop on d5. This reduces Black’s defensive capabilities. For example,
1.Rd7+ Kc8 2.Ra7
wins immediately as Black cannot even attempt …Rb3 to block Ra8# with …Rb8.
The other drawback to e3 is that Black’s check on the d-file is on a white square (d3). This potentially gives White an opportunity to move his bishop away from d5 while preventing the check of the Black rook at the same time. This means that the bishop could retreat to c4 or e4 (if it wasn’t hanging) and Black would be unable to check White’s king back from d6. Intriguing… but how can this help us? The answer is Philidor’s first bit of genius.
1.Rd7+ Ke8
1…Kc8 2.Ra7 wins immediately as we have seen
2.Ra7 Kf8 3.Rf7+ Ke8
3…Kg8 4.Rf3+ still wins
4.Rf4 A nasty little move that threatens Bc6+ followed by Rf8+. Black can defend in 2 ways:
A. 4…Rd3
Prevents Bc6+ but disturbs Black’s defensive structure and the retribution is swift:
5.Rg4 Black’s rook cannot get to f3 so Rg8+ is terminal!
B. 4…Kd8
The most obvious of course: 5.Rf8+ is met by 5…Re8
5.Be4
Wonderful! The bishop interrupts the Black rook’s access to the back rank without allowing a check on the d-file. The bishop still covers b7 so running with the king to c8 allows simply Rf8#. Black’s only other move is
5…Ke8
but now
6.Bc6+ Kd8 7.Rf8+ Re8 8.Rxe8#
Fabulous coordination by the rook and bishop. Note the value of White’s manoeuvre 2.Ra7: this forced the king to f8 and allowed White to play 3.Rf7+–f4 all with gain of tempo. It feels very unnatural to help the Black king to run away from danger, but as we know by having the studied the Kd6,Bd5 vs Kd8 piece configuration, the Black king is like a puppet on a string for us!
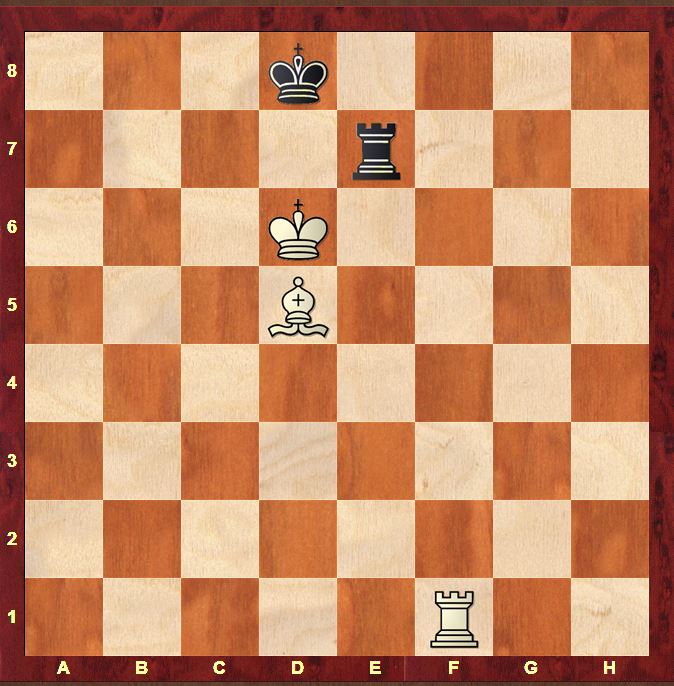
Restricting the White bishop by checking from the back (1st rank)
So is there a better square than e3? Well if you’re very clever, you may have figured out that e2 is Black’s safest defensive square as it enables him to check on the d-file from a dark square (d2). However, what happens if Black’s rook is on e1? In similar fashion to the previous example, White could move his bishop to b3 or f3 and still prevent a check from d1… but then White’s bishop is very far from the Black king! Can this be dangerous?
1.Rb7
The most difficult move to remember of the whole ending in my opinion.
1…Rc1
So far so good: Black maintains his defensive structure.1…Kc8 transposes to a line we saw earlier! 2.Ra7 Rb1 3.Rh7 Kb8 4.Rh8+ Ka7 5.Ra8+ Kb6 6.Rb8+
2.Bb3
Here it is. White’s bishop retreats. There is no concrete threat: White isn’t threatening mate on the 8th rank any more than he was on the previous move. So OK, all Black has to do is make a decent move and then the onus is on White again… Hmm… a decent move. It’s not that easy for Black! The rook can’t move away from the c-file, and since c2 is covered the only waiting move Black can play with the rook is 2…Rc3. However, we know already that the Black rook is badly-placed on the 3rd rank and it’s no surprise that White wins in similar fashion to the example we saw earlier. For that reason, Black’s best attempt to maintain his defensive structure is to play
2…Kc8
2…Rc3 3.Be6 Rd3+ 4.Bd5 Rc3 5.Rd7+ Kc8 (5…Ke8 6.Rg7) 6.Rg7 Kb8 7.Rb7+ Kc8 (7…Ka8 8.Rb3+) 8.Rb4 Kd8 9.Bc4
3.Rb4 Kd8
Since 4.Bc4 allows 4…Rd1+, Black seems to be holding on, but now the second moment of Philidor genius kicks in:
4.Rh4 Re1
4…Kc8 5.Bd5
Threatening Rh8#
5…Kb8
to block 6.Rh8+ with 6…Rc8
6.Ra4 Mate on a8 is unstoppable!
Back to 4…Re1
5.Ba4
A fabulous move! From a4, the bishop stops the Black rook from checking the White king and also interferes with Black’s defensive structure. Black can no longer ensure that a White check on the 8th rank can be met by the interposition of his rook so he has only one option left: to flee!
5…Kc8
This doesn’t look so bad. It exploits the drawback to removing the bishop from d5: White is no longer covering the b7 square with his bishop. However, White has the fantastic
6.Rb4
winning. Black cannot stop Bd7+ and Rb8+ mate! The move 2.Bb3 therefore placed Black in zugzwang. This is the first time we have seen this, but not the last!
Restricting the White bishop by checking from the back (2nd rank)
So this would seem to be the ideal Black defensive structure: with the rook on e1 or e3 Black loses, but with his rook on e2, Black will check the White king on the d-file from a dark square if the bishop moves. Fair enough, but what if White waits?
1.Rh7
I think you see the problem: zugzwang! Both king moves allow mate, while any rook move ruins Black’s ideal defensive structure! Black is lost!
Putting it all together
So it’s time to put it all together! Hopefully now, it will all make perfect sense! I’ll just give the variations with a few little memory pointers along the way.
1.Rf8+ Re8 2.Rf7
The rook goes to the 7th to allow White to disrupt Black’s ideal defensive structure.
2…Re2
The best square for the rook: Black can check the White king on the d-file from a dark square (d2) that cannot be controlled by White’s light-squared bishop.
3.Rh7
Zugzwang!
3…Re1
3…Re3 4.Rd7+ Ke8 (4…Kc8 5.Ra7) 5.Ra7 Kf8 6.Rf7+ Ke8 7.Rf4 Kd8 8.Be4 Coordination!
4.Rb7 Rc1
4…Kc8 5.Ra7 Rb1 6.Rh7 Kb8 7.Rh8+ Ka7 8.Ra8+ Kb6 9.Rb8+
5.Bb3
5…Kc8
5…Rc3 6.Be6 Rd3+ 7.Bd5 Rc3 8.Rd7+ Kc8 (8…Ke8 9.Rg7) 9.Rh7 Kb8 10.Rb7+ Kc8 11.Rb4 Kd8 12.Bc4 Coordination!
6.Rb4 Kd8 7.Rh4
Very typical use of the mobility of White’s rook operating effortlessly on both flanks
7…Re1
7…Kc8 8.Bd5 Kb8 9.Ra4 The king can try to run… but try is all it is
8.Ba4 Kc8 9.Rb4 Coordination again!
To learn this ending properly, I would try to practise repeating these sequences with reversed colours, and with the board turned around 90 degrees to get you used to the situation that is likely to occur in a practical game. 10 minutes a day on your pocket set in the train on your way to work will turn you into a R&B vs R monster within a couple of weeks!
A few days ago a GM could not mate in blitz with Knight and Bishop while the Internet was watching 🙂 See PRO Chess League: Mating With Bishop And Knight/chess.com https://www.youtube.com/watch?v=OO0PtF8F3-Q ; https://en.wikipedia.org/wiki/Bishop_and_knight_checkmate
Great explanation! Thank you very much. I have once seen the practical problem of defending such a constellation live in Groningen 1994 where the defending player was short on time (Hodgson – van der Wiel). No chance of survival. This reminds me of Mark Dvoretsky stating (referring to a white rook + h4-pawn vs bishop): if you don’t KNOW this kind of ending you will never find it over the board!
Hi Ulrich, thanks for that! It’s a real nightmare indeed with no time – so confusing, and so many ways to stumble into the Philidor position! We’ll see a few of those in the next couple of articles! Best Wishes, Matthew
Hi Matthew,
Many thanks for putting together this brilliant explanation! In fact, I’m enjoying all your blog articles and I haven’t even had a chance to look at the videos yet … Specifically, on R+B vs. R I think I’m slowly getting to grips with this with your help. I had studied the endgame a few years ago using Jonathan Hawkins’s book (which I think is also excellent). I thought I knew the win, but of course I find now that I had forgotten all the details. The particular problem I had was the move Rb7 in the position Kd6, Rf7, Bd5 vs. Kd8, Re1 which you helpfully highlighted. It’s interesting that it’s exactly the position where Caruana also slipped up in the recent Candidates. One thing that I am still confused about is your section entitled Disruption on the 7th rank. Should the black rook be on e3 here? Otherwise it’s not completely obvious to me what happens after 1.Rd7+ Ke8 2.Rb7 Kf8 3.Rf7+ Ke8 4.Rf4 Rd2 5.Rg4 when Rf2 sort of defends (though not in a tablebase sense). The move 1.Rh7 putting Black in zugzwang as you give later seems a bit simpler. All the best, Peter
Hi Peter, thanks for your comment! You are absolutely right – that section is confusing using an example with a rook on e2. With the power of instant publishing, I’ll change it asap! Thanks a lot and glad you’re enjoying the blog! Best Wishes, Matthew
Today a +2670 GM had problems with the Philidor position with more than 2:30 minutes left:
https://youtu.be/Cg8MQ_3Cz38?t=25s
Here is an online tablebase up to 6 pieces:
http://www.shredderchess.com/online-chess/online-databases/endgame-database.html
Since December I’ve been making a huge effort to improve my endgames, doing over 1000 exercises on chesstempo. Time and again I kept thinking, on attempting R+B v R, “I have not got a blind clue what I’m trying to do here.” Stumbling upon your blog has been a godsend for my understanding in this area. Thank you for the detailed explanations!
Hi Moss, thanks a lot! Glad it helped! Best Wishes, Matthew
Thanks Mathew,I need critical endgames