
In a previous article, I examined the winning technique from the Philidor position in detail. In the next couple of articles, I want to spend some time on the best way to defend the rook and bishop against rook ending.
To help me, I put together a database of decisive rook and bishop against rook endings between players averaging more than 2300. That came to 686 games. I’ve now played through about 130 of these, I’m planning to play through all of them, but it’s safe to say that I’ve seen some trends already. The first thing that struck me was how often the defending side went wrong quickly. Discounting incomplete games and games in which the entry point to the rook and bishop against rook ending was lost anyway, I came up with these statistics for the remaining 81 games:
| Starting move of R&B vs R | Moment at which the weaker side was lost (forced mate) | #Moves to mate |
| 69 | 90 | 18 |
The fact that so many strong players lost the ending within about 20 moves is an indication of how difficult the ending is to defend. Many books teach the defensive side of the ending by explaining 2 techniques: Cochrane’s defence and the second-rank defence. The idea is: apply these consistently and stay out of trouble.
The question is, will you manage that in a practical game? In many of these endings, I see the defending player starting off well, but then – under the pressure of the clock, due to a lapse in concentration, or due to the difficulty of keeping track as your king moves from corner to corner – something goes wrong and it’s suddenly a little fraught. At those moments, it’s well worth knowing a few of the last-gasp techniques and principles in this ending to keep a dodgy position afloat. These “emergency panic buttons” will be the focus of my next articles.
In this article, I’d like to answer 2 sensible questions that occurred to me while analysing these endings by examining 3 positions related to the Philidor position. These positions bear the name of the Italian player Giambattista Lolli, although I believe that only the first was analysed by him. The games are available again in playable form: http://cloudserver.chessbase.com/MTIyMTYx/replay.html
Where do you run?
The first question that popped up in my head when I played through the endings was: “If my king is forced to run (probably ending up on the back rank in the process), to which corner should I flee? The corner covered by the bishop or the opposite corner NOT covered by the bishop?”
We can best answer this by examining the 3 theoretical positions mentioned above.
Lolli’s position – Kings on the bishop’s file.
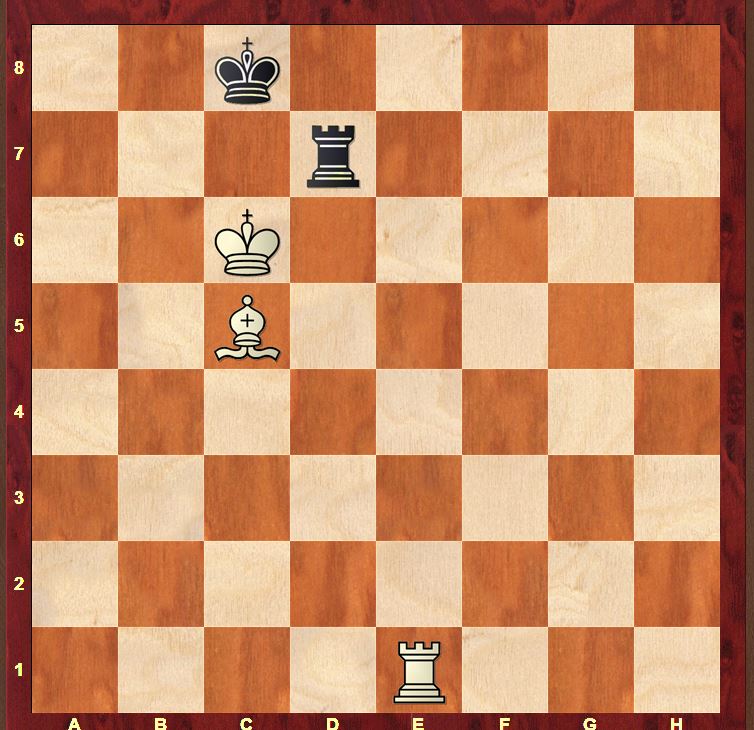
The difference between this position and the Philidor position we examined in a previous article is that White has less room to play with on the short side of the Black king. Moreover, the bishop on c5 does not cover a square on Black’s back rank on the short side of the king (as the bishop on d5 covered a8 in Philidor’s position). This makes it easier for Black to cover a mate on the 8th rank from a rook on a8. However, the downside to Black’s position is that his king is extremely constricted once it flees to the a-file. White gains the extra possibility of delivering mate with a king on c6, bishop on d6 (covering the escape square b8) and a rook on the a-file. White thus maintains the ability to mate on 2 sides and this is again too much for Black to cope with. In fact, White’s key technique is to force the Black king to the a-file.
1.Re8+ Rd8 2.Re7 Rd2 3.Rh7
The standard reaction when Black places his rook on the second rank. This temporising move forces Black to adjust his rook to a rank on which he will step on a square of the colour of the White bishop to check the White king on the c-file. This allows White the opportunity to move his bishop away from his king and simultaneously cover Black’s checking square on the c-file. This prevents Black from checking the White king away from its dominating post on the 6th rank.
3…Rd1 4.Ra7 Rb1
4…Kb8 5.Ra4 Rc1 6.Re4 with inevitable mate
5.Ba3
Again familiar from the Philidor position. Any Black move now worsens his defensive structure.
5…Rb3
5…Kb8 6.Re7 The difference with the Philidor position: (6.Ra4 Kc8 7.Rh4 Rd1 defends as here White cannot cover d8 with his bishop while still covering c1.) 6…Ka8 This defence is less effective than in the Philidor position as White doesn’t have to work too hard here to give mate on the a-file. 7.Re5 Rb7 8.Rd5 Zugzwang. Any Black move allows mate in 4.
6.Bd6 Rc3+ 7.Bc5 Rb3 8.Rc7+
Again the difference with the Philidor position: 8.Ra4 doesn’t achieve anything. The key technique is to drive the Black king to the a-file.
8…Kb8
8…Kd8 9.Rf7 The point of White’s Ba3–d6–c5 manoeuvre. Black cannot play …Re3 to block on the e-file so he must feel instead to the corner. And this sanctuary proves to be a fatal trap.
9.Re7 Ka8 10.Re4
with mate in 4.
Lolli’s position – Kings on the knight’s file
The first thing you notice is how little space White has on the short side of the king to mate the Black king. Moreover, White does not have the typical retreat of the bishop to cover checking squares behind the White king: the bishop is too close to the edge of the board. Lastly, since White has a light-squared bishop, he cannot force Black’s king on to the a-file and keep it there as he cannot cover Black’s escape square back to b8. All in all, White’s prospects don’t look good!
1.Rd8+ Rc8 2.Rd7 Rc2 3.Rh7 Rc1 4.Bc6
4.Rb7+ Kc8 5.Ra7 Kb8 White cannot generate any threats on the short side of the king.
4…Rb1+ 5.Kc5 Rc1+ 6.Kd6
This is White’s most dangerous attempt: to bring the White king to d6 and the bishop to d5 and hope to emerge in a side-variation of a Philidor position!
6…Rf1
7.Bd5 Rf6+
A massively important defensive technique. By checking from the side, White drags the White bishop away from d5 and secures some extra freedom for his king.
8.Be6 Rf2 9.Rh8+ Kb7 10.Bd5+ Ka6 11.Kc5 Rc2+ 12.Bc4+ Kb7 13.Rh7+ Kc8 14.Rg7 Rc1
leading to the Cochrane defence, a form of defence that we shall come across in a later article.
Lolli’s position – Kings on the rook’s file
You might think that if the position with the kings on the knight’s file is drawn, then this position must also be drawn. After all, White has no short side to play with at all. However, just as in the position with the kings on the knight’s file, White can attempt to transfer his king to a more central position. In this position – unlike the position on the knight’s file – Black’s king is so constricted that he cannot properly oppose the plan.
1.Re1 Rb3 2.Re6 Rb2 3.Rf6
A tempo to force the Black rook to a worse position.
3…Rb1 4.Bb6
4…Ra1+ 5.Kb5 Rb1+ 6.Kc6
The position of the White rook on the 6th rank prevents Black from applying the plan of …Rf1–f6+ as in the previous example.
6…Rc1+ 7.Bc5 Rb1 8.Rf4
winning
It seems therefore that the king should flee to the corner which IS covered by the bishop: a counter-intuitive conclusion! What are the differences between the structure on the bishop’s file and the structure on the knight’s file? (we won’t consider the a-file any more as White’s winning procedure there is to transfer the king to the c-file!)
The first difference is that from the knight’s file, White is unable to cover the light-square on the back rank (b1) with his bishop (as with Bb3 in the Philidor position, and Ba3 in Lolli’s position on the bishop’s file). The second difference is that with Black’s king on the knight’s file, White’s rook is unable to mate on both sides of the Black king without the assistance of the White bishop (which is required to cover the a8 square). The bishop on b5 is poorly-placed to assist the rook (if it moves to c6, then Black checks from behind and nudges the White king away). White is successful in the Philidor’s position because of his ability to combine disruptive play on the 7th rank with alternating threats of mate on both sides of the king.
Where should White put his king and bishop?
The considerations above explain why White’s best winning attempt against the king on b8 is to set up a structure with the king on d6 and the bishop on d5 (just as in the Philidor position). The bishop covers a8 from d5 which reintroduces the possibility of White’s rook mating from both sides of the Black king.
This allows us to understand another facet of the ending: White’s should establish a structure with his king on the 6th rank anywhere from the c-f file and the bishop on the 5th rank behind it, covering checks from the rear. In general, White does not want to put his king on the knight’s file as there is no forced win from there, even if Black’s king is confined to the back rank in the most unfavourable situation.
Hope that was interesting! In the last article on this theme, I’ll take a look at a few typical mistakes and last-gasp defences!
Re-examining these RBvR blogs after 7 years. I’d totally forgotten the splendid tips about the defending K running to the _same colour corner as the B and White aiming for K on c6-f6. Thank you again.
Ah thanks Moss! I was really pleased about these articles so glad they are still helpful! 🙂