
In this final article in this series on the rook and bishop versus rook ending, I would like to examine both some typical mistakes and some unexpected saving resources from over 600 master games.
Cochrane’s Defence. The hidden pitfall.
Cochrane’s Defence is the most reliable way to defend this ending when starting from a safe defensive position. The basic idea is to prevent White from ever establishing a king on the 6th rank covered from checks by a bishop on the 5th rank. This is achieved by pinning the bishop to the White king when the king is on the 5th rank and the bishop is on the 4th rank. How does that work?
Cochrane’s Defence
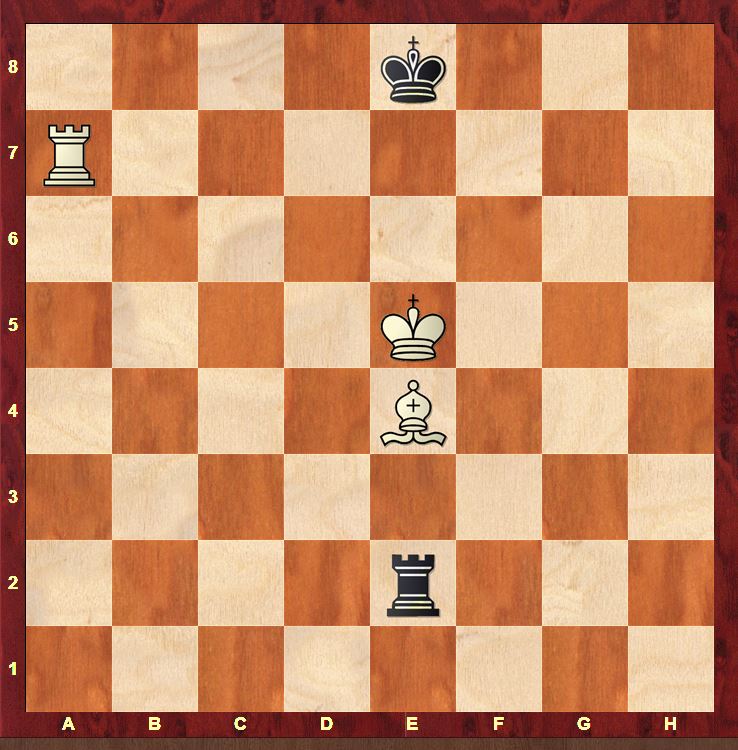
This is the template for Cochrane’s Defence. Black’s king has been pushed back to the back rank but the pin on the bishop stops White from inflicting any further damage.
1…Re1 2.Kd5
2.Kf5 Kd8
2…Kf8
Looks easy, doesn’t it? Just keep on pinning and when the White king moves one way, the Black king runs in the opposite direction. It is easy, but there is a fundamental point to this defence that is rarely highlighted… and this is where things often go awry. Some examples:
Roeder,Frank – Gallagher,Joseph G
Krumbach 1991
87.Rh4 Bf5 88.Rb4 Ke5 89.Rb3 Be4 90.Ke3 Rh1 91.Rb5+ Bd5 92.Ra5 Rh3+ 93.Kf2 Rc3 94.Rb5 Ke4 95.Rb4+ Bc4 96.Ra4 Kf4 97.Kg2 Rc2+ 98.Kh3 Ke5 99.Kg4 Bd5 100.Ra3 Rh2 101.Ra5 Rg2+
This is where it all starts. White has survived for 14 moves already but now faces his first test as the White king gets pushed back to the back rank. White can head for a pure Cochrane’s Defence with 102.Kh5, but it feels more natural to head away from the Black king already with 102.Kh3 and that is what White does.
102.Kh3 Rg1 103.Rb5 Ke4
Watch out…here it comes…
104.Ra5 Kf3
And suddenly, Black is winning! By moving his king to the 6th rank with tempo, Black gains the opportunity to move his king and bishop from the 4th and 5th ranks to the 5th and 6th ranks and thus reach a Philidor position. The end is swift.
105.Kh4 Kf4 106.Kh5 Be4 107.Kh6 Rg6+ 108.Kh5 Rc6 109.Ra4 Rb6
109…Rc2 was even quicker
110.Rc4 Rb7
0–1
What does this example tell us about Cochrane’s Defence? Let’s take another look at our template position.
In this position, White is unable to unpin his bishop with tempo: 1.Kd6 or 1.Kf6 lose the bishop to 1…Rxe4 while 1.Ke6 (threatening mate) is met by 1…Rxe4 check! In other words, the kings must stand opposite each other for the pin on the bishop to work! Otherwise it’s just an empty threat! Let’s see another disaster!
Tunik,Gennady – Potapov,Alexander
Katowice 1993
81.Bf3 Rh4 82.Rd8 Kf5 83.Ke3 Rb4 84.Rd5+ Ke6 85.Ra5 Rb3+ 86.Kf4 Rb4+ 87.Be4 Kd6 88.Rd5+ Ke6 89.Rc5 Rb6 90.Re5+ Kd6 91.Rd5+ Ke6 92.Rd4 Ra6 93.Rb4 Kd6 94.Rb5 Ra1 95.Rd5+ Ke6 96.Rd2 Rf1+ 97.Ke3 Ke5 98.Rd5+ Ke6 99.Ra5 Re1+ 100.Kd4 Rd1+ 101.Bd3 Kf6 102.Ra6+ Kg5 103.Rg6+ Kf4 104.Rf6+ Kg5 105.Rf2 Ra1 106.Be4 Ra4+ 107.Ke5 Ra5+ 108.Bd5 Kg4 109.Rg2+ Kh3 110.Rg8 Kh4 111.Ke4 Ra4+ 112.Kf5 Ra5 113.Ke5 Rb5 114.Rg1
Black had survived already for 33 moves. I think we know he should have played 114…Kh5 here. However, he relied on the pin of the bishop on e4 blindly and played…
114…Ra5 115.Kf4
Disaster. Note how clever White was to play 114.Rg1 on his previous move. Had the rook still been on g8, the trick would not have worked as Black could take the bishop and then block on h5 with his rook!
115…Kh5 116.Be4
A Philidor position. End of story.
116…Kh6 117.Rg6+ Kh5 118.Rb6 Kh4 119.Rc6 Rb5 120.Ra6 Rc5 121.Bd3 Kh3 122.Ra2
1–0
The conclusion is that Cochrane’s Defence must be executed precisely: lack of precision can spell instant disaster. And that’s something that I’ve never seen properly explained in endgame literature.
Keeping the rook close
Part of White’s winning technique in the Philidor position rests on the fact that the Black king cannot run away due to a devastating discovered check:
R&B vs R – Discovered check (1)
1.Rf8+ Re8 2.Rf7 Re3 3.Rd7+ Ke8 4.Rb7 Kf8 5.Rf7+
when
5…Kg8
loses to
6.Rf3+
This discovered attack could be neutralised if the Black rook were closer to the Black king. Black’s king could then run to g8 away from the White king. Let’s take a look how that works!
Emms,John M – Chiaudano,Andrea
World op 1991
47…Rb2 48.Bg3 Rc2 49.Bf2 Rc4 50.Rh5+ Ke6 51.Kg2 Rf4 52.Be3 Rf5 53.Rh8 Kd5 54.Kg3 Ke4 55.Bf4 Rb5 56.Re8+ Kf5 57.Kf3 Rb3+ 58.Be3 Ra3 59.Rg8 Rb3 60.Rg5+ Kf6 61.Ra5 Ke6 62.Ke4 Kd7 63.Ra6 Rb4+ 64.Kd5 Rb5+ 65.Bc5 Rb7 66.Rh6 Kc8 67.Bd6 Kd7 68.Rh8 Rb5+ 69.Bc5 Rb7 70.Ra8 Rc7 71.Bd6 Rb7 72.Ra5 Kc8 73.Ke6 Rb6 74.Ra7
Black is under pressure, but he is still holding due to the proximity of his king and rook. If White plays Rc7+, then Black can escape (for now) with …Kb8 and White doesn’t have a decisive discovered check. 74…Rc6 was the only move to maintain the balance. However, Black played…
74…Rb5 75.Rc7+ Kd8
75…Kb8 76.Rc5+ now loses! The rook has strayed just one square too far away!
76.Rc6 Rb7 77.Ra6
and mate is unstoppable.
1–0
R&B vs R – Proximity (2)
1…Rf8
1…Kh8 2.Bf5 leads to a winning Lolli position
2.Bd3 Rf7
Keeping the rook close nullifies any discovered checks
And now an amazing example that I have seen in the computer analysis to a couple of lost games
R&B vs R – Proximity (3)
1…Ra2 2.Kf3 Rh2
Absolutely amazing! Can you get the king and rook any closer than this?
3.Rg5
3.Be3 Rg2 4.Rh3+ Rh2 forces a draw
3…Rf2+
kicks the king away
4.Ke3 Rc2
and Black is still holding…
The 3rd rank
There is a great deal of literature about the 2nd rank defence in this ending, but few endgame manuals have pointed out the value of the 3rd rank for the defending side. We have already seen a couple of examples already in this series: Black’s defence in the Lolli position with kings on the knight’s file in my second article, and Emms – Chiaudano above. A couple more examples taken from practical play:
R&B vs R – 3rd rank (1)
It all looks very scary for Black, but his rook is perfectly placed on the 3rd rank! No fear!
1…Rf6
1…Rg6 is also good enough. 2.Ra7 Kd8 3.Rd7+ Kc8
2.Rh7
2.Ra7 Kd8 3.Rd7+ Ke8 thanks to the proximity of the Black rook to the Black king!
2…Rd6 3.Rg7 Kd8 4.Kb7 Re6 5.Rd7+ Ke8
R&B vs R – 3rd rank (2)
1.Rd6
1.Rb6; 1.Ra6 Even this is possible though less clean 1…Rd7+ 2.Ke8 Rc7 3.Rd6
Stalemate!
Stalemate is an important part of the defence of this ending. We’ve seen a few examples already: let’s finish on a few more!
R&B vs R – Stalemate (1)
White’s situation looks desperate but…]
1.Re2+
kicks the king away as
1…Kxe2
is stalemate!
R&B vs R – Stalemate (2)
1…Re7 2.Rb2
2.Rxe7 Stalemate
2…Ra7 3.Rg2 Rd7+ 4.Kxd7
Stalemate!
Hope this all helps you defend this endgame better (though not against me of course!)
Here is a high-class example of the Cochrane defence going wrong (albeit in blitz!), in a somewhat different way. https://www.youtube.com/watch?v=HY3SM3GKjd8 Starting from the position reached at 1.30 in (WKe4 Bd4 Rg8, BKh4 Ra4), Houdini / tablebase shows that 5…Ra4?? was losing (BR should stay on 3rd rank), 7 Rg2?? allows a draw again (7.Rb3 wins) and 7…Kh5?? (7…Ra5+ draws) was the final blunder.
Hi Steve, thanks, nice example! Just a nightmare to defend in blitz!
When Lasker defended an endgame R vs. RB against Tarrasch in 1908 (Munich Worldchampionship), he had a lot of time to calculate. They played 15 moves per hour.
Good point! Still impressive though! Best Wishes, Matthew