
For the section on Keith Arkell’s rook endings in my new book “Chess for Life” (co-authored with WIM Natasha Regan) I played through more than 300 of Keith’s rook endings. A heroic effort I hope you agree! The effort seems to have rubbed off on my play – I’ve had more rook endings than ever before in the past few months!
I’ve been having fun analysing them too so I wanted to share some of the most interesting moments. In my recent game against the young player Sam Chow, I spotted a variation in which I suspected I might be able to finish the game off with precise calculation. In the end my opponent chose a different line, but I was curious to know whether I’d been right or not. It turned out to be even more complicated than I’d thought!
Sadler – Chow
4NCL 2016
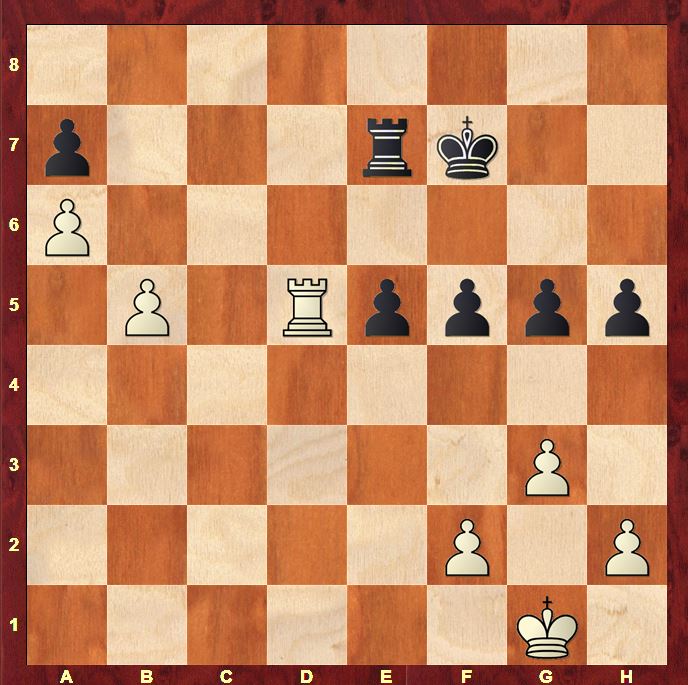
After 45 moves of tough battle, we reached this rook ending. From afar it felt very promising for White. However, promising rook endings have a tendency to peter out if the opponent gets active so I was focused on maintaining control and keeping Black bottled up.
46.Rd6
I was happy but also a touch uncomfortable about this move. On the one hand, I liked its manifold ideas:
- The awkward and forcing threat of b6
- Restriction of the activation of Black’s king on the 3rd rank
- The possibility of switching behind the kingside pawns with Rh6.
On the other hand, I felt a little sad at leaving the 5th rank and abandoning the idea of f4 winning a pawn! Sometimes you’d like to fork a game of chess and play 3 promising continuations at the same time.
46.f4 exf4 47.gxf4 gxf4 48.Rxf5+ Kg6 49.Rxf4 Re1+ 50.Rf1 Re5 also looked pretty good for White but it didn’t feel like good technique to allow so many exchanges of pawns.
46.Rd8 was suggested after the game with the idea of a quick Rb8–b7. However, I was unhappy about 46…Rc7 47.Rb8 Ke6 48.Rb7 Kd6
I decided that I would look for similar ideas to 46.Rd8 but nab Black’s h-pawn on the way!
46…e4
The only move to give the rook an escape square off the back 3 ranks. 46…Kg7 47.b6 axb6 48.Rxb6 Re8 49.a7 Ra8 50.Ra6 looked completely winning to me. I was expecting to emerge with a R,fP & hP vs R ending with the Black king stranded on the queenside
47.Rh6 Kg7
47…Re5 48.b6 axb6 49.Rh8 is a beautiful win! 49…Ra5 50.a7]
48.Rxh5
My opponent now played 48…Re5 which took me by surprise. After 49.Rxg5+ Kf6, the adventures continued with 50.Rg8 Rxb5 51.Ra8 – I’ll take a look at this continuation in a future blog post!
I was more worried about
48…Kg6 49.Rh8 f4
This was the plan I was wondering about: you could imagine Black causing problems with …f3 and …Rd7. During the game I spotted an interesting idea that I thought might even be winning immediately. I didn’t have time to calculate it all but once I was home, I gave it a go…
50.b6 axb6 51.Ra8
This was the idea! White is planning a7 and then R –> 8th rank with check to force queening. Black isn’t in time to get behind the pawn – 51…Rd7 52.a7 Rd1+ 53.Kg2 Ra1 54.Rg8+ wins – so he has to ask his rook to stay on the 7th and shield the Black king from the check on the 8th rank.
Black can hide his king behind his rook on the h-, g- or f-file or he can try to hide it behind the g-pawn on g5. The question is: can White smoke out the Black king from his refuge? There are some fascinating variations in all cases. The key point is that White does not have unlimited time to win the position: Black will push his b-pawn to try and distract the White rook from its protection of the a-pawn. White’s king can try and halt the march of the b-pawn, but then the king has to watch out for the creation of another passed pawn with …e3.
1st defence: Black ignores White’s threats and seeks counterplay of his own:
51…Rd7 52.a7 f3 Is Black’s attempt to avoid passivity and play for counterplay against the White king but it fails miserably to 53.h4
2nd defence: Black hides on the h-file:
51…Kh5 52.a7 Rh7
How safe is the Black king on the h-file? Not at all!
53.h3 b5 54.g4+ Kh6 (54…Kh4 55.Rg8 Rxa7 56.Rh8+) 55.h4 gxh4 56.g5+ Kh5 57.g6
Remember this idea! It’s the typical way of drawing out the Black king! …Kxg6 is met by Rg8+ and …Rg7 is met by Rh8+.;
3rd defence: Black hides on the g-file:
51…b5 52.a7 Rg7
When I analysed by myself, I thought this was winning for White… I was wrong!
53.gxf4 (53.h4 gxh4 54.gxh4 Kh5+ 55.Kf1 Rh7 is a draw. As White cannot disturb the Black king any more with g4+, Black can just push the b- and e-pawns. Eventually White will need to abandon the a-pawn to help deal with Black’s passed pawns) 53…gxf4 54.Kf1
The winning move I thought!
54…b4 55.h4
Now 55…b3 56.h5+ Kg5 57.h6 b2 58.hxg7 b1Q+ 59.Kg2 f3+ 60.Kh2 was my winning line!
Stockfish however finds counterplay against the White king! 55…f3 56.h5+ Kg5 57.h6
Game over you would think…
57…Rd7 Gains time for the crucial hiding behind manoeuvre 58.Ke1 (58.Rg8+ Kh5 59.a8Q Rd1#) 58…Kh5
Again, remember this idea! The idea of the Black king slipping behind the back of an advancing White pawn and using it as a shield from checks is the main defensive idea. Endgame specialist German GM Karsten Mueller calls this “the umbrella”! Here Black has used combined threats against the White king as a means of achieving this.
4th defence: Black hides on the f-file:
51…Kf5 52.a7 Rf7
Is the f-file safe for Black. I thought not… I was wrong too! (52…Kg4 53.gxf4 wins)
53.h3 (53.gxf4 Kxf4 Black can keep counterattacking against the pawn on f2 along the f-file while the b-pawn distracts the White king from the defence of the kingside pawns.)
Now Black must be careful:
53…b5 54.g4+ Kf6 55.h4 is the idea we saw too against 51…Kh5;
53…fxg3 54.fxg3 b5 is a bit fraught but just OK for Black 55.Kf2 b4 56.Ke3
Taking control of f4 56…b3 57.g4+ Kf6 58.h4 b2 (58…gxh4 59.g5+) 59.hxg5+ Kxg5 60.Rg8+ Kh4
Never occurred to me the king would be safe here! 61.a8Q b1Q 62.Rh8+ Kg3 63.Qb8+ Qxb8 64.Rxb8 Kxg4 65.Kxe4 is a draw;
53…f3 is best and safest. 54.Kf1 b5 55.Ke1 b4 56.Kd2 Rd7+ is just enough for Black 57.Kc2 Rf7 Threatening …e3 58.Kd2 Rd7+;
5th defence: Black hides his king on the g-file after restricting the White king.
51…f3 52.a7 Rg7 A seemingly reasonable plan, but it delays Black’s counterplay with …b5. White can take advantage of this with deadly sloth!
53.Kf1 g4 Stops h4 54.Ke1 b5 55.Kd2 b4 56.Ke3 b3 leads to a draw;
53.h4 gxh4 54.gxh4 Kh5+ 55.Kh2 (55.Kf1 Rh7 56.Ke1 b5 57.Kd2 b4) 55…Kg4 (55…Rh7 loses to 56.Kg3 but Black has a lovely hiding idea, very similar to one we’ve seen earlier) 56.h5 Kh4
This lovely idea of hiding behind the pawn just before the White pawn gets to the 6th rank! 57.h6 Re7 draws;
White does have something better though: 53.h3
Slowly does it!
53…b5 54.Kh2 I hadn’t spotted that this idea could also be executed slowly! 54…b4 (54…e3 55.fxe3 b4 56.Kg1 b3 57.Kf2 b2 58.Rb8 Rxa7 59.Rxb2 Rh7 60.Kxf3 Rxh3 61.Kg4 Hadn’t spotted that this might be winning!) 55.h4 gxh4 56.gxh4 No …Kh5 with check now after White’s preparation with h3 and Kh2! 56…b3 57.h5+ Kg5 58.h6 wins;
6th defence: Black stabilises the kingside pawn structure and heads for a safe haven on g4
51…fxg3 is a final idea and it makes quite a bit of sense when you see what has happened in the previous lines
52.hxg3 Kf5 53.a7 Kg4 The king hides on the g-file without inconveniencing the rook!
In conclusion, the lines are not easy, but Black gets a number of defensive opportunities after the over-sharp 50.b6 axb6 51.Ra8.
So how should White play? There are many better continuations. 50.b6 axb6 51.Rb8 is one obvious idea, intending Rxb6+-b1-a1, supporting the a-pawn while covering the back rank from checks. However, my all-time favourite idea is:
50.h3
It makes me think of an episode in the post-mortem after my game against Peter Svidler at Tilburg 1998. I’d just drawn after failing to make any headway in a good endgame after some excellent preparation (in all fairness, I was exhausted towards the end of my first ever super-tournament!) While analysing, I couldn’t prove anything clear. While we were randomly throwing variations on to the board, Vladimir Kramnik came to the board to follow our analysis:

I kept on trying to exchange off rooks and dash for the a-pawn with my king, but Black always seemed to be able to get counterplay on the kingside with …Ne5-g4. Kramnik must have watched our analysis for about 30 seconds before saying “Ah, 24.h3!” And yes indeed, that made all the difference! The Black king cannot approach with 24…Ke6 due to Nf4+ and White’s next idea is to swap rooks with Rc4-c5. And because g4 is covered now, no Black counterplay with …Ne5-g4! Easy when you know how!
So that’s why I like h3 here! It’s useful in many ways: it keeps the Black king out of g4 and can meet …Kf5 with g4+, and it also removes any back rank mate threats. And secondly, it exploits the fact that Black’s rook cannot easily leave the second rank due to White’s idea of b6! A sample line is:
50…Rc7 51.Re8
An excellent accurate move from Stockfish, keeping tabs on the e4 pawn.
51…Rc1+ 52.Kg2 f3+ 53.Kh2 Rc2
Black searches for counterplay but he’s too slow!
54.b6 Rxf2+ 55.Kg1 e3 56.b7 Rg2+ 57.Kh1 Re2 58.Rxe3 Rxe3 59.b8Q
I hope you enjoyed that! Was fun to analyse in any case!
Postscript
A little while later while reading through Reti’s Best Games Collection, I came across this study that he had composed in 1925:
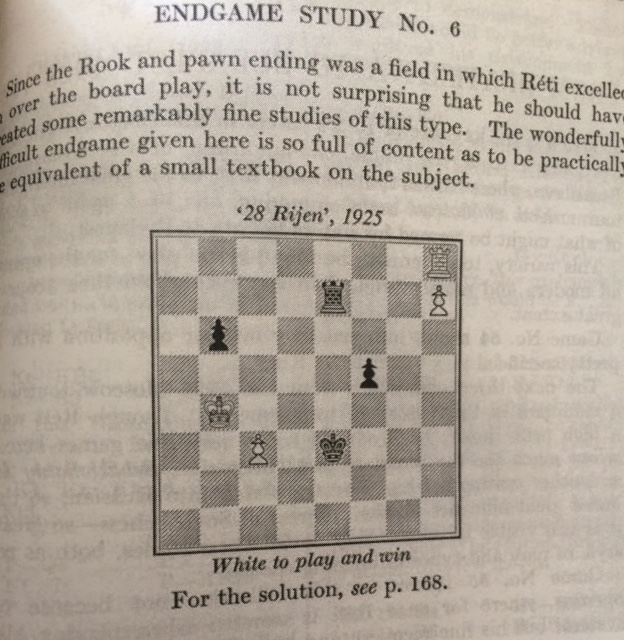
As you can see, the situation is very similar to the one in my game! Reti builds a very instructive study around this theme!
Reti Study
28 Rijen, 1925
1.Kb5 f4
1…Ke4 2.Kc6 Ke5 3.c4 f4 4.Kxb6 f3 5.c5 f2 6.Rf8 Rxh7 7.Rxf2 wins
2.Kc6
2.Kxb6 f3 3.c4 f2 4.Rf8 Rxh7 5.c5 Rh4 with the threat of …Rf4 is a draw
2…Kf2
The threat of Kd6 forces Black to hide his king behind his f-pawn instead of his rook. However, now the king blocks advance of the f-pawn!
2…f3 3.Kd6 f2 The rook can’t move as White will reply Re8+ and queen his h-pawn 4.Kxe7 f1Q 5.Re8
3.Kxb6
The manoeuvre Kc6–b6 has ensured that the Black f-pawn has an obstacle on the way to queening: its own king!
3…f3 4.Kc6
The king heads back to annoy the Black rook. The Black king must not be allowed to peep its head out on the e-file!
4.c4 Ke2 5.c5 f2 is still drawn
4…Rf7
4…Ke2 5.Kd6 f2 6.Kxe7 f1Q 7.Re8 wins again; 4…Kf1 5.Rf8 Rxh7 6.Rxf3+ is also a win
5.Kd6 Rf6+ 6.Kd5 Rf5+ 7.Ke6 Rh5
Black switches to defence behind the h-pawn. However, that means that White has achieved something siginificant: the Black king no longer has cover on the e-file when it wants to make way for the f-pawn. All White needs to do is
- Clear the e-file
- Get out of the checks of the Black rook
- Push the c-pawn.
That’s easy!
8.Kd6 Rh6+ 9.Kc5 Rh5+ 10.Kb4 Rh4+ 11.c4 and the pawn queens!
Postscript
While reading through “Draw! The Art of the Half-Point in Chess” by Leonid Verkhovsky, I came across this nice ending with the same theme:
Kluger – Shandor
Budapest, 1964
1…Ra3+ 2.Kg2 Kg4 3.a7 Ra2+ 4.Kg1 Kf3
The king hides behind the f-pawn!
5.Kh1
Avoiding …Rg2+ and thus not giving Black the possibility of transferring the rook to the 7th rank (see 5.f5)
5.f5 Rg2+ This gives Black the opportunity to transfer his rook to the 7th rank from where it can stop any number of isolated passed pawns! 6.Kh1 Rg7 7.f6 Rf7 is drawn
5…h4 6.f5 Kg3
Threatening mate
7.Rg8+ Kh3
Hiding behind the h-pawn now!
8.Kg1
8.a8Q Ra1+ 9.Qxa1 is stalemate
8…Rg2+ 9.Rxg2 is also stalemate
½–½