
In 1927, Bogolyubow beat Reti twice from the same opening: 1.Nf3 d5 2.c4 e6 3.d4 Nf6 4.Nc3 Nbd7 5.e3. The first game was a sharp fight in an IQP structure; the second was an instructive example of the fight against hanging pawns. In a previous article – https://matthewsadler.me.uk/the-middlegame/hanging-out-with-efim/ – we saw Bogolyubow in trouble while facing Lundin’s hanging pawns; here he turns the tables and makes Reti’s life miserable! We’ll start off as usual by first working out where the turning point in the game was and then work our way back to find better alternatives.
Bogoljubow,Efim – Reti,Richard
British Empire Club Masters London 1927
1.Nf3 d5 2.c4 e6 3.d4 Nf6 4.Nc3 Nbd7 5.e3 Be7 6.Bd3 0–0 7.0–0 c5 8.Qe2 b6 9.Rd1 Bb7 10.cxd5 exd5 11.Ba6 Qc8 12.Bxb7 Qxb7 13.b3 Ne4 14.Bb2 Nxc3 15.Bxc3 Nf6 16.Bb2 Rac8 17.Rac1 Rfd8
18.Nh4 Qd7 19.dxc5 bxc5
Reaching the hanging pawns structure (pawns on c5 and d5)
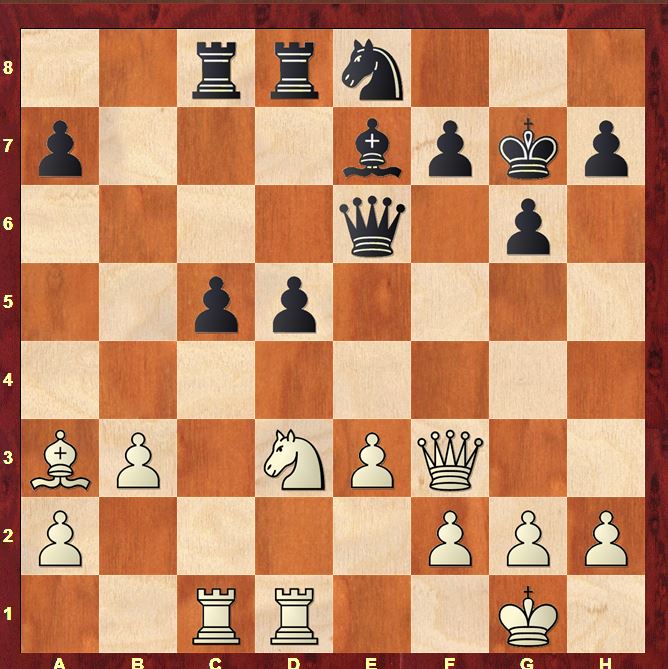
20.Qf3 Ne8 21.Nf5
21…Bf6
This is where the position goes completely awry. After this move, Black is unable to hold his c- and d-pawns.
22.Ba3
A venomous reply. Surprisingly, Black cannot cover his c5 pawn in a normal manner anymore. His only attempt is to drive away White’s knight from in order to be able to support c5 from the dark-squares d6 and e7.
22…g6 23.Nh6+ Kg7 24.Ng4 Be7
24…Qd6 is mentioned by Soloviov but as he also points out, 25.Nxf6 Nxf6 26.Bb2 is a horrible prospect for Black! Bogolyubow now plays a very strong manoeuvre:
25.Ne5 Qe6 26.Nd3
The reason this game appealed to me: White has reached an optimal piece configuration against the hanging pawns structure. His rooks target both hanging pawns on the half-open c- and d-files while his bishop and queen are also in the fray. The key role however is played by White’s knight. From d3, the knight assists in the attack on the c5 pawn and it is ready to switch at a moment’s notice to the attack of the d5 pawn from f4. Note that the bishop on a3 can also retreat to b2 to put pressure on a knight on f6 if necessary.
26…c4
26…Qa6 27.Bxc5 Bxc5 28.Nxc5 Qxa2 (28…Qa3 29.Qf4 is the problem (29.Nd3 Qxa2 was the idea) 29…Rxc5 30.Qd4+) 29.Ra1 Qb2 30.Rxa7 Rc7 (30…Rxc5 31.Qxf7+ Kh6 32.Qxh7+ Kg5 33.Rf7 mates) 31.Rxc7 Nxc7 was my best defensive attempt: Black has limited the damage to a pawn.
26…Qb6 27.Nf4 Qa5 28.Nxd5 Qxa3 (28…Rxd5 29.Qxd5 Qxa3 30.Qd7) 29.Nxe7 Rxd1+ 30.Rxd1 Rc7 31.Nd5 Rd7 32.Qe2 is also just an extra pawn for White.
27.Nf4 Qf6 28.Bxe7 Qxe7 29.Nxd5 Qa3 30.bxc4 Qxa2 31.Qe4
31…Qa3 32.Qd4+ Kh6 33.c5 f6 34.e4 Kg7 35.h4 Rc6 36.Ra1 Qxc5 37.Rxa7+ Kh6 38.Qxc5 Rxc5 39.Rb1 g5 40.hxg5+ Kxg5 41.f4+ Kg6 42.Rd1 Nd6 43.Rd3 Kh5 44.Rh3+ Kg6 45.Raxh7 Rc1+ 46.Kh2
1–0
Why did things go wrong so quickly for Black? If we compare this game with Bogolyubow’s game against Lundin, we see that Reti’s pieces had much lower latent activity behind the hanging pawns. Against Lundin, Bogolyubow always had to look out for d4-d5, opening the a1-h8 diagonal, activating the bishop on b2 and adding another piece into White’s kingside attack.
In other words, Lundin’s managed to weave together the advantages of his hanging pawns with his kingside initiative. Here, Black’s hanging pawns occupy and secure territory, but do little more than that. In these situations, it’s easy to end up in a situation where the pawns are nothing more than easy targets for White’s pieces. In the game, the sensible-looking 21…Bf6 simply cost Black a pawn!
How could Black have improved his play? The first obvious improvement is 21…Bf8
Black keeps c5 covered and intends …g6 on the next move to get rid of the knight on f5. White’s most natural reaction is to thwart …g6 and to attempt to maintain his strong attacking structure with the queen on f3, knight on f5 and the bishop on b2.
a) 22.e4
The violent options are the ones you always look at first!
22…d4 23.Ne3
23.b4 Qb7 is good for Black so White attempts to make use of his new light-square outposts on c4 or d5.
23…Qe6 24.Nc4 Nd6
was a position I found difficult to evaluate. Black has central space and has blocked the bishop on b2, but if White can organise some concerted pressure on c5, Black may struggle. Komodo prefers Black however, and to be fair, in our practice runs, he kept on doubling on the e-file and winning my e-pawn!
b) 22.b4 White seeks to soften up the Black position first
22…g6
The key idea. 22…c4 23.e4 was White’s hope.
23.e4 gxf5 24.Rxd5 Qe6 is good for Black.
c) 22.Rc4 g6 23.Rg4
I wasn’t sure how to get rid of White’s kingside pieces, but I had an uneasy feeling about this setup. Komodo is also not impressed
23…Rc6 24.h4 d4 25.exd4 Rf6 is pretty clear!
d) 22.Qf4
My favourite idea, preventing …g6 due to Nh6+ and thus maintaining the knight on f5 for a little longer. It’s not too easy to find a good follow-up however.
22…Qe6
with …Nd6 to follow next move. Black is a bit worse but it’s survivable.
23.g3 Nd6 24.Nxd6.
Now 24…Bxd6 25.Qg5
is the tactical idea behind 23.g3
25…Bf8
25…f6 26.Qxd5
26.Rxc5
26…h6 27.Rxc8 hxg5 28.Rxd8 is winning for White
However 24…Rxd6 is just a small White edge. White has the clear plan of lining up against the d5 pawn whereas Black’s plan is harder to find. However, Black has enough resources to cover the d5 pawn and just sit tight.
White has a better idea here however, learning from the piece setup Bogolyubow used in the game:
e) 22.Ng3
In the game we saw how Bogolyubow brought his knight to f4 with decisive effect (after an eventful trip via f3–h4–f5–h6–g4–e5–d3). The knight was so strong on f4: it makes you wonder whether it’s worth trying to maintain the knight on f5. The knight’s manoeuvre to f5 has achieved a great deal. White’s grip on the a1–h8 diagonal has been strengthened; for example, Black’s knight cannot return to f6 to defend d5 and Black’s bishop is a couple of moves away from the a1–h8 diagonal. Black’s minor pieces deal now adequately with the threats that White is currently creating: g7 is firmly protected by the knight on e8 and bishop on f8. However, If White shifts the focus of attack to another weakness, Black will struggle to get his minor pieces back into reasonable positions. For that reason, 22.Ng3 is an excellent idea, preparing to refocus against the d5 pawn by transferring the knight to f4 via h5 (preferably) or via e2.
22…Qe6
This move looks naive at first sight as it puts the queen in the way of White’s Nh5–f4 manoeuvre. However, Black has a surprising source of counterplay in mind.
e1) 23.Nh5 Qa6
is extremely annoying: a2 is surprisingly hard to defend adequately
e2) 23.Rd2
23.Rc2 c4 is more disruptive than against 23.Rd2
23…c4
Black has to take some action before White completes his regrouping with Rcd1/Qd1 and Ne2/h5–f4. 23…Qa6 24.Rcd1
24.h3 cxb3 25.Rxc8 Qxc8 26.axb3 Qb7 27.Qd1
is a sample line. Black still has problems along the a1–h8 diagonal which makes his defence of d5 extremely problematic. Black cannot also easily develop pressure against the White weakness he has created on b3.
27…Rb8 is met by 28.Be5
27…Nc7 is met by 28.e4
White’s chances are thus to be preferred, even after the improvement 21…Bf8. Going back just a little bit further, the active 20…Ne4
was Black’s best alternative as
21.Nf5 Bf6
is now possible. 22.Ba3 threatens nothing as the pawn on c5 is defended by the knight on e4 while …Nc3 is also in the air. The position is almost equal. The violent
22.Bxf6 Nxf6 23.e4
Is interesting when 23…d4 24.e5 feels like a little initiative for White. However Stockfish’s
23…Nxe4 24.Rxd5 Qe6
doesn’t seem to leave anything hanging (25.Rxd8 Rxd8 26.Re1 Ng5) which means that Black will be fine. To keep life in the position, White probably try a move like
23.h3
followed by doubling rooks on the c- or d-files and bringing the knight to f4. It should be a slightly more comfortable for White to play, but it’s fine for Black too. In general, Black should always be looking to place his minor pieces as actively as possible in these structures
If you’re looking for a White improvement earlier, then
18.dxc5 bxc5 19.Ne5
is worthy of attention: Instead of sending the knight to f4 via the enormous detour h4-f5, White transfers the knight to d3 as quickly as possible.