
While rummaging through some old score sheets, I came across a couple of interesting rook endings which I thought were worth sharing. They were both played for Solingen in the Bundesliga just after I retired from professional chess and started a full-time job in Amsterdam. In both cases, I was on the grinding side of the ending, trying to turn a slight advantage into a full point.
A playable version of this analysis is available at http://cloudserver.chessbase.com/MTIyMTYx/replay.html
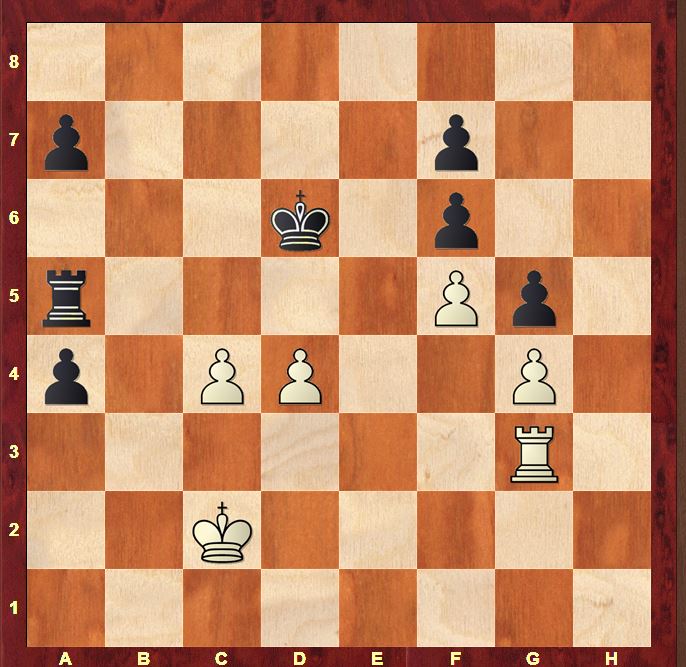
On the 20th move, I’d taken a grandmasterly decision to double my f-pawns with …exf6 and thus stop any White play on the f-file and I’d been cursing myself ever since! As you can see, my pawn structure in this ending is a bit of a disaster: without pawn breaks, I will have to rely on my activity to tease out concessions from White. In general, I’m looking to get one of White’s passed pawns on c4 and d4 to advance so that I can nestle my king in between them. I also have a target in the g4 pawn, but going after it with my rook is a double-edged decision. Without Black’s rook to assist, Black’s king will have a tough time holding back 2 passed pawns supported by a rook!
58…a3 59.Kb1 a2+ 60.Ka1
White’s king has been completely tied down which restricts White’s ability to make temporising moves.
60…Ra4 61.Rc3 Kc6
Avoiding the threat of 62.c5+ Kc6 63.d5+ and waiting for a reaction from White.
62.Rc2
White’s tempo move, and a very annoying one: as Black has to watch out for counterplay with Rxa2 and Rxa7. Black is unable to exchange off rooks as the pawn ending is completely lost (a consequence of Black’s earlier acceptance of a damaged pawn structure).
62…a5
62…Ra3 was the move I wanted to try but I didn’t like the intermezzo 63.Rxa2 Rg3 64.Ra6+ which leads to a rapid clean-up of the pawns. By moving the a-pawn to a5, I stop this intermediate check which introduces some extra possibilities. The drawback to 62…a5 is that after a sequence d5+ …Kc5, Rd3 I no longer have …Ra6 to prevent d5–d6. I couldn’t see any way however to maintain all my possibilities.
Now after 62…a5…
…imagine that
Black were to move now:
63…Ra3 64.Rxa2 Rd3 65.Rxa5
65.d5+ Kc5 66.Ra4
is ugly but looks like a clear draw
66…Rd4 67.Kb2 Rxg4 68.Rxa5+.
Makes use of tactics along the 4th rank – a recurring theme in this ending 68…Kb4 (68…Kxc4 69.Ra4+) 69.Ra7 Rxc4 70.Rxf7 Rd4 71.Rxf6 Rxd5
with a draw
65…Rxd4 66.Ra6+ Kc5
i) 67.Rxf6 Rd7
was exactly what I was aiming for. Black’s plan is simply to take the c-pawn and then take his king over to White’s kingside pawns. It’s a slow plan, but White’s king is far enough away to make things very fraught. A scenario where Black captures both White’s pawns in exchange for his f-pawn and then gets his king in front of his g-pawn (as described in https://matthewsadler.me.uk/the-endgame/king-rook-pawn-vs-king-rook-part-i/) is extremely plausible.
If Black tries 67…Rxg4 68.Rxf7 Kxc4
There are many ways to draw, but the following neat way occurred to me first:
69.f6 Kd5 70.Rc7 Ke6 (70…Rf4 71.Rg7) 71.f7 Rf4
72.Rc5 g4 73.Rc4
73…Rf1+ 74.Kb2 g3 75.Rg4 Rf2+ 76.Kc1
Back to the much stronger 67…Rd7
68.Ra6 Kxc4 69.f6
looked like the best to me: White wants to exchange off his f-pawn for Black’s g-pawn.
69…Kd4
69…Rd4 70.Ra5 Rd5 (70…Rxg4 71.Ra4+) 71.Ra7 Kd4 72.Rxf7 Ke5 73.Rf8 Ke6 (73…Rd4 74.f7) 74.Kb2 Rd4 75.Kc3 Rxg4 76.Kd3 Rf4 77.Ke3 draws. White’s king has got back into play.
70.Ra5 Rd5 71.Ra7 Ke5 72.Rxf7 Rd6
73.Rg7
73.Kb2 Rxf6 74.Rb7 Kf4 75.Rb4+ Kg3 followed by …Rf4
73…Kxf6 74.Rg8 Rd4 75.Kb2 Rxg4 76.Kc3 Rf4 77.Kd3 Kf5 and Black will win
ii) 67.Kb2
is more or less White’s only way, again using 4th rank tactics to hold things together
67…Kxc4 (67…Rxg4 68.Rxf6 Black can no longer play …Rd7 to keep more pawns on) 68.Kc2 Rd7 (68…Rxg4 69.Ra4+; 68…Kd5 69.Rxf6 as …Rd7 is impossible) 69.Ra4+ Kb5 70.Re4 leaves White with a holdable 2 vs 3 on one side
Back to the game now.
White is to move, so I try some subtleties to get the position I want with Black to move.
63.Rc3 Kd7
I was looking to triangulate to get my position with Black to move, but White decided not to sit still
64.d5
64.Rc2 Kc7 65.Rc3 Kc6 66.Rc2 Ra3 was what I wanted…
64…Kc7 65.c5
That certainly got my heart rate going! My subtle triangulations were being met by an all-out assault!
65…Rxg4 66.d6+ Kc8
66…Kd8 67.c6 Rd4 68.c7+ Kc8 69.Rc6 is also losing. There is no defence to the threat of Ra6–a8+; 66…Kc6 is the most natural move, but this loses at once to 67.Rd3 Kd7 68.c6+
67.Re3
67.c6 Rd4 68.d7+ Kc7 followed by …g4–g3 wins
67…Rc4
67…Rd4 was perhaps a better practical chance, though by now White has a clear sight of a draw 68.Re7 draws (68.Re8+ Kd7 69.Re7+ Kc6 70.Rc7+ Kb5 71.d7 g4 wins) 68…Rd5 69.Rc7+ Kd8 70.Kxa2 Rxf5 71.c6 draws as in the game
68.Re8+ Kd7 69.Re7+ Kd8
69…Kc6 70.Rc7+ Kb5 71.d7 Rd4 72.c6 wins as the pawns are too fast
70.Rc7 Rc2 71.c6 g4 72.Rd7+ Kc8 73.Rc7+ Kd8 74.Rd7+ Kc8 75.Rc7+
Neither side can avoid the repetition. A well-played ending by both sides.
½–½
I remember being very pleased with the following game. Normally, you’re on course for a good season if you can win the position I had after 23 moves! (Black to move I hasten to add!)
After some manoeuvring and little tactics, I got as far as this typical ending:

Holzke,Frank – Sadler,Matthew D
BL Castrop 2001
40.Ra5
40.Kf4 a3 41.g4 hxg4 42.fxg4 (there are many other ways) would lead to a position similar to the one I had against Sarakauskas in the last round of the Bury St Edmunds Open in 2014.
White plays h5 and waits. Strangely enough my engines claim that Black is winning after
42…Ra1 43.Kg3 a2 44.Kg2 Kg8 45.h5 Kf8
followed by playing around with the king, but I don’t see it myself!
46.Ra8+ Ke7 47.Ra7+ Ke6 48.Ra6+ Ke5 49.Ra5+ Kf4 50.Ra4+ Kg5 51.Kh2 f5 (51…Rb1 52.Rxa2 Kxg4 53.Rg2+) 52.gxf5 White can happily lose both pawns and still draw.
40…Kg6 41.Kh3 Ra3 42.Kg3 Ra1 43.Kh2 a3 44.Ra6 Ra2 45.Kg3 Kh7 46.Ra5 Kh6 47.Ra6 Ra1 48.Ra5 Kg6 49.Ra7 Ra2 50.Ra6
A careless move, giving Black the opportunity to instigate action in the most favourable circumstances. If you don’t have a win, that’s the next best thing!
50.Kf4 would have prevented Black from activating his king 50…Rxg2 51.Rxa3 (is not at all dangerous) while; 50.Ra5 Kf7 51.Rxh5 Rc2 52.Ra5 a2 would win White a tempo on the game continuation.
50…Kf5 51.Ra5+ Ke6 52.Rxh5 Rc2
The point of playing the rook to a2 on the 49th move: Black can follow up the rook move away to the side (52…Rc2) with the supported advance of his passed pawn to the 7th rank. From the side, the rook interferes tactically with White’s counterplay: the attack on Black’s kingside pawns with his king. The rook does this in 2 ways:
1. by attacking the pawn on g2 which forces White to spend several tempi preparing the advance of his king.
2. via the possibility of lateral checks which under the right circumstances can allow Black to block the a-file with gain of tempo.
53.Ra5 a2 54.Kh3
54.Kf4 Rxg2 is perfect for Black as his rook covers the weakest point in Black’s kingside structure: the pawn on g7. For this reason, White first has to secure his g-pawn before he can start up his desperate race to Black’s kingside pawns.
54…Kd6 55.g4
A big mistake, caused by tension and time shortage. White has a window of opportunity to activate his king which he must exploit while he has the chance. The pawns can follow later!
55.g3 Kc6 56.Kg4
i) 56…g6
Prevents the White king from entering f5, but also gives White a closer target to exchange pawns.
57.f4
Some care is required 57.h5 gxh5+ 58.Kxh5 Rc5+
57…Kb6 58.Ra8 Kb5 59.h5
59.f5 Rc4+
60.Kf3 Ra4
is a well-known trick and demonstrates the power of the rook’s position to the side of the passed a-pawn on the 7th. 61.Rb8+ Ka5 62.Ra8+ Kb4 63.Rb8+ Ka3
59…gxh5+ 60.Kxh5 Kb4
Threatening …Rc5–a5 but White is in time!
61.Kg6 (61.f5 Kb3 62.Kg6 also works) 61…f5 62.Rb8+ (62.Kxf5 Rc5+ again!) 62…Kc4 63.Ra8 as after 63…Kb3 64.Kxf5 Black can no longer play …Rc5–a5
ii) 56…Kb6
57.Ra8 Kb5 58.Kf5
Perfect timing! With Black’s king on b5, …Rc5–a5 is no longer possible
58…Kb4
Threatening …Rc5–a5
59.Kg6
Past the danger area! White is now safe
59…Kb3 60.Kxg7 leads to a draw
60…Rc4 61.Rxa2 Kxa2 62.Kxf6 Rc3 63.f4 Rxg3 64.h5 Rh3 65.Kg6 Rg3+
55…Kc6 56.g5 Kb6 57.Ra8 fxg5 58.hxg5 Kb5
You can see the difference at once with 55.g3: Black has got his king in the perfect spot to prevent White’s king from advancing. No king advance means no counterplay!
59.g6
59.Kg4 Rc4+ 60.Kf5 Ra4; 59.f4 Kb4 60.Kg4 g6!
59…Kb4 60.Kg4 Rc4+
60…Rc4+ 61.Kf5 (61.f4 Kb3 followed by …Ra4) 61…Rc5+ 62.Ke6 Ra5
0–1